Wuben X3 Prototype Review

Wuben X3 Prototype#
- Specifications
- Introduction
- Torch in use
- Build quality
- LED, bezel, lens, reflector and beam
- Size
- User interface
- Batteries and charging
- Performance
- Beamshots
- Conclusion
- Price
- Product page
Specifications#
| Brand/model | Wuben X3 |
|---|---|
| LED | 1x Samsung LH351D, 1x Red 670nm |
| Maximum lumens | 700 lm |
| Maximum beam intensity | 2,590 cd |
| Maximum throw | 102 m |
| X3 battery | Built-in 1000mAh |
| Charging case battery | Built-in 3000mAh |
| X3 charging | 5W wireless |
| Charging case | USB-C |
| Material | Aluminium, Plastic |
| Modes | 3 White, 3 Red |
| Blinkies | White SOS, Red blinking |
| Reflector | TIR |
| Waterproof | IP65 |
| Review date | May 2023 |
Introduction#
An opportunity to review the Wuben X3 prototype came up and I offered to provide feedback.
Wuben sent this X3 prototype via express post and it arrived overnight in Australia. That is a pretty good indication that Wuben want to receive early feedback. This motivated me to go a bit further than what I normally do when testing a torch. I tried to look for faults and break it.
I ended up sending several emails to Wuben and I had a chat with one of their engineers via WeChat.
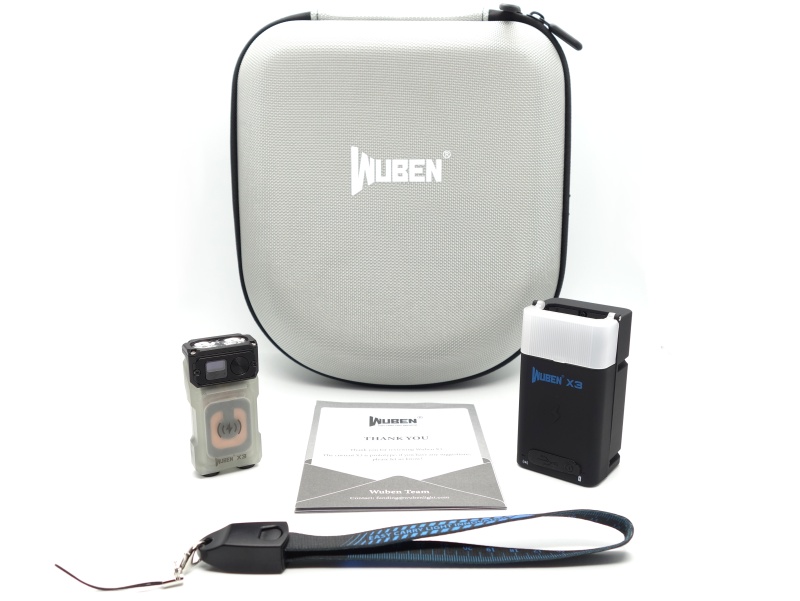
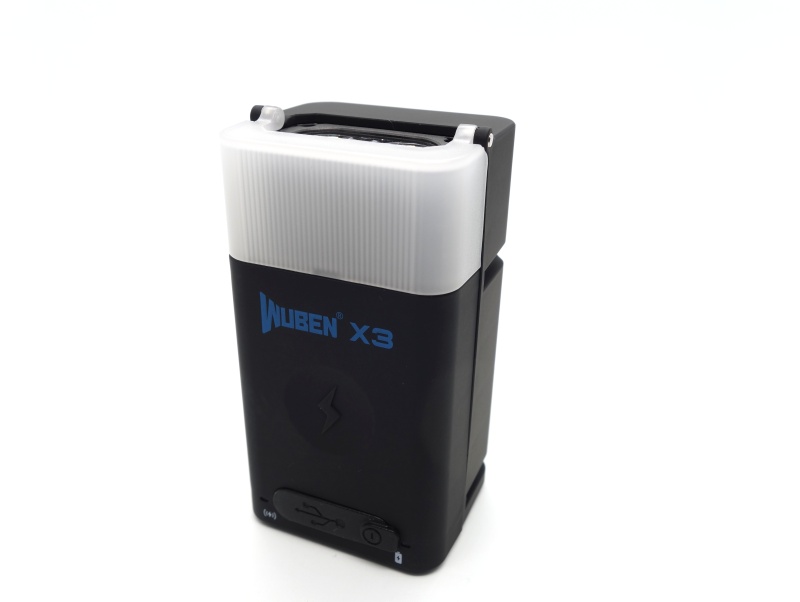
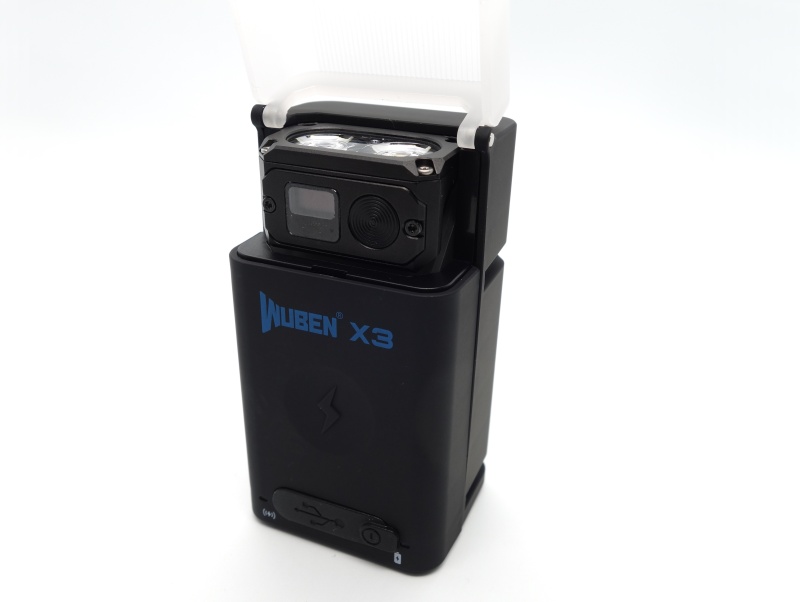
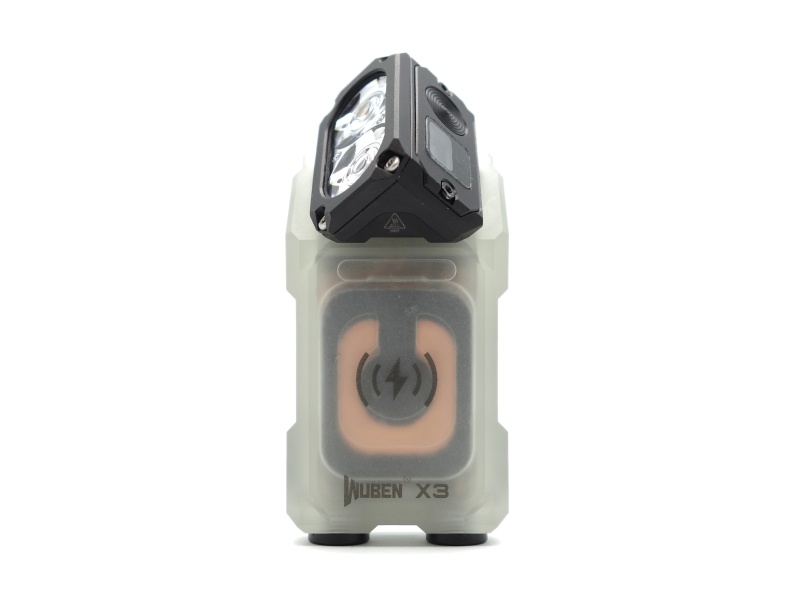
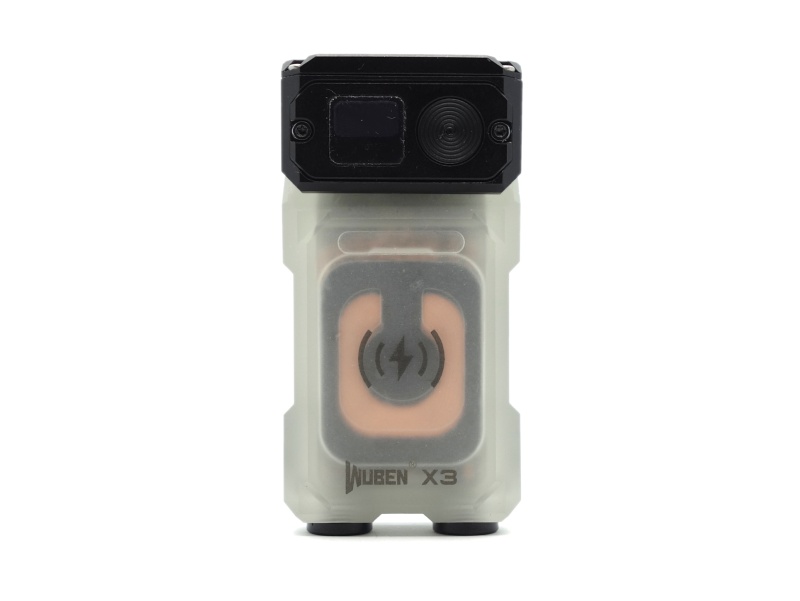
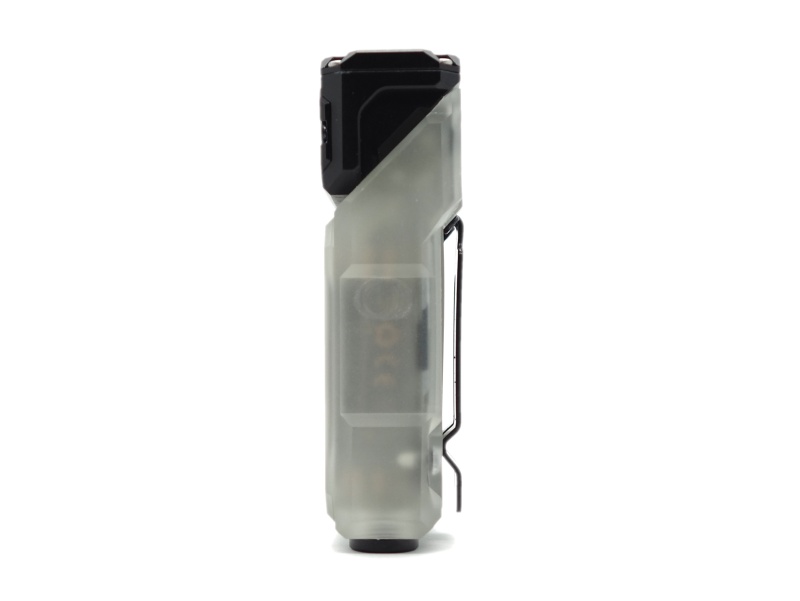
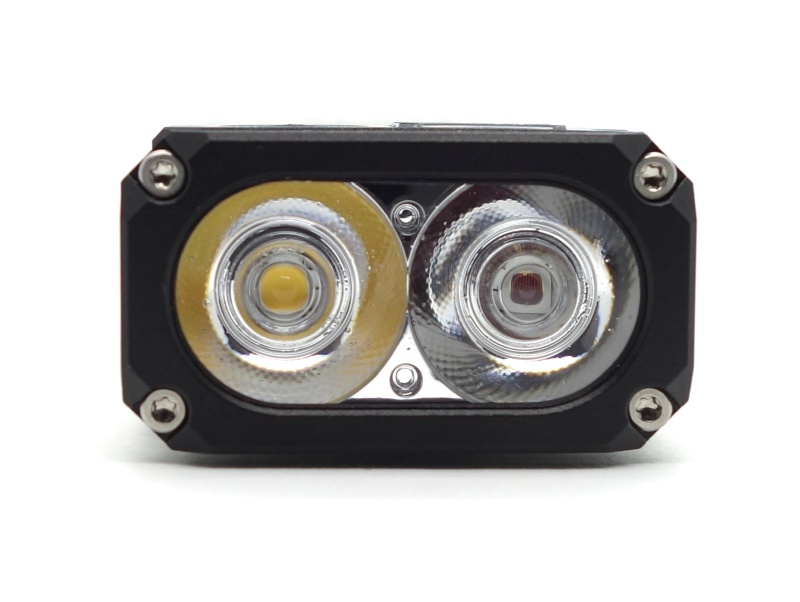
The Wuben X3 prototype that I received has a white Samung LH351D emitter and a red 670nm emitter. There are some nice features: a display, wireless charging, two blue aux lights at the back, a glow-in-the-dark case and magnets. A charging case was also included.
I have not been paid for this review nor have I held back my opinions of this torch. That said, this review contains an abridged version of the issues.
Packaging#
Wuben prepared a special package for reviewers to provide feedback about the Wuben X3 prototype. Final retail packaging will be different.
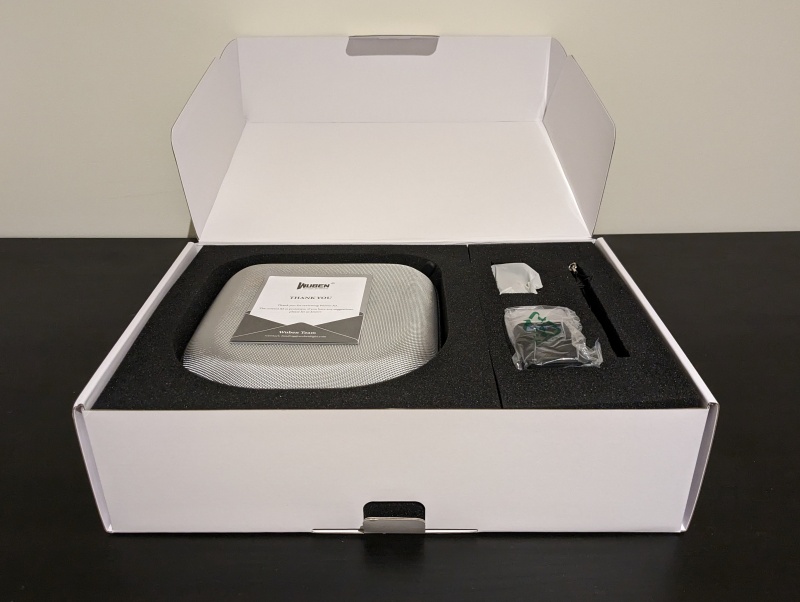
The following was included in the box:
- Wuben X3.
- Charging case.
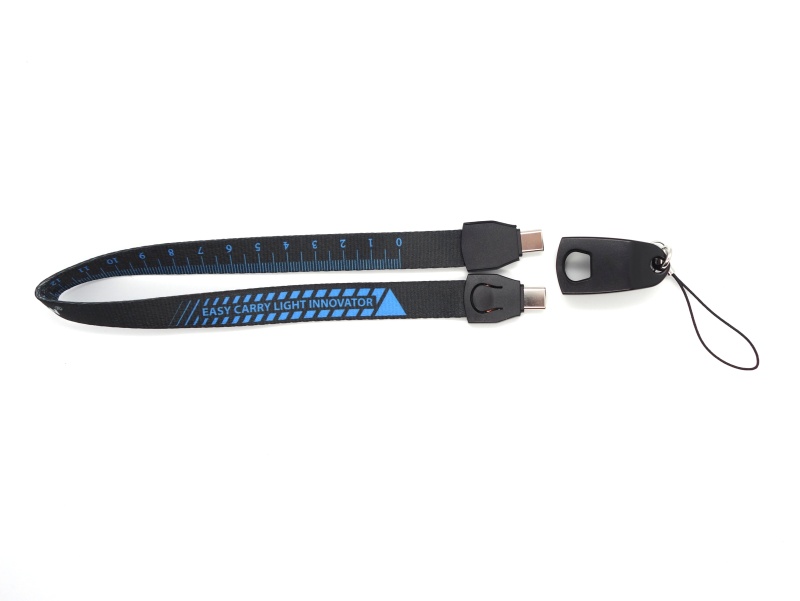
- USB-C lanyard.
- User manual.
- Wuben branded carry case (for reviewers of the prototype).
I used the carry case a few times while taking beamshot photos of multiple torches. It is a nice gesture for reviewers.
Torch in use#
The Wuben X3 prototype has so many cool features! Where to begin…
It has wireless charging and a charging case!
I was able to get it to charge using my phone and another wireless charger.
The torch feels comfortable in my hand and it is slightly longer than the Wuben X0.
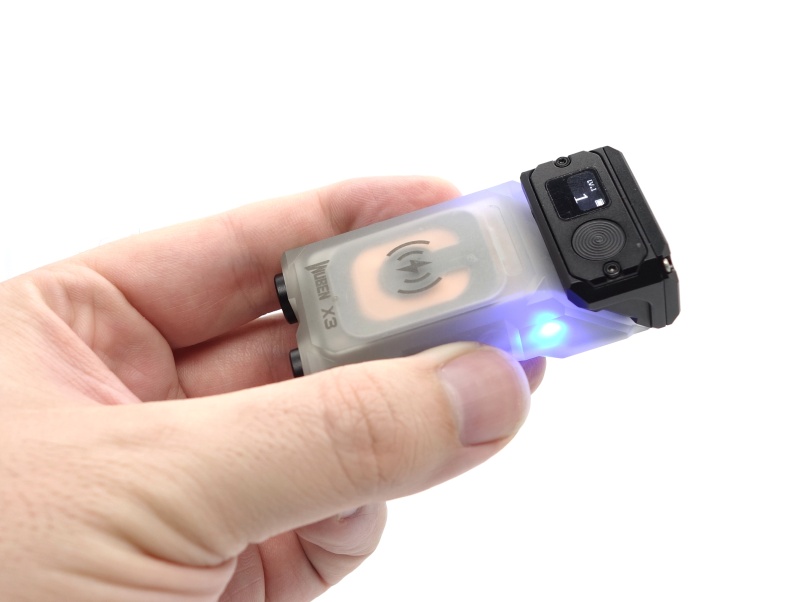
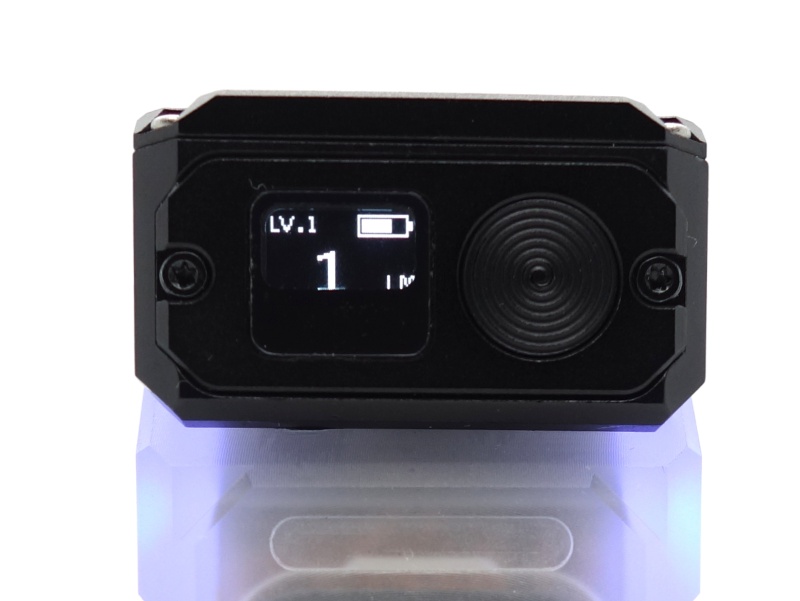
It has a display! It displays the battery status and the mode that the torch is in.
It would be nice if the display brightness could be reduced to 50% and if the display could sleep after 5 seconds instead of remaining on at 100% while the torch is in use.
It would also be nice if the cut-out for the display is made a bit larger so that I can easily see the whole display from a wider angle.
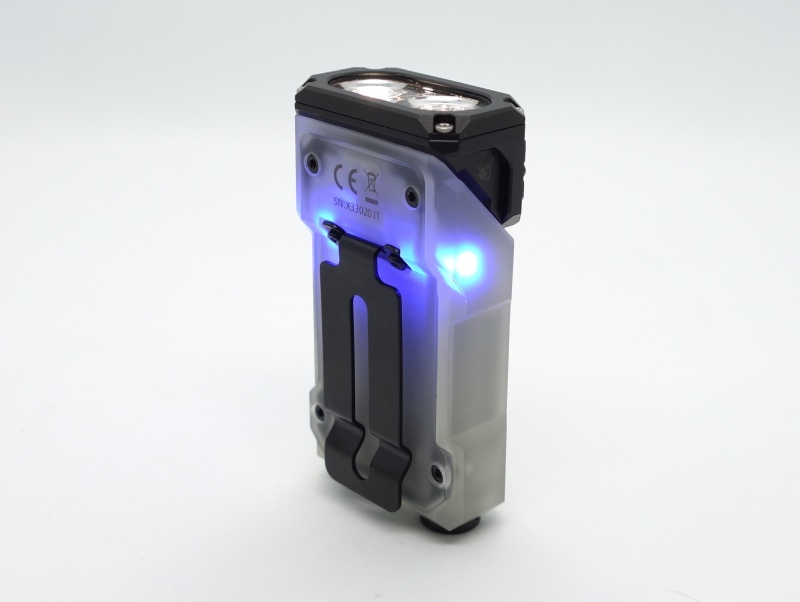
There are two blue aux lights that shine through the back of the case when the torch is on or when it is wirelessly charging. They can enabled or disabled with five clicks.
It would be nice if the blue aux lights breathed while charging when the head has been rotated 180 degrees.
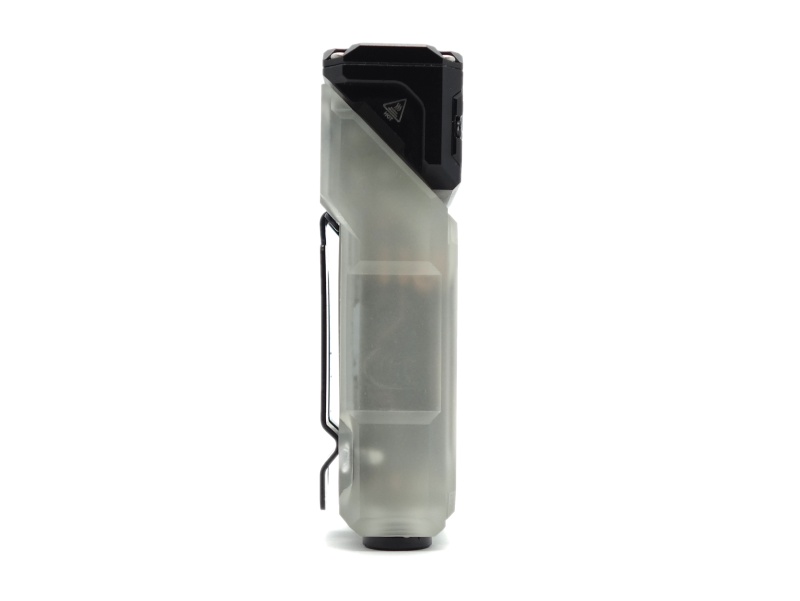
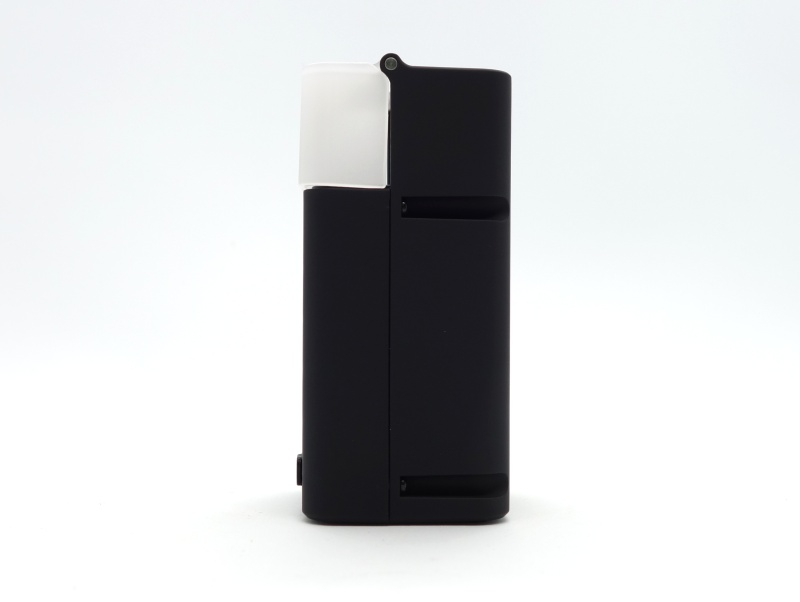
What was that? Rotated 180 degrees? Yes! It took me a little longer than I would have liked before realising that the head can rotate!
I need to memorise which direction to turn the head:
- If it is straight: rotate anti-lockwise;
- If it is at a right-angle: rotate clockwise.
It feels like I might break the head if I turn it in the wrong direction.
The Wuben X3 glows in the dark! This makes it easier to find at night.
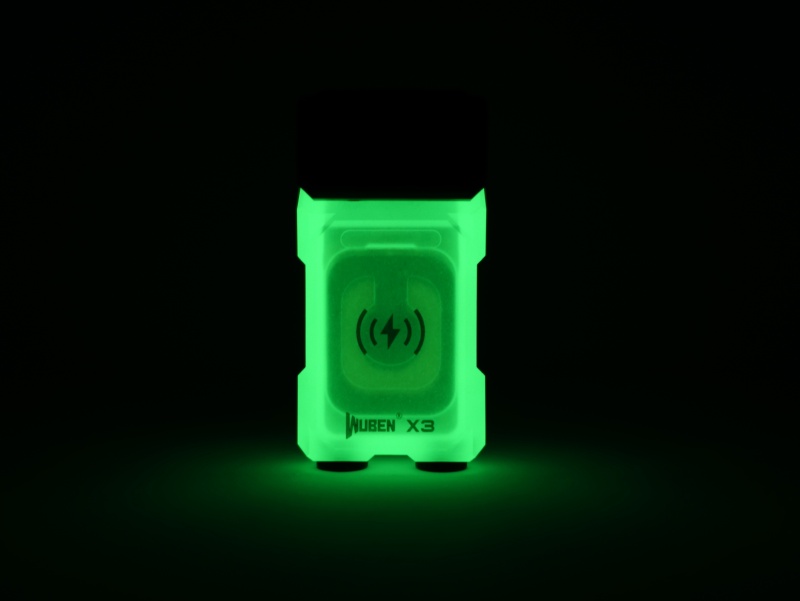
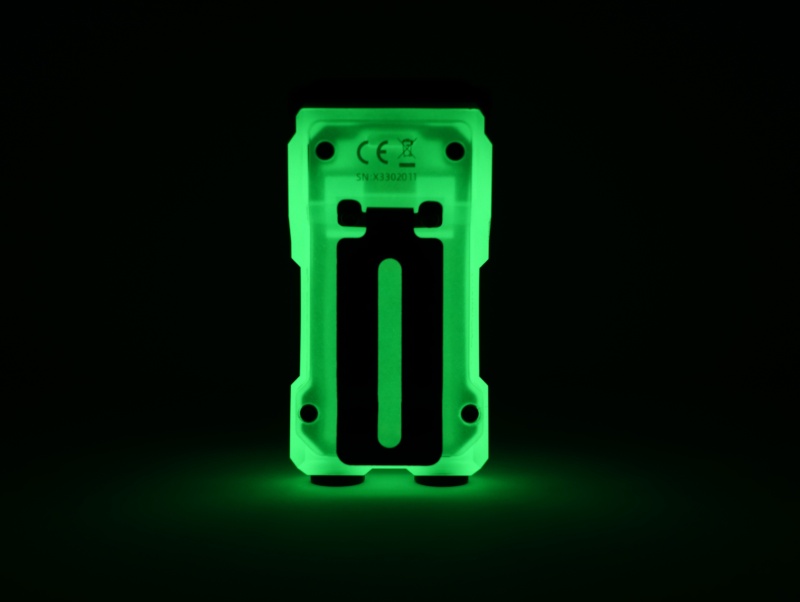
Note: I used a UV torch to make the Wuben X3 glow intensely.
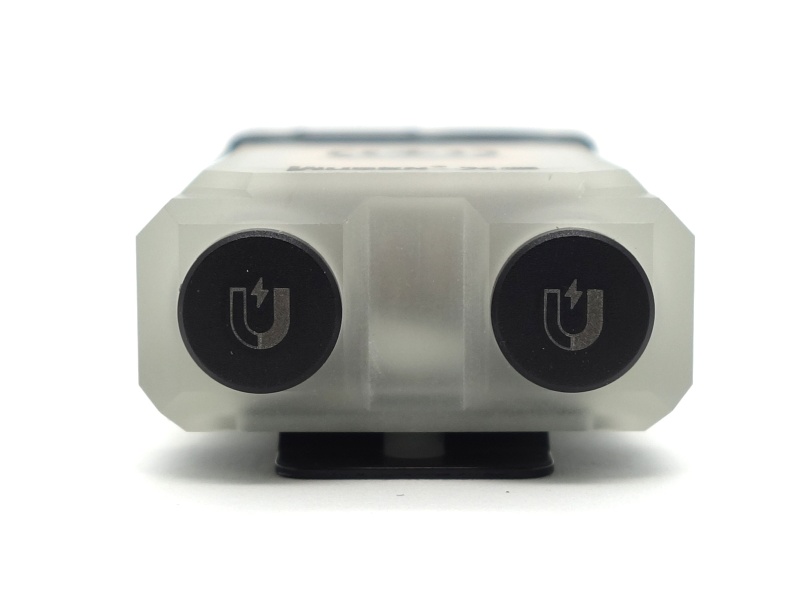
The magnets are really strong! Here is a video of the Wuben X3 lifting a Leatherman FREE P4 (249g).
There is a large hole in the pocket clip that could be used to attach a lanyard. It would be nice if the torch had a dedicated hole in it for a lanyard. A smaller lanyard would also be nice.
Build quality#
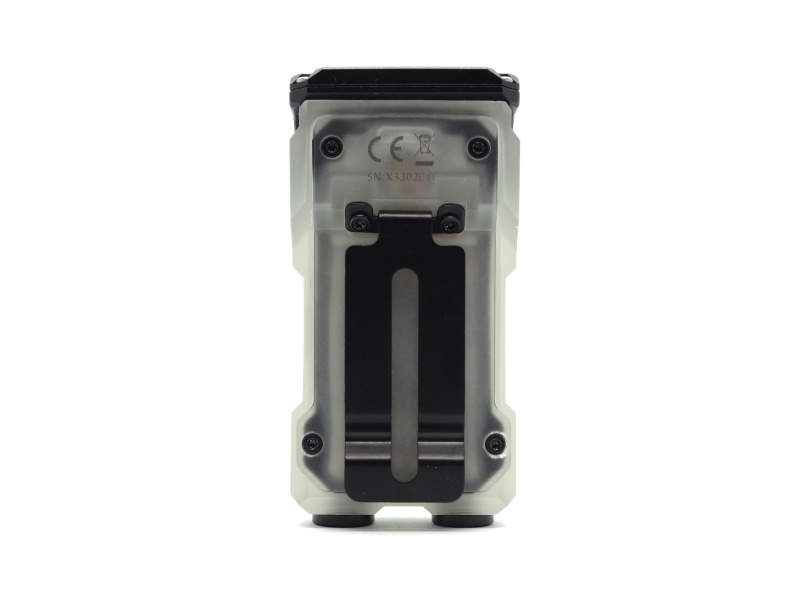
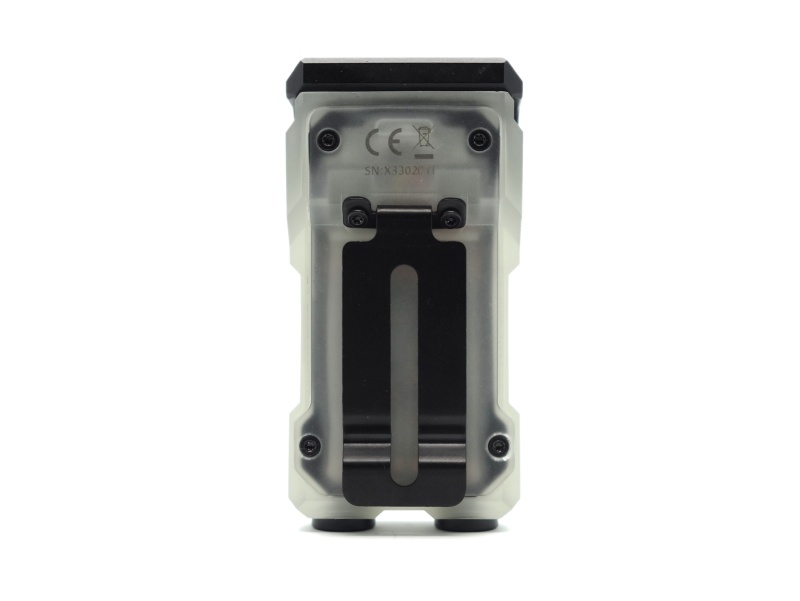
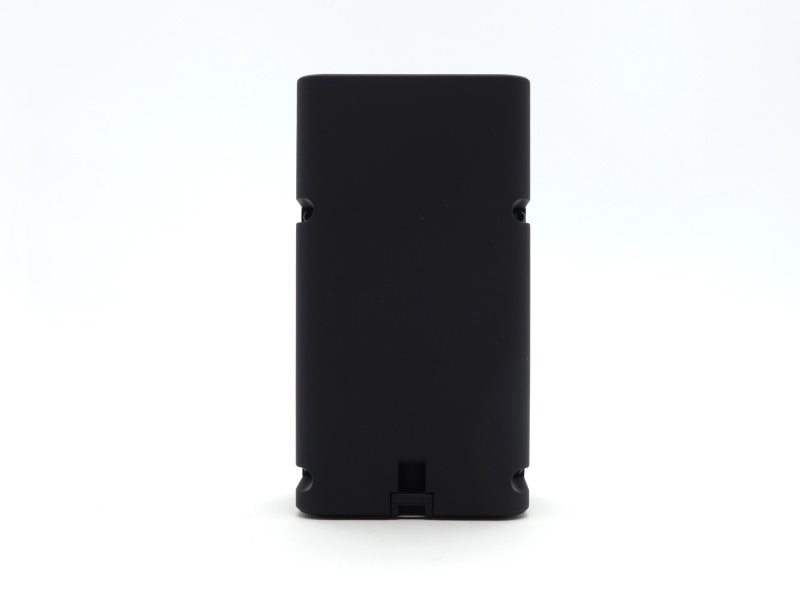
The Wuben X3 prototype has a black anodised aluminium head and a plastic glow-in-the-dark body. There are no sharp edges.
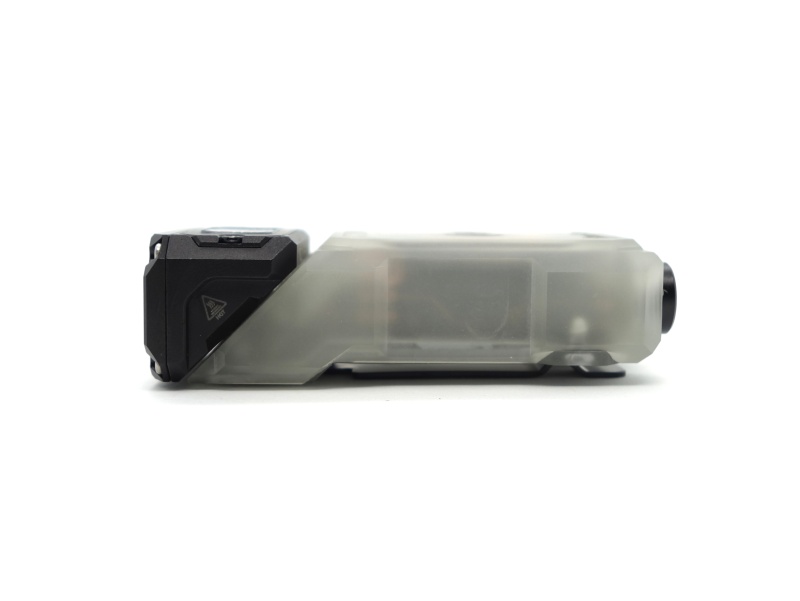
There is a large pocket clip that can be attached to a hat. It cannot be reversed.
I had a chat with an engineer at Wuben about the back plate being slightly bent due to the pressure from the pocket clip. They said that they have now reduced the thickness of the pocket clip from 0.8mm to 0.6mm to try to reduce the strain on the plastic.
The head turns smoothly and it feels like it locks into place. It came lightly lubricated.

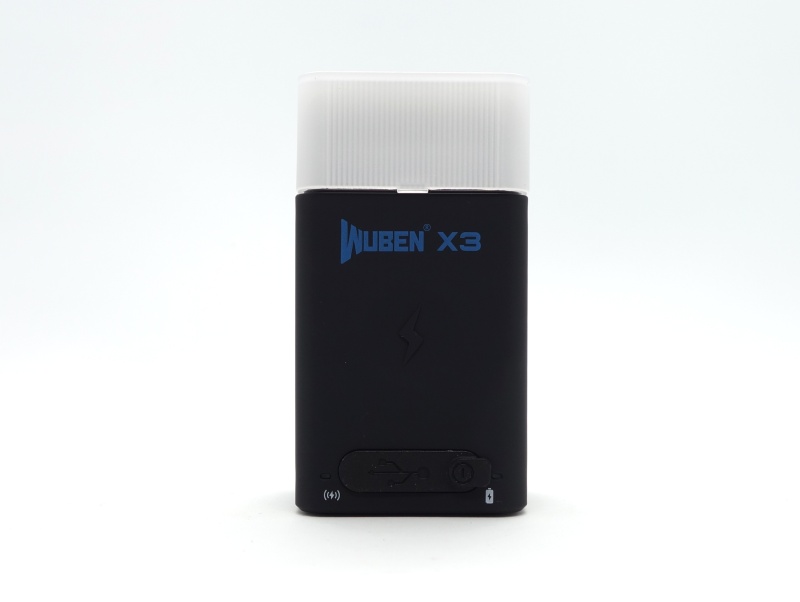
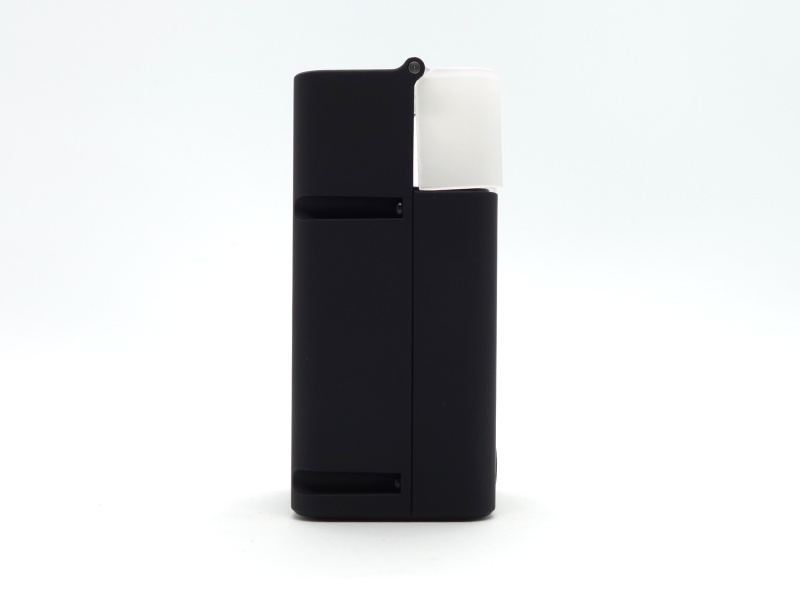
The charging case is made out of two types of plastic.
The main body of the charging case has a textured feel to it while the opaque plastic feels smooth.
When opening the charging case, a little bit of plastic unclips.
I suggested a few changes to the charging case:
- Reduce the length of the sides from 23.5mm to 19.4mm so that the cover takes up 50% of the space. This will make it easier to remove the X3 with my thumb and index finger.
- Increase the height by 3mm and make the two hinges flush so that they do not stick out.
- Replace the semi-transparent cover with a transparent cover so that the display can be seen.
- Replace the hole in the cover with more transparent plastic.
- Use two magnets in the corners of the cover instead of a clip.
- Consider removing the hinges and instead having four magnets to hold the cover in place.
The USB-C lanyard is a nice concept. I recommended covering up some of the exposed copper wires near the plastic clip.
I measured a cable resistance of 99 mOhm with a AVHzY CT-3 USB Meter.
Here is a teardown video of the Wuben X3 and the charging case.
The MCPCB has thermal paste.
There are seals for the back plate, bezel and switch to help improve wate resistance.
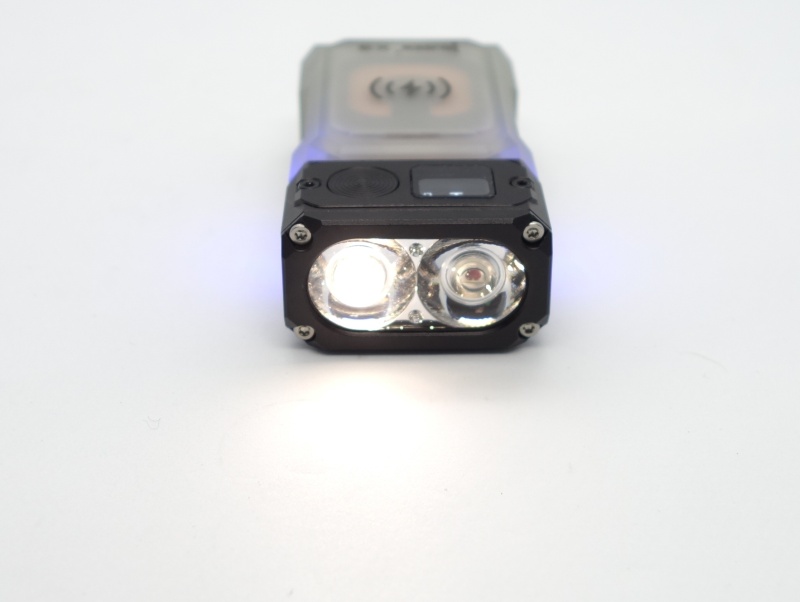
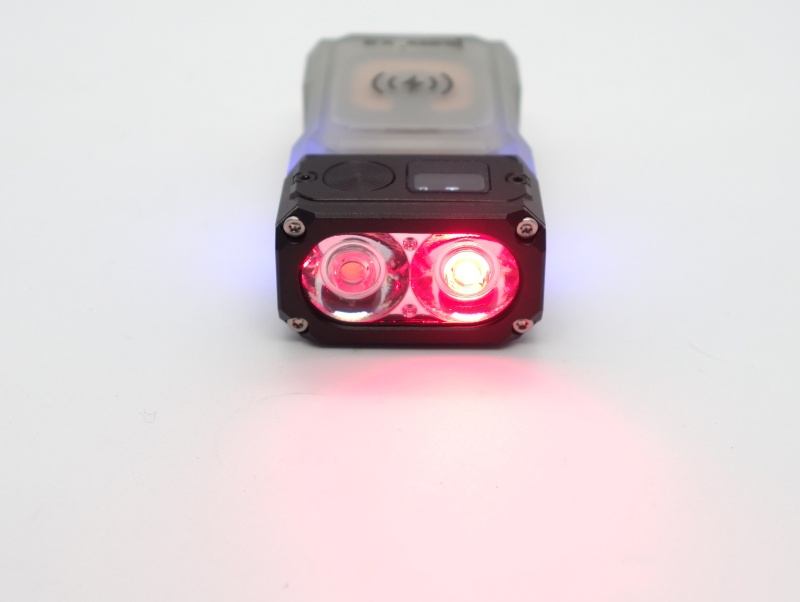
LED, bezel, lens, reflector and beam#
The Wuben X3 prototype that I received has a white Samung LH351D emitter and a red 670nm emitter.
The bezel can be unscrewed to reveal a TIR optic with a combined reflector.
CCT, CRI, and duv#
I have taken Correlated Colour Temperature (CCT) and Colour Rendering Index (CRI, RA of R1-R8) measurements with the torch positioned one metre away from an Opple Light Master Pro III (G3).
The CCT is around 5000K. The CRI is around 96.
The Delta u, v is slightly positive (green) on lower modes and closer to pure white on Turbo.
Both the white and red beams have a similar pattern on Low. The TIR optic creates a throwy square hot spot with a bit of a circle. The spill is what you would expect from a mule.
| Mode | CCT (K) | CRI (Ra) | x | y | Duv |
|---|---|---|---|---|---|
| Low | 4641 | 95.8 | 0.3543 | 0.3465 | -0.0062 |
| Medium | 5018 | 96.5 | 0.3451 | 0.3564 | 0.0024 |
| High | 5037 | 96.4 | 0.3445 | 0.3558 | 0.0023 |
| Turbo | 5078 | 97.1 | 0.3431 | 0.3507 | 0.0004 |
Calculate Duv from CIE 1931 xy coordinates
Size#
Dimensions#
I took the following measurements using a vernier caliper.
| Measurement | Unit (mm) |
|---|---|
| Wuben X3 length | 70.0 |
| Wuben X3 width | 35.25 |
| Wuben X3 height | 20.0 |
| Charging case length | 87.5 |
| Charging case width | 47.0 |
| Charging case height | 41.25 |
Weight#
I took the following measurements using a digital scale.
| Weight | Unit (g) |
|---|---|
| Wuben X3 | 63.14 |
| Charging case | 104.19 |
User interface#
There is a switch near the display to turn the white or red emitter on. Click to turn the white light on. Hold to turn the red light on.
Both white and red have mode memory.
You are not meant to be able to turn both white and red emitters on at the same time but I found a way.
| State | Action | Result |
|---|---|---|
| Off | Hold | Red light on (mode memory) |
| Off | Click | White light on (mode memory) |
| Off | Two clicks | White light on (Turbo) |
| Off | Three clicks | White light SOS |
| Off | Five clicks | Toggle blue indicator lights on/off |
| Red light on | Click | Cycle (Low, High, Blinking) |
| Red light on | Five clicks | Toggle blue indicator lights on/off |
| White light on | Click | Cycle (Low, Medium, High) |
| White light on | Two clicks | Turbo |
| White light on | Three clicks | SOS |
| White light on | Five clicks | Toggle blue indicator lights on/off |
| White light on to White light SOS | Hold | Nothing |
| Off to White light SOS | Hold | White light SOS + Red light on (mode memory) |
| White light SOS + Red light on | Wait 3 seconds then three clicks | White light off |
| White light SOS + Red light on | Three clicks within 1 second of turning Red light on | White light Turbo |
| White light Turbo + Red light on | Hold | Cycle (Low, High, Blinking) |
| White light SOS | Click | Off |
| White light SOS | Two clicks | White light Turbo |
| White light SOS | Three clicks | Previous state (unless Turbo, then Low) |
| White light Turbo | Hold | Low |
| White light Turbo | Click | Off |
| White light Turbo | Two clicks | Previous state |
| White light Turbo | Three clicks | Off |
| White light Turbo | Five clicks | Toggle blue indicator lights on/off |
Battery level indication#
The display shows the battery level.
PWM#
I did not notice any visible PWM (flickering).
What I like about the UI#
- Simple and intuitive.
What could be improved#
- Disable mode memory for Red. It would be nice if it always started on Low.
- There is a bug with the user interface where the Red light can be turned on during SOS. This causes unexpected behaviour. You can end up with both lights on (red + SOS or red + Turbo) and cycle the red mode.
Batteries and charging#
Battery#
A 1000mAh Lithium battery is built-in. It has been soldered to the driver.
Charging#
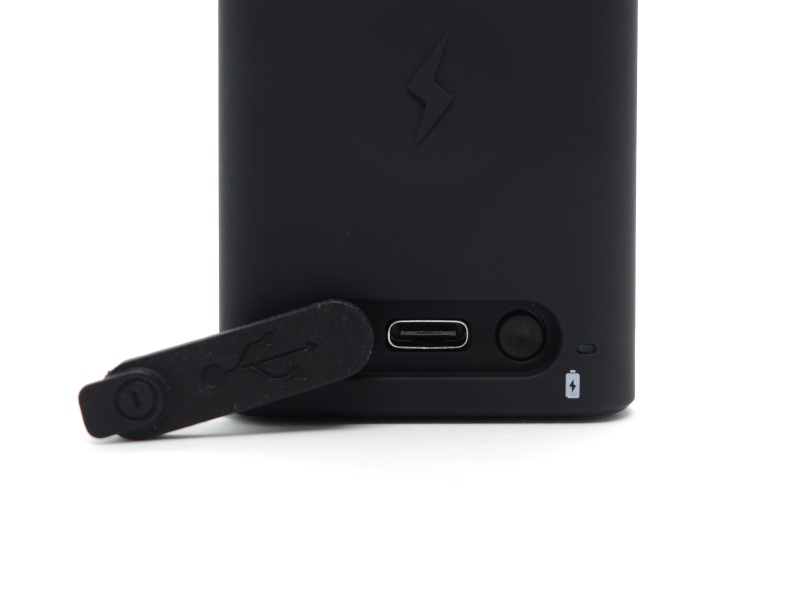
To charge the Wuben X3, I found that I need to insert it into the charging case while the case is off and then press a button near the USB-C port to turn the case on.
The button is easy to push when a USB-C cable is not connected.
I found that I got one or two charges out of the case. The Wuben X3 prototype that I have kept taking about 3 hours to go from 95% to 100%.
Power supply: PinePower Desktop
USB Meter: AVHzY CT-3 (recommended by LiquidRetro)
Room temperature: 24 C
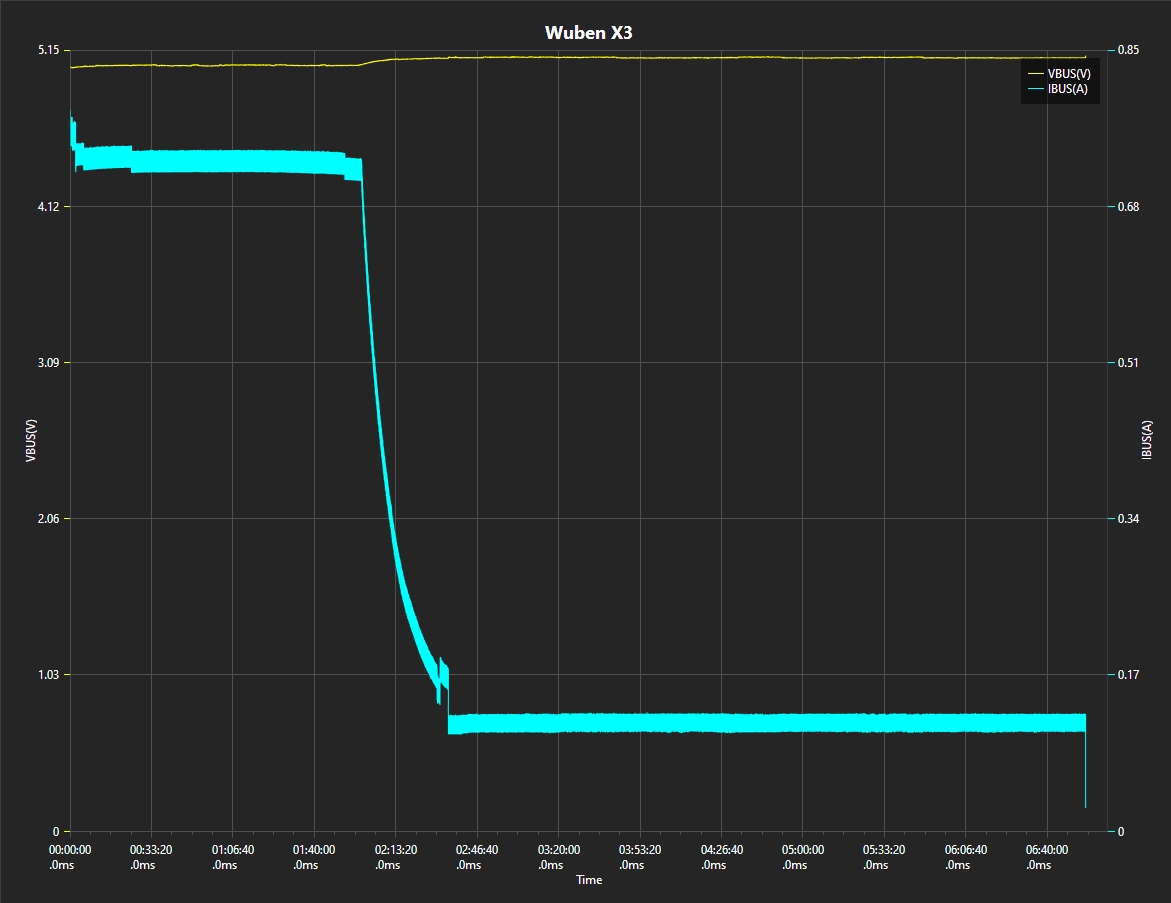
I measured the input into the charging case while wirelesly charging the Wuben X3.
The X3 charged to 95% after 3 hours. It finished charging at 6 hours 55 minutes.
I noticed that wireless charging does not resume if I take the X3 out of the charging case and put it back in. I had to turn the charging case off and on again to get it to resume charging.
Power bank#
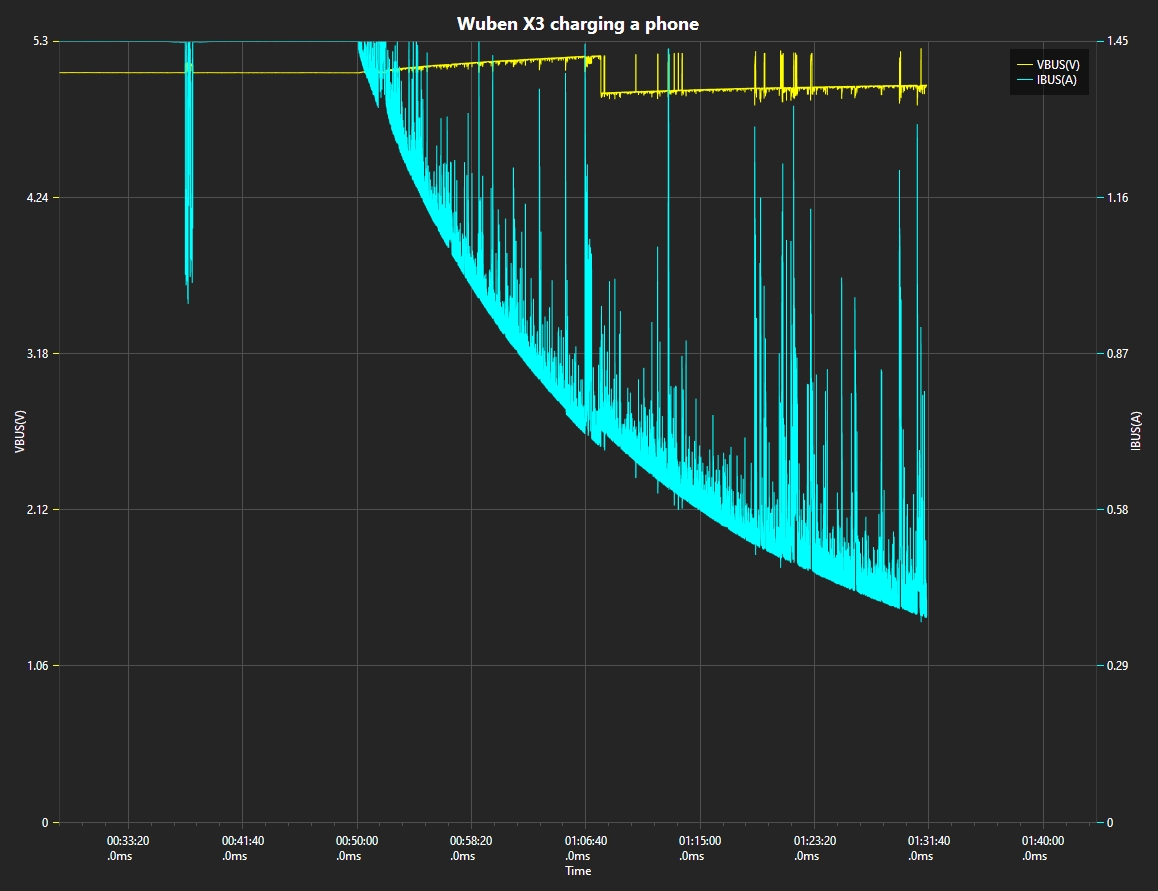
I was able to use the charging case to charge my phone at about 5V 1.3A.
Power supply compatibility#
I tried the following power supplies with the charging case:
| Power supply | USB Type | Protocol | Does it charge? |
|---|---|---|---|
| Apple 61W Power Adapter | USB-C | PD | Yes |
| Google Pixel Power Adapter | USB-C | PD | Yes |
| PinePower Desktop | USB-C | PD | Yes |
| PinePower Desktop | USB-A | QC | Yes |
| PinePower Desktop | USB-A | Yes |
USB-C to USB-C charging works.
Wireless charger compatibility#
I tried the following wireless chargers with the Wuben X3:
| Wireless charger | Watts | Charge? |
|---|---|---|
| Wuben X3 charging case | ? | Yes |
| PinePower Desktop | 10 | Yes |
| Google Pixel 5 | 5 | Yes |
Wuben X3 is capable of receiving up to 5W wirelessly.
The surface temperature of the X3 was 60 C while charging wirelessly with the PinePower Desktop from 10% to 70%. This might be due to not placing the X3 on the wireless charger properly.
Just for fun, I enabled battery sharing on my phone and I was able to charge the Wuben X3!
Performance#
Specifications from the manual:
White Light:
| FL1 STANDARD | Turbo | High | Medium | Low | SOS |
|---|---|---|---|---|---|
| Output (lumens) | 700 + 200 | 150 | 50 | 0.5 | 200 |
| Runtime | 1min + 2h | 2.5h | 10h | 30 days | |
| Beam Distance (metres) | 1.02 | ||||
| Beam Intensity (cd) | 2,590 |
Red Light:
| FL1 STANDARD | High | Low | Blinking |
|---|---|---|---|
| Output (lumens) | 70 + 30 | 1 | 20 |
| Runtime (hours) | 3min + 2h | 30h | |
| Beam Distance (metres) | |||
| Beam Intensity (cd) |
Lumen measurements#
| LED | Mode | Specs | Lumens @turn on | Lumens @30 sec | Lumens @10 min |
|---|---|---|---|---|---|
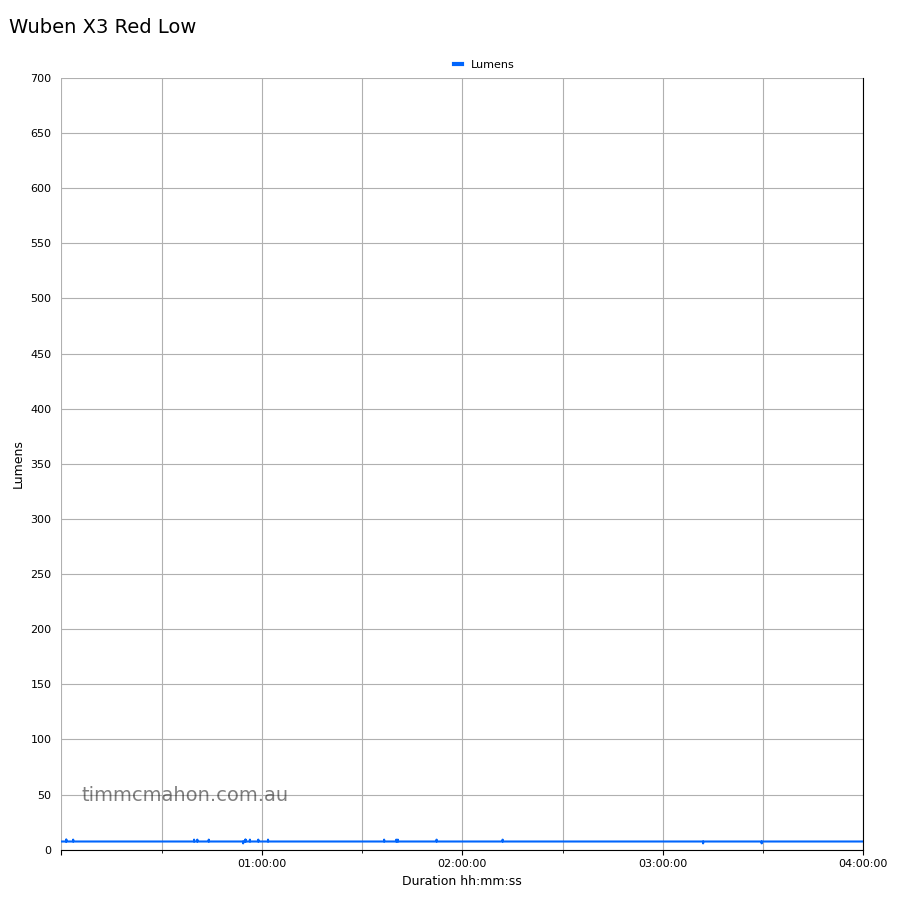
| Red | Low | 1 | 7 | 7 | 7 |
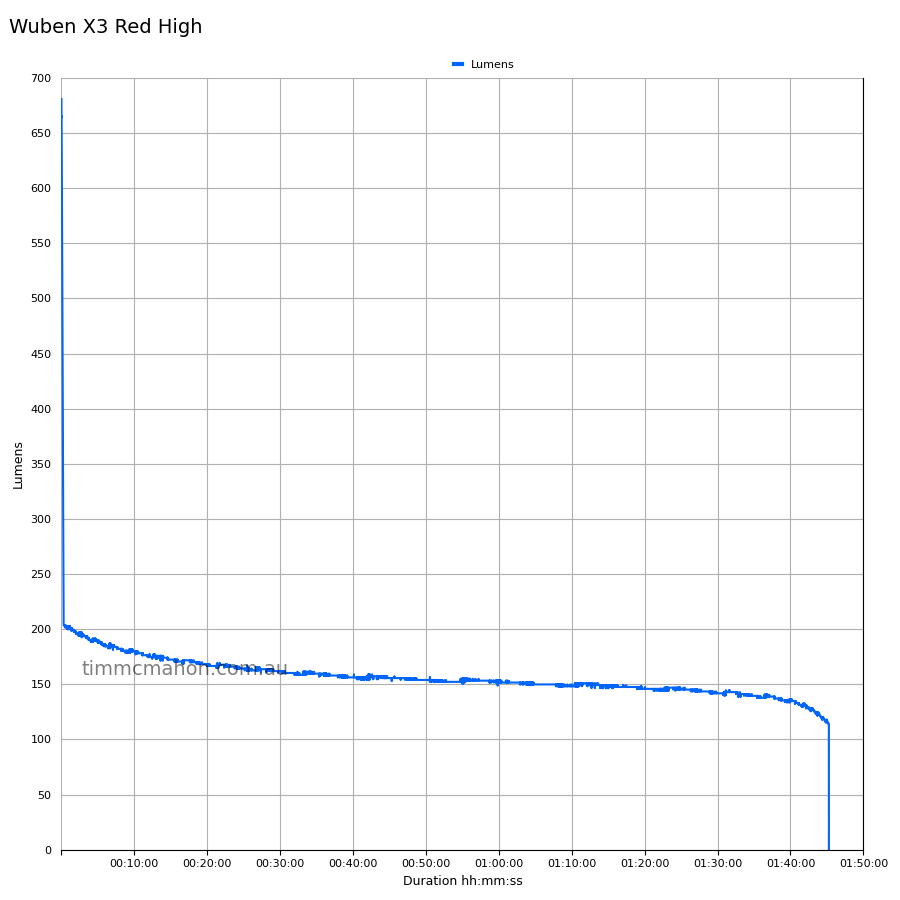
| Red | High | 70 | 680 | 203 | 179 |
| White | Low | 0.5 | 1 | 1 | 1 |
| White | Med | 50 | 72 | 70 | 65 |
| White | High | 150 | 175 | 169 | 148 |
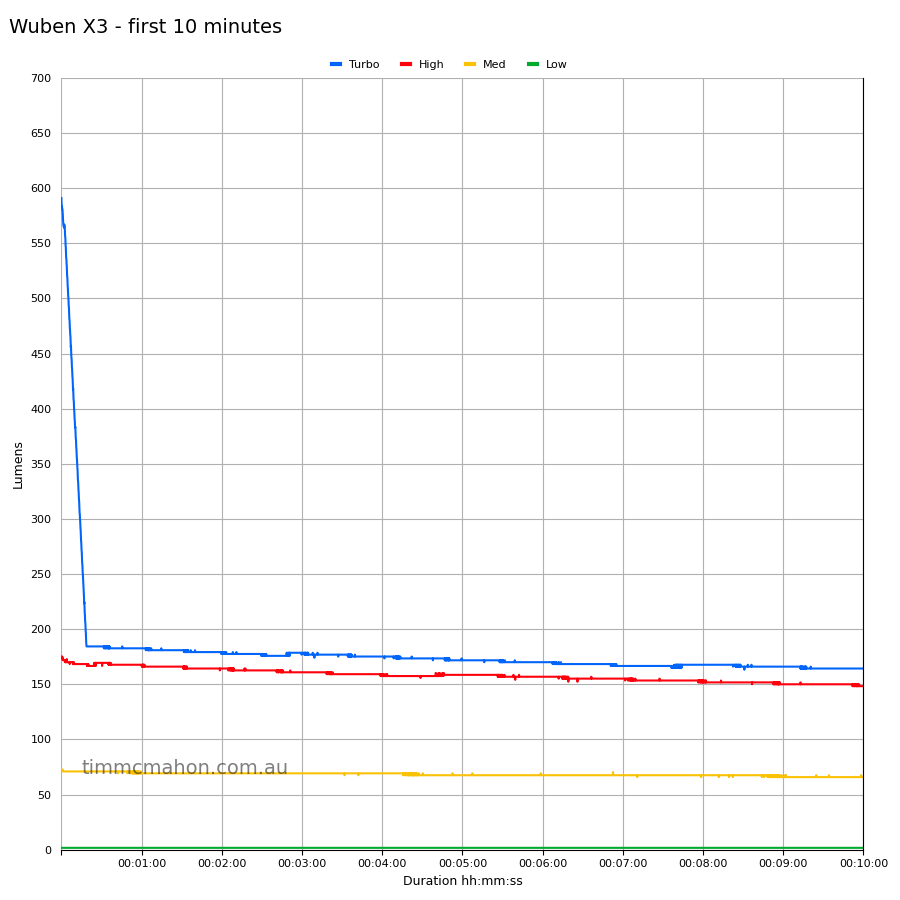
| White | Turbo | 700 | 591 | 184 | 164 |
Red was much higher than expected on the High mode.
The display shows:
- LV.1 1 LM
- LV.2 50 LM
- LV.3 150 LM
- Turbo 700 LM
Those lumen numbers do not match the output exactly.
Perhaps Low, Med, High and Turbo could simply be displayed.
Runtime graphs#
I used my own DIY lumen tube with a TSL2591 sensor and forked bmengineer’s project RuTiTe to record runtimes.
Note: Lumen measurements may be off by 10% with my DIY lumen tube.
The room temperature was approximately 21 C.
Runtime#
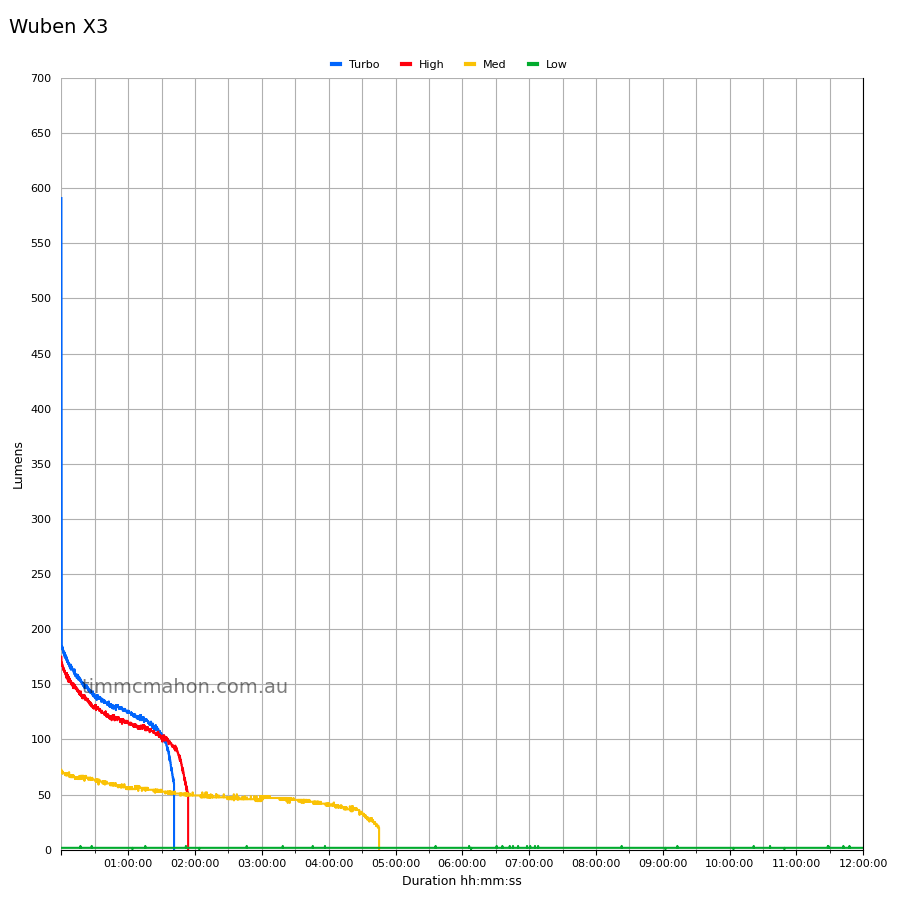
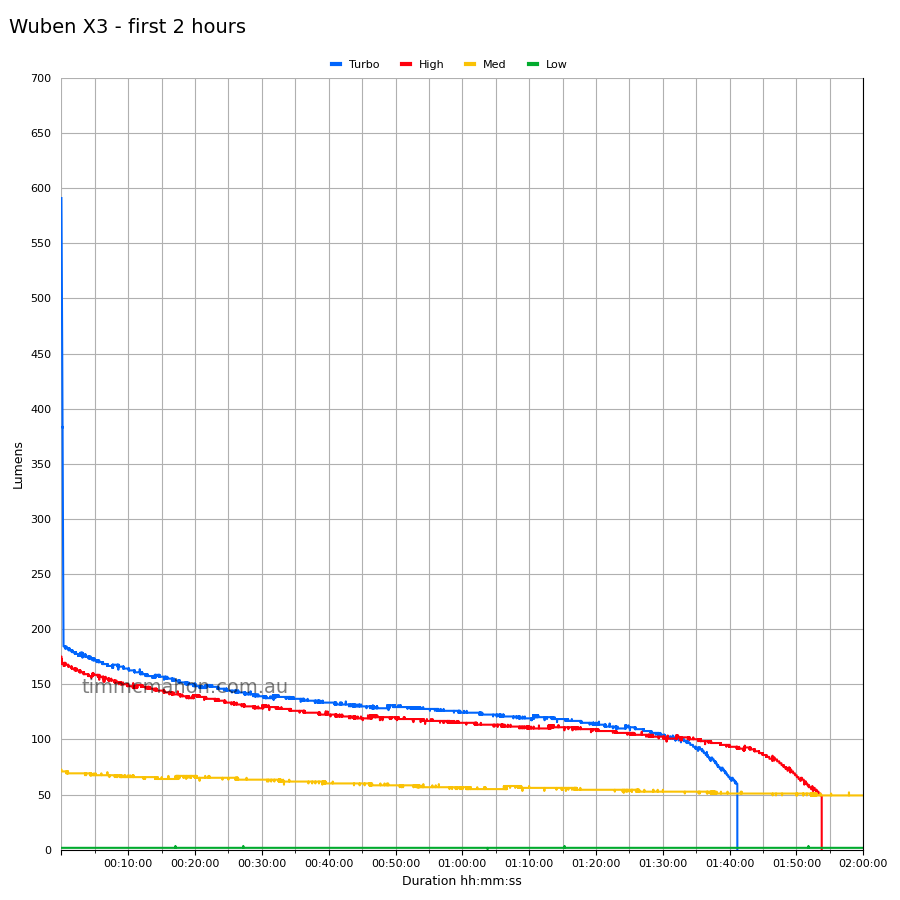
Here is a summary of the runtime results:
| LED | Mode | User manual | Runtime result |
|---|---|---|---|
| White | Turbo | 1min + 2h | 1h 41min 8s |
| White | High | 2h 30min | 1h 53min 46s |
| White | Medium | 10h | 4h 45min 14s |
| White | Low | 30 days | 12h+ |
| Red | High | 3min + 2h | 1h 45min 16s |
| Red | Low | 30h | 4h+ |
The runtime result is the time until my lumen tube no longer detects more than 1 lumen.
At the end of Turbo, the display showed a battery level of 10%. It was down to one blinking bar. I was able to cycle through Low, Medium, and High.
White High and Medium fell short of the official specifications. I am taking the user manual with a grain of salt. The user manual needs to be updated.
I stopped recording after 12 hours for the white Low mode. The battery level was 70%.
I stopped recording after 4 hours for the red Low mode.
The runtime and regulation is pretty good.
Throw#
I took lux measurements with a UNI-T UT383BT at 30 seconds. Low and Medium were measured at one metre. High and Turbo were measured at two metres.
| LED | Mode | Specs (cd) | Specs (m) | Candela measured (cd) | Distance (m) |
|---|---|---|---|---|---|
| White | Low | 5 | 4 | ||
| White | Medium | 293 | 34 | ||
| White | High | 816 | 57 | ||
| White | Turbo | 2,590 | 102 | 884 | 59 |
The beam distance was much shorter than expected. The manual says 1.02 Meters which may be a typo because 2,590 candelas converts to about 102 metres.
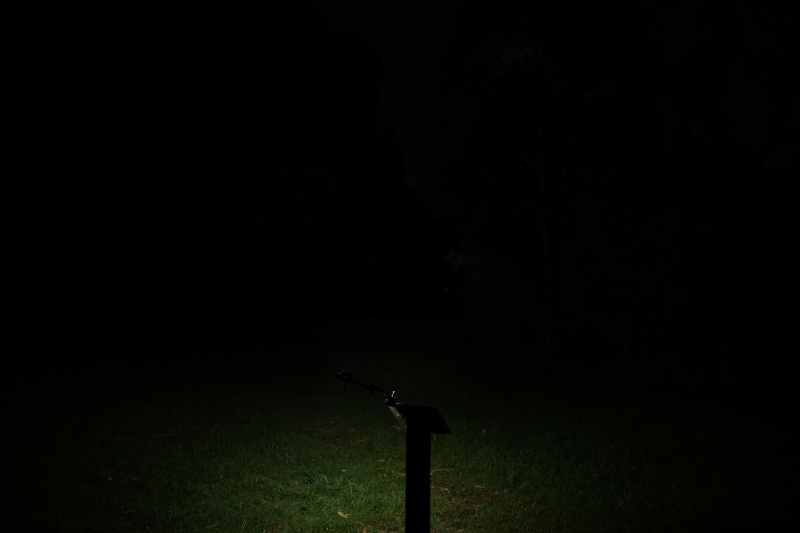
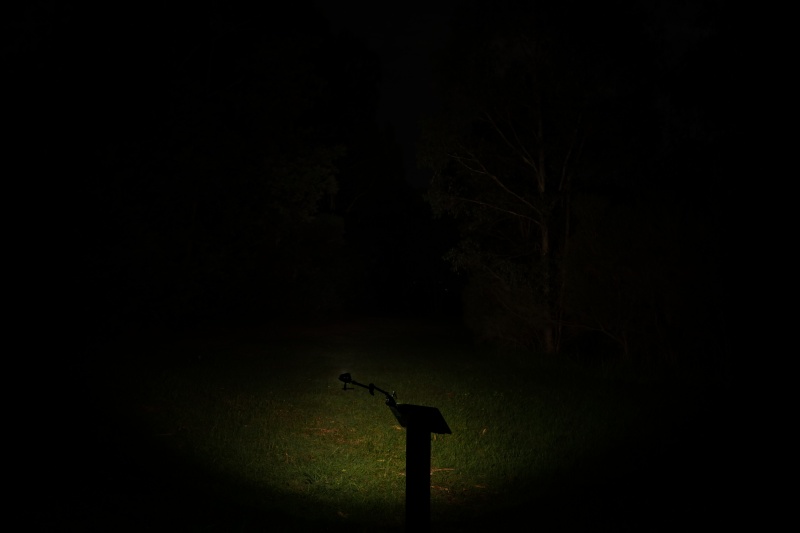
Beamshots#
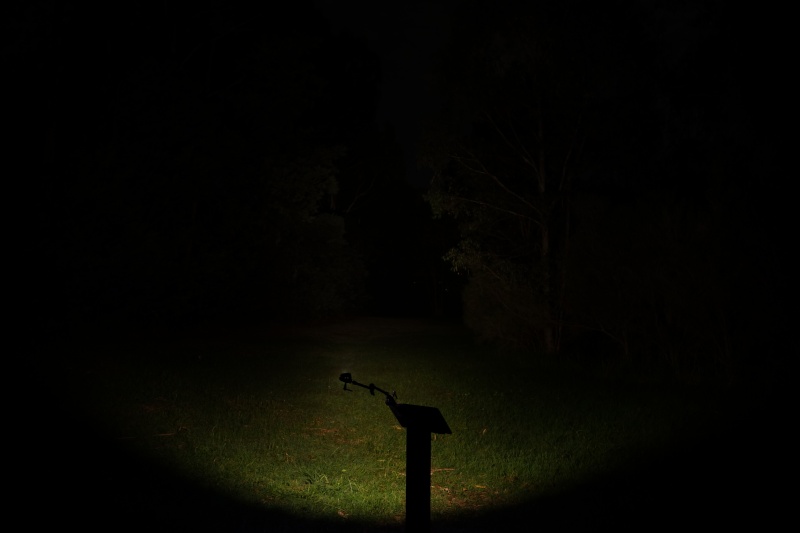
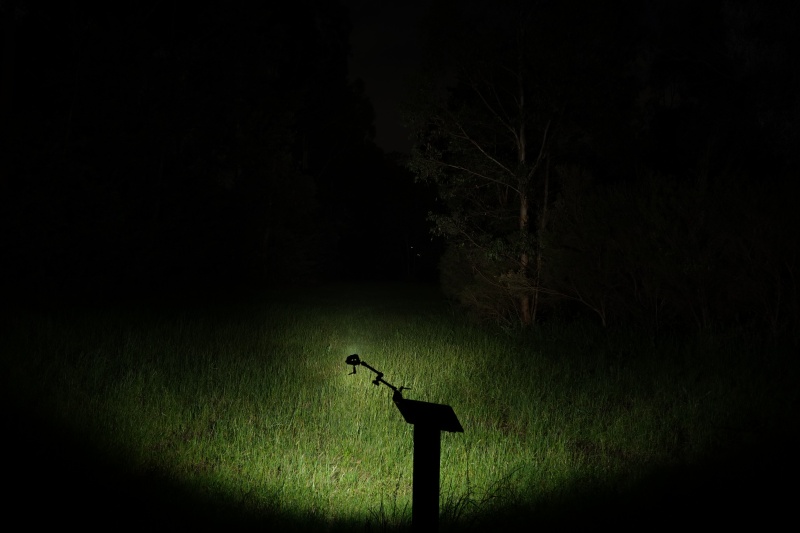
I went to a local park and aimed the Wuben X3 at a tree 70 metres away while using Turbo.
Beamshots were taken using a Sony RX100M2 using 3.2", f3.2, ISO 100, 5000K WB.
Wuben X3 (Turbo)#
ReyLight Pineapple Mini (100%)#
ReyLight LANapple (100%)#
Acebeam Pokelit 2AA (High)#
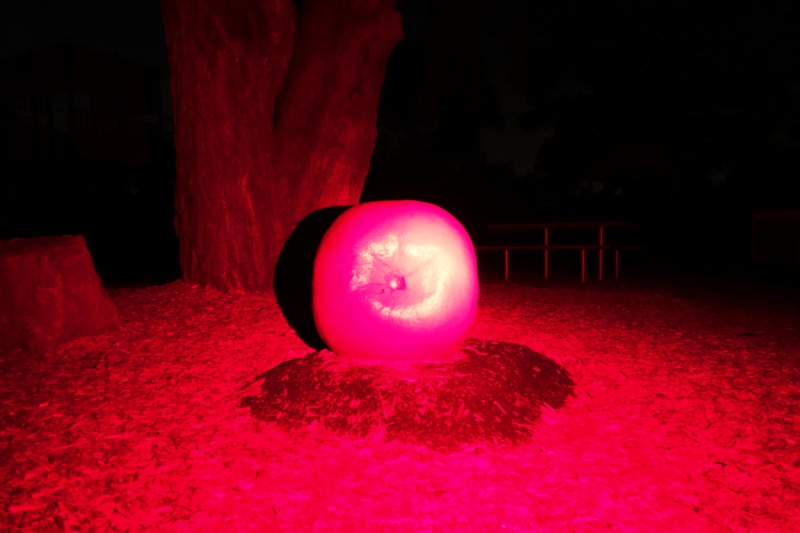
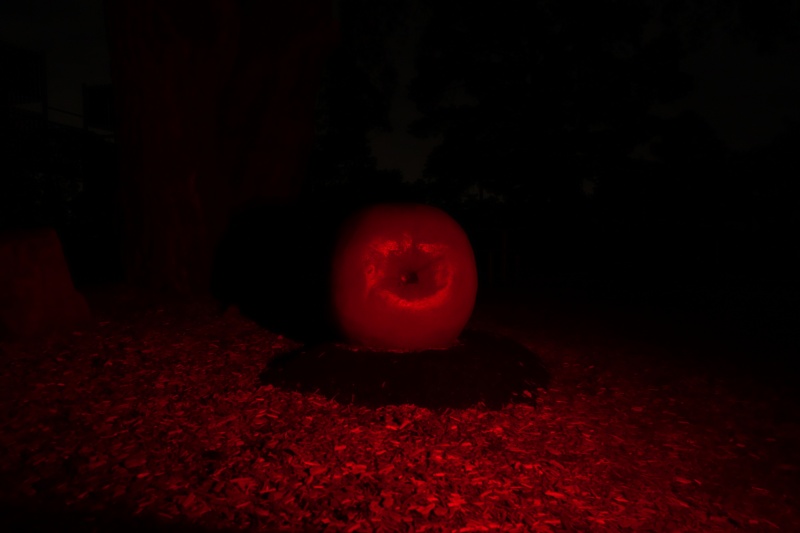
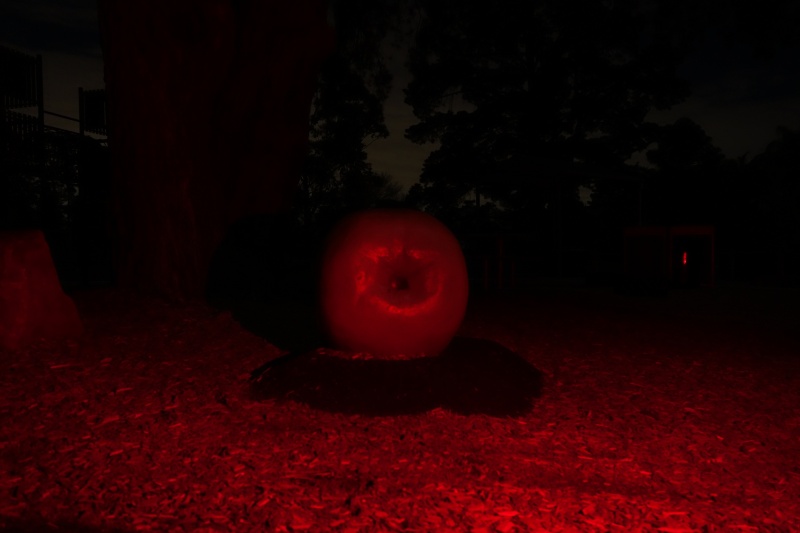
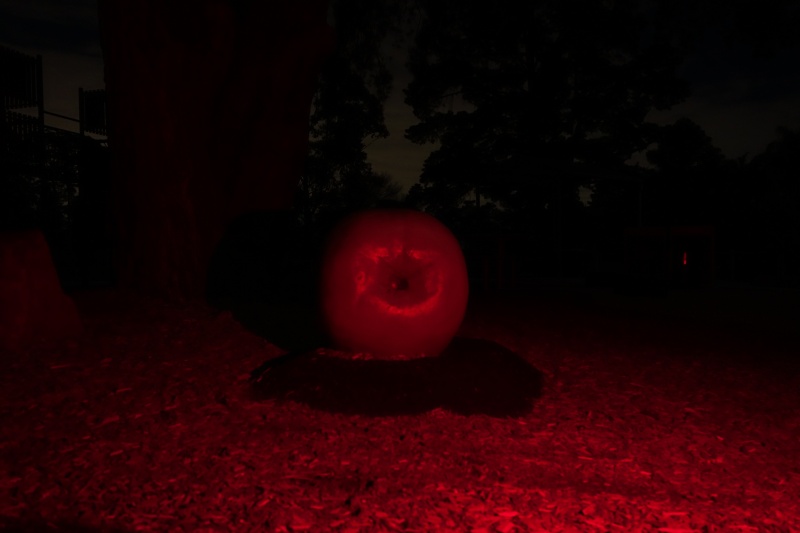
I later visited a playground and aimed the torch at a big apple approximately 2 meters away while using the Red emitter.
Red beamshots were taken using a Sony RX100M2 using 1/2.5", f3.2, ISO 800, 5000K WB.
Wuben X3 Red (High)#
Cyansky HS6R#
Cyansky HS5R#
ZebraLight H502pr#
Conclusion#
This is the first time that I have reviewed a prototype of a torch before it has been released and the experience has been great.
Wuben sent the prototype overnight to Australia via express courier.
I sent Wuben about twenty emails. Instead of getting defensive, they asked if I would like to talk with one of their engineers directly. We had a chat and I shared some photos and videos of the issues. And they confirmed some changes being made.
I am looking forward to the final version of the Wuben X3!
UPDATE (28/05/2023): I received a newer version of the Wuben X3 in a reviewer kit and it looks like some of the issues have been fixed. For example: Wireless charging resumes when I take the X3 out and put it back into the charging case.
Pros:#
- Wireless charging.
- Swivel head.
- Display.
- Magnets.
- Good build quality.
- Charging case.
Cons:#
- Improvements have been mentioned above.
- UI bugs.
Price#
US$49 super early bird on Kickstarter.
US$59 normally.
Product page#
Promo code: TIM20
Wuben X3 on Amazon (affiliate link)
Wuben X3 on wubenlight.com (affiliate link)
https://www.wubenlight.com/collections/everyday-carry?ref=Tim