Acebeam Defender P16 Gray Tactical Torch Review

Acebeam Defender P16 Gray#
- Specifications
- Introduction
- Torch in use
- Build quality
- LED, bezel, lens, reflector and beam
- Size and comparison
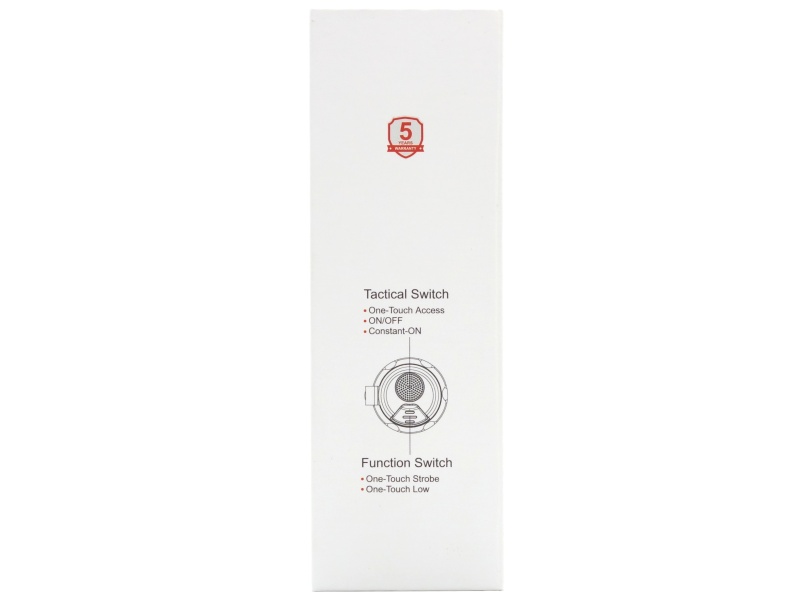
- User interface
- Batteries and charging
- Performance
- Beamshots
- Conclusion
- Price
- Product page
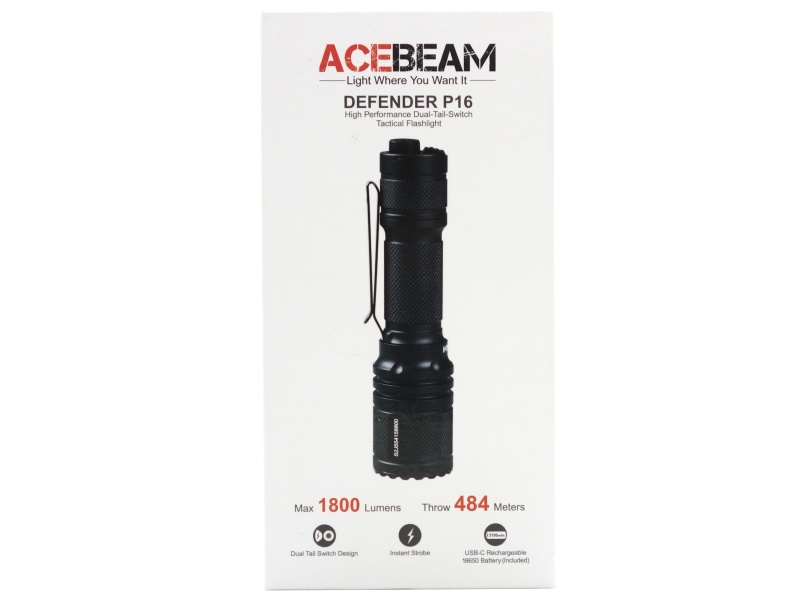
Specifications#
| Brand/model | Acebeam Defender P16 Gray |
|---|---|
| LED | Luminus SFT40 |
| Maximum lumens | 1,800 lm |
| Maximum beam intensity | 58,564 cd |
| Maximum throw | 484 m |
| Battery | 1*18650 |
| Onboard charging | No (USB-C battery) |
| Material | Aluminium |
| Modes | 4 |
| Blinkies | Strobe, SOS |
| Reflector | TIR |
| Waterproof | IP68 |
| Review date | July 2023 |
Introduction#
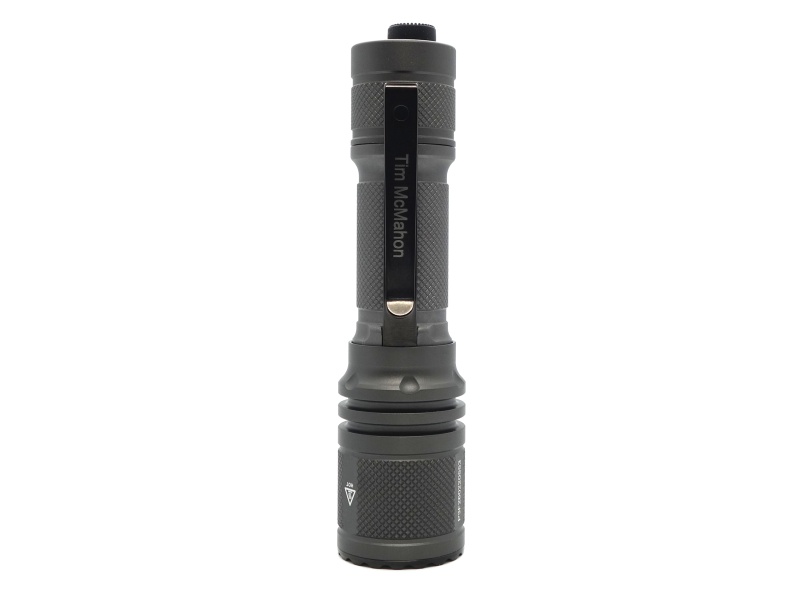
Acebeam kindly presented me with an Acebeam Defender P16 Gray tactical torch with my name engraved on the pocket clip when I visited their headquarters.
I have reviewed half a dozen of Acebeam’s EDC range of the torches. The build quality has been excellent.
This is the first time that I have used a tactical torch from Acebeam. After seeing multiple videos by Mike about tactical torches, I am excited to try out the Acebeam Defender P16!
I have not been paid for this review nor have I held back my opinions of this torch.
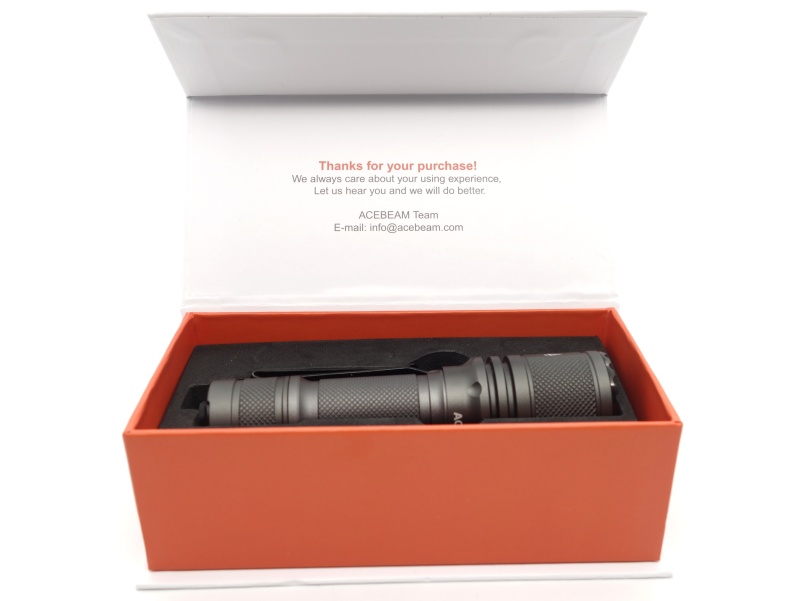
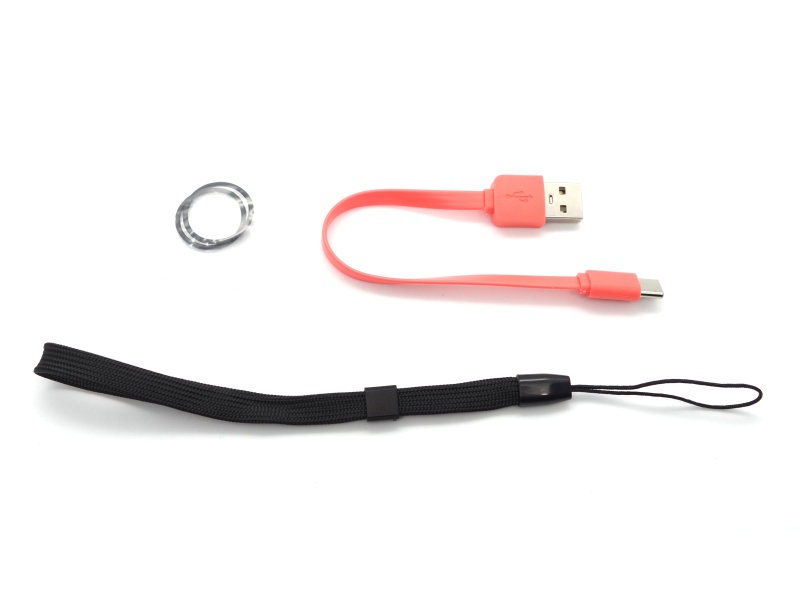
Packaging#
The Acebeam Defender P16 Gray comes in a white box with an image of the torch on the top and the Acebeam logo.
The following was included in the box:
- Acebeam Defender P16 Gray
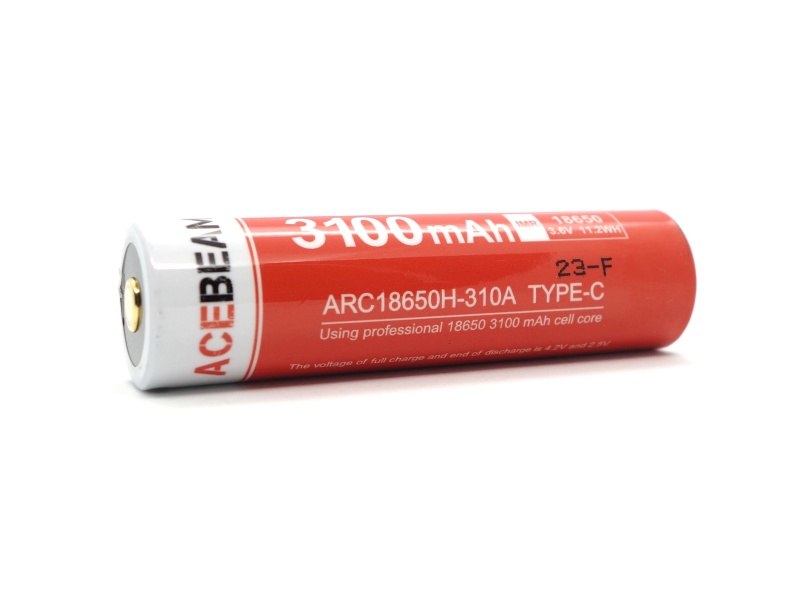
- Acebeam ARC18650H-310A 3100mAh battery
- USB-A to USB-C cable
- Two spare o-rings
- Lanyard
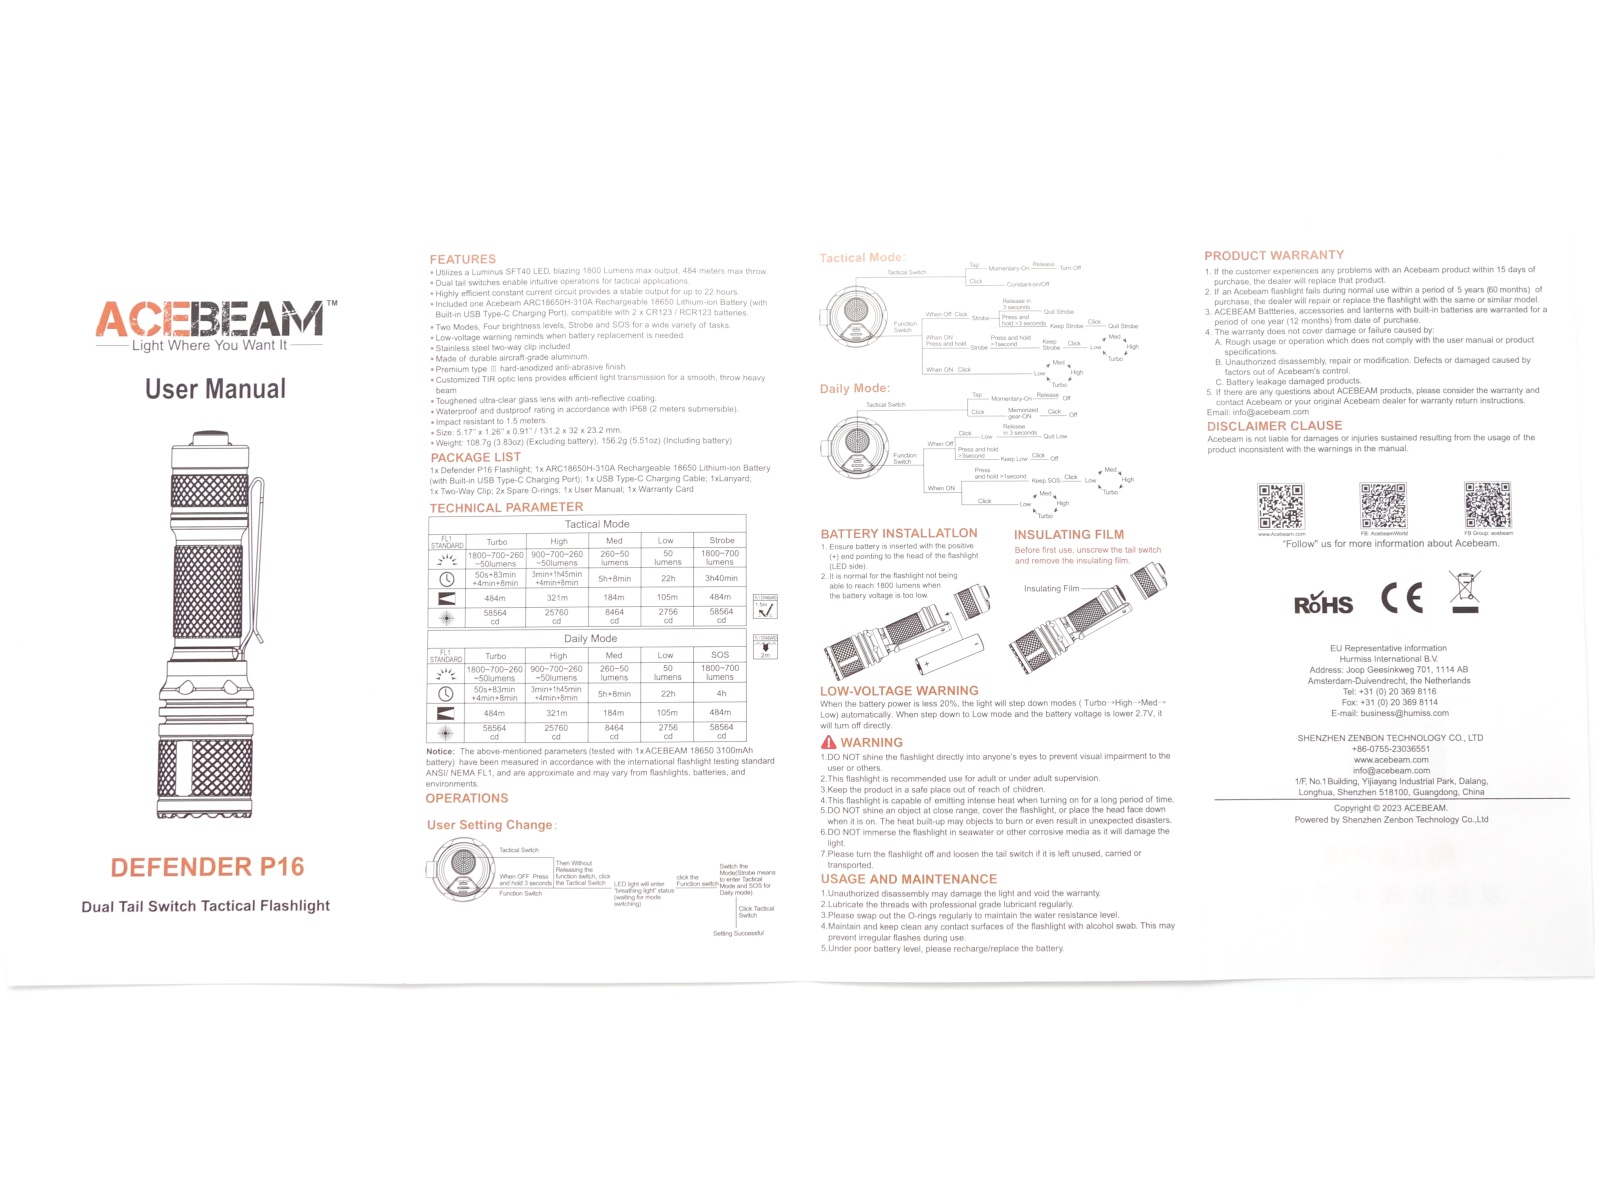
- User manual
The packaging is really nice!
Torch in use#
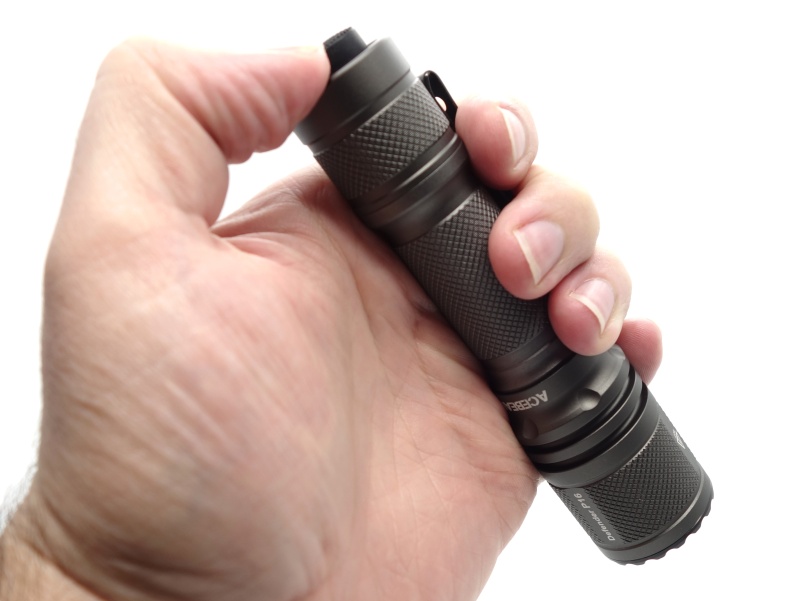
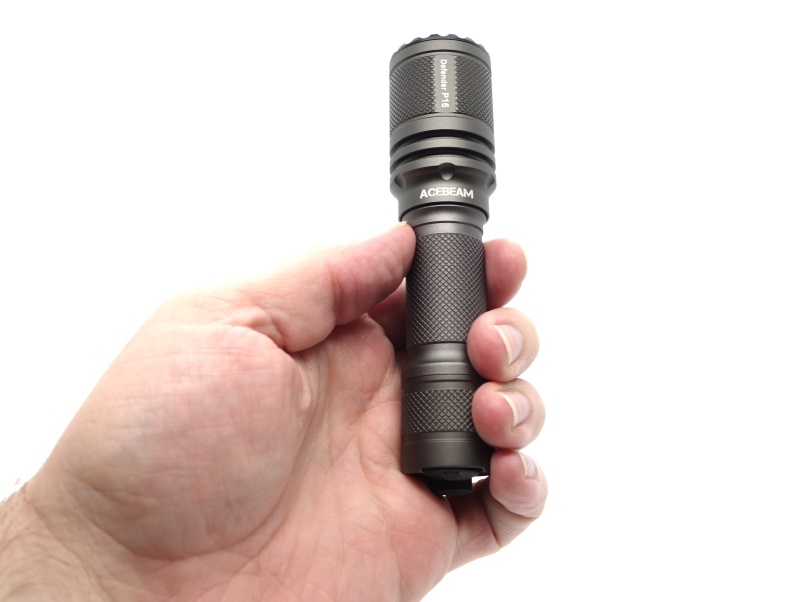
The Acebeam Defender P16 Gray fits comfortably in my hand.
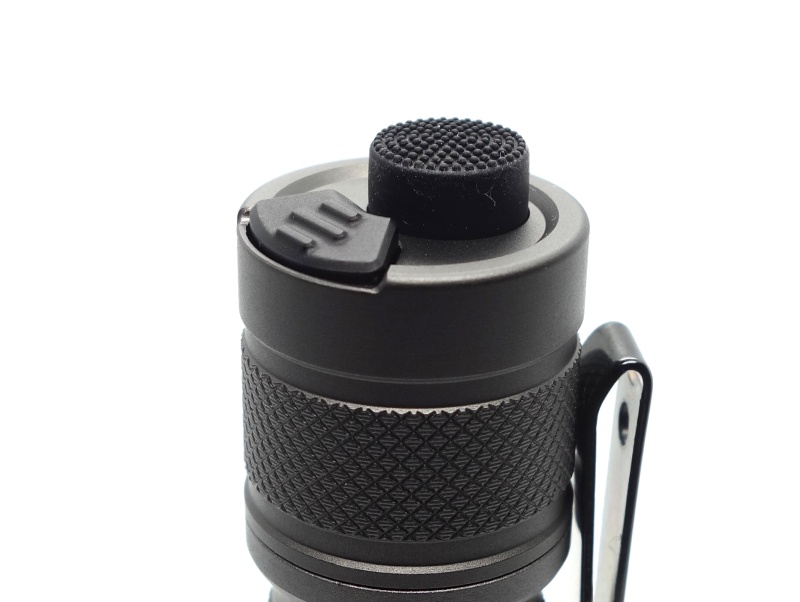
A large Tactical Switch can be pressed to turn the torch on and off.
A small Function Switch is used to change modes and to momentarily turn the torch on.
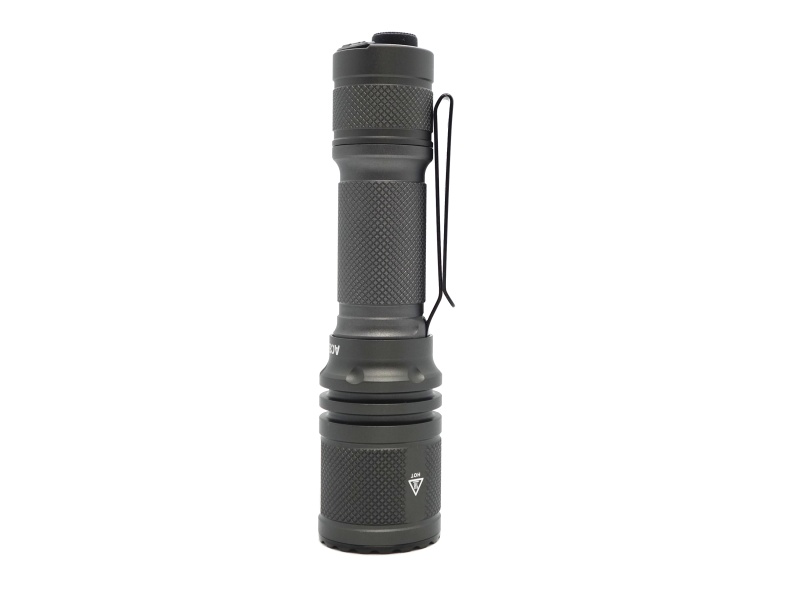
I prefer the feel of the knurling in my hand so I removed the pocket clip. The pocket clip was the only thing preventing the torch from rolling around.
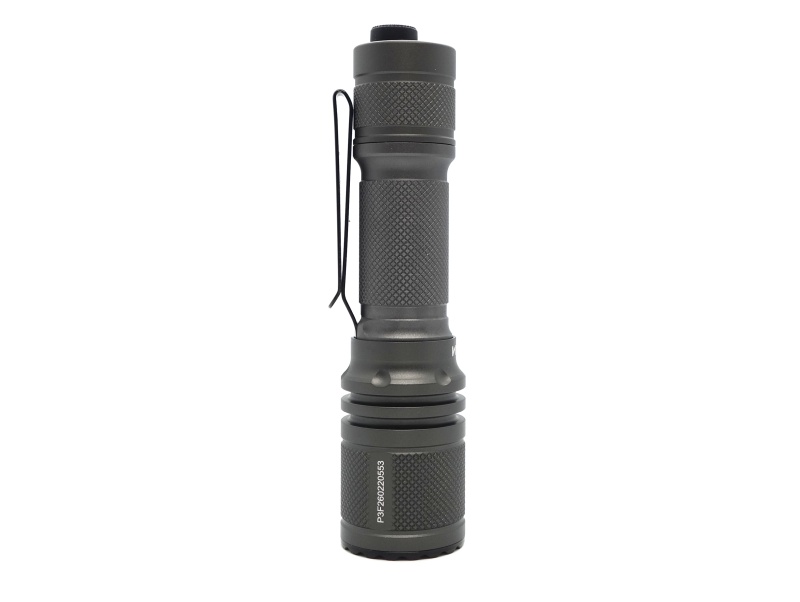
The included lanyard could be attached to the pocket clip.
The torch does not tailstand due to the buttons at the end.
Build quality#
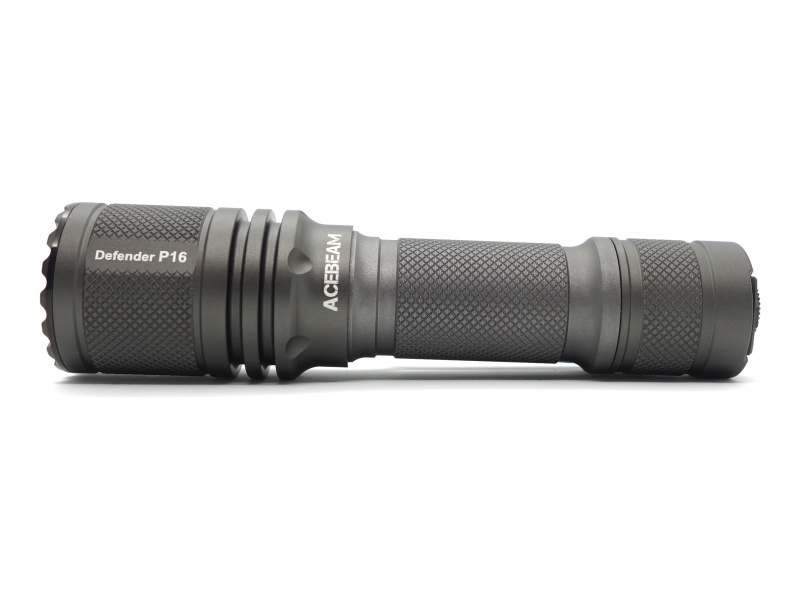
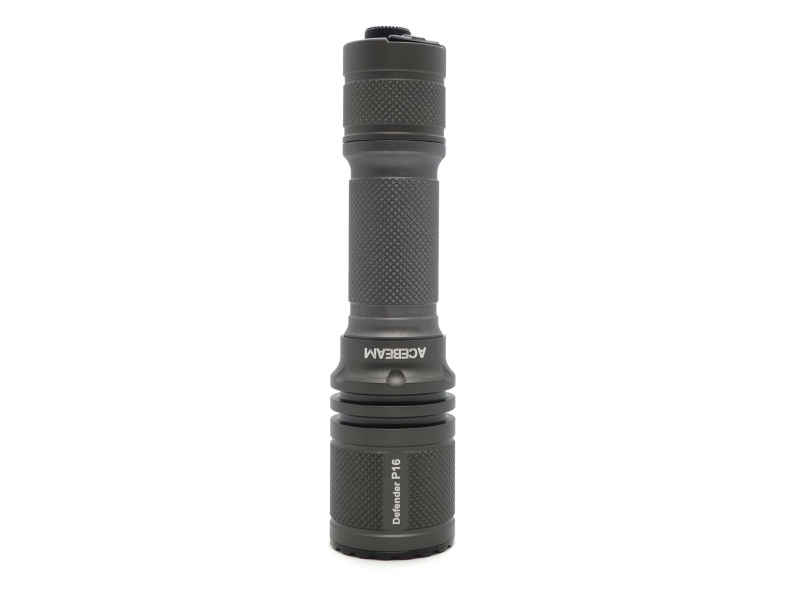
The Acebeam Defender P16 Gray has gray anodised aluminium. There are no sharp edges.
Knurling on the head, tube and tailcap provide plenty of grip.
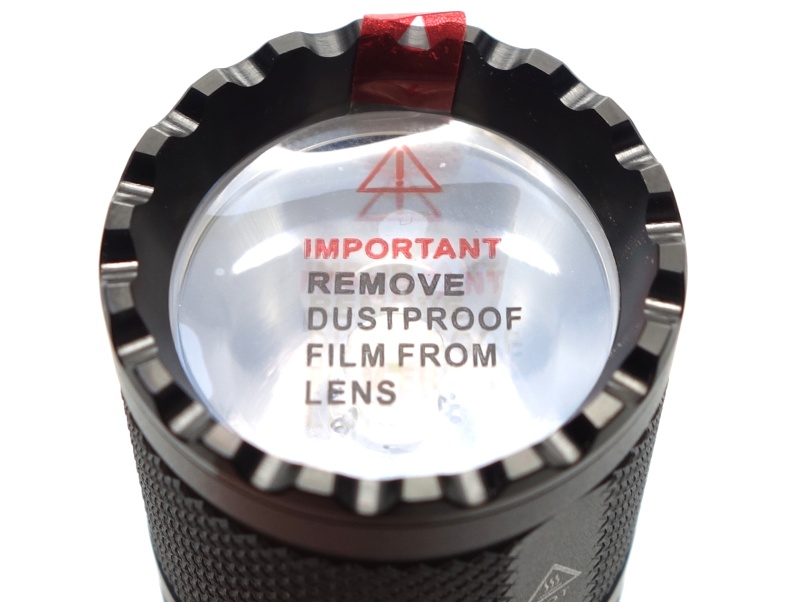
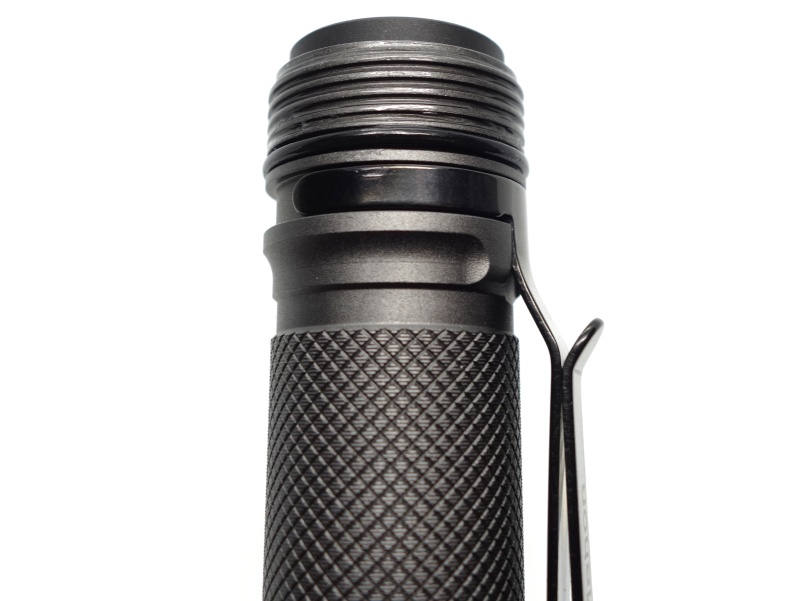
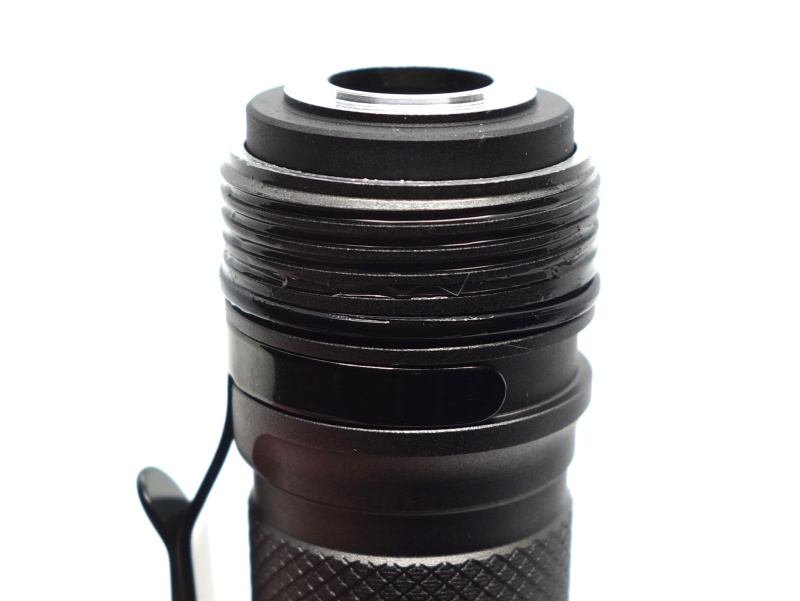
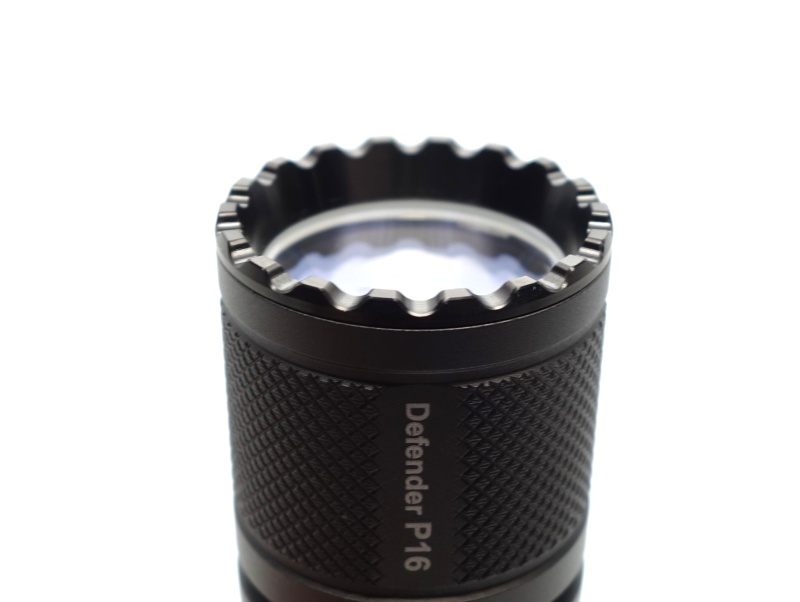
The TIR optic came with a protective film. The bezel can be unscrewed to reveal a glass lens protecting the TIR optic.
The Tactical Switch feels a bit squishy for the first two millimeters but then it gives a satisfying click. The smaller Function Switch can be momentarily pressed and it provides a bit of a clicky sound.
The reversible pocket clip is clipped to the tube near the head and it allows both a “head up” carry and a deep carry. The head helps keep the pocket clip secure by covering it.
One disadvantage with the deep carry feature is that the pocket clip presses against the tailcap. This is particularly annoying when unscrewing the tailcap to remove the battery every time it needs to be charged.
I scratched the tube while removing the pocket clip. It took a lot of force to rip the pocket clip off and it ended up digging into the aluminium. Fortunately, the damage is hidden by the head.
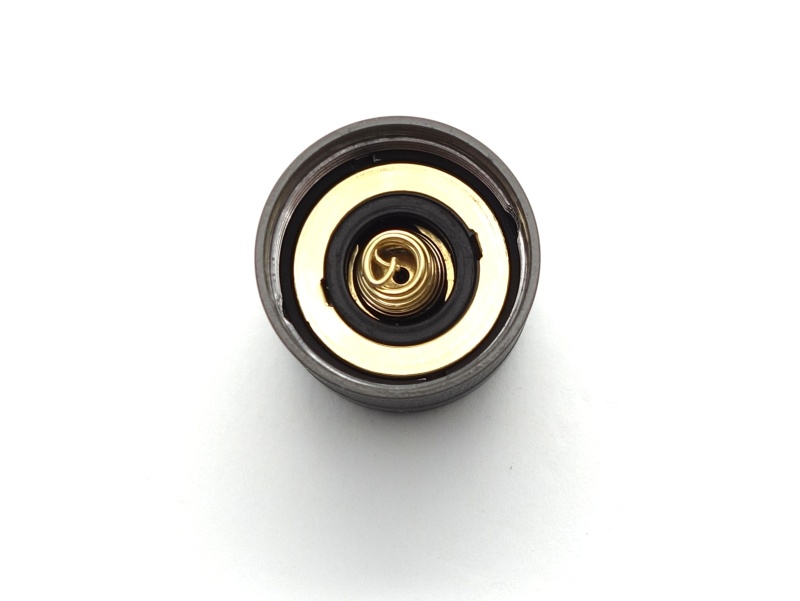
Dual springs have been used at the tail and at the head to help ensure that the battery is connected properly.
The driver at the head has two rings for the ground and signal, and dual springs for the positive.
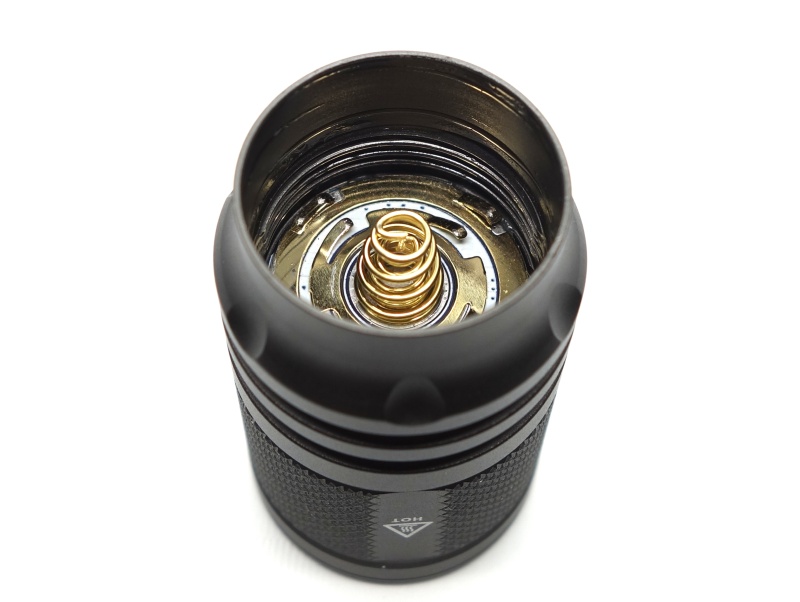
An outer and inner tube connect the head to the two switches in the tailcap.
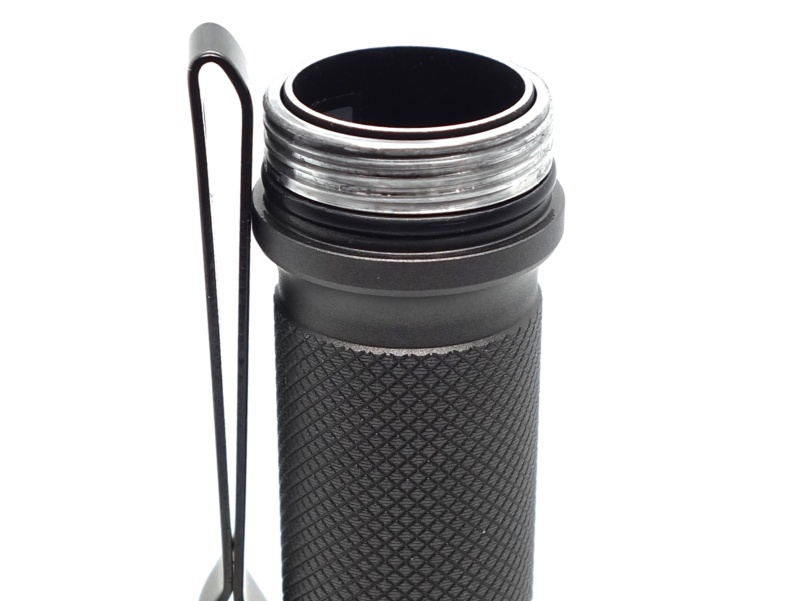
Square cut tail threads turn smoothly initially but then they become gritty after a few weeks because the threads have not been anodised.
The square cut threads at the head have been anodised. They turn smoothly and have remained clean after a few weeks.
The build quality is pretty good but it would be nice if the tail threads were anodised and if the pocket clip were easier to remove.
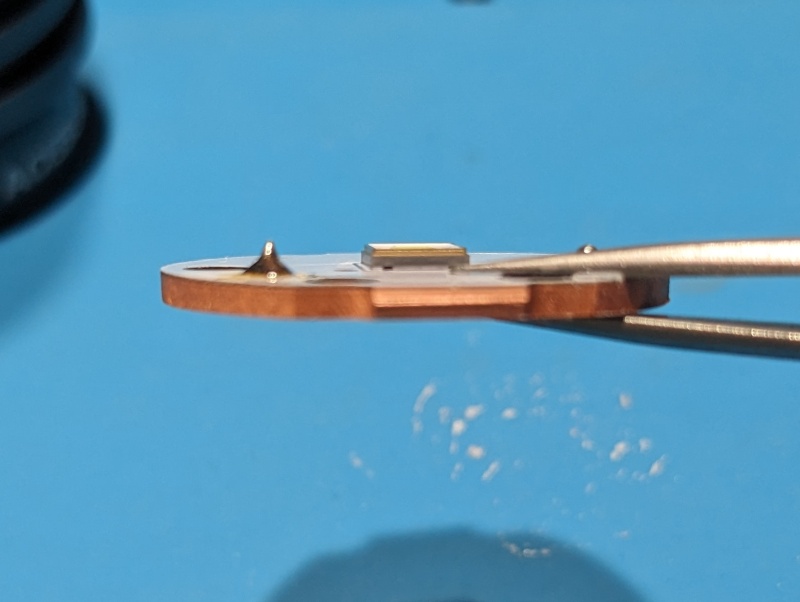
LED, bezel, lens, reflector and beam#
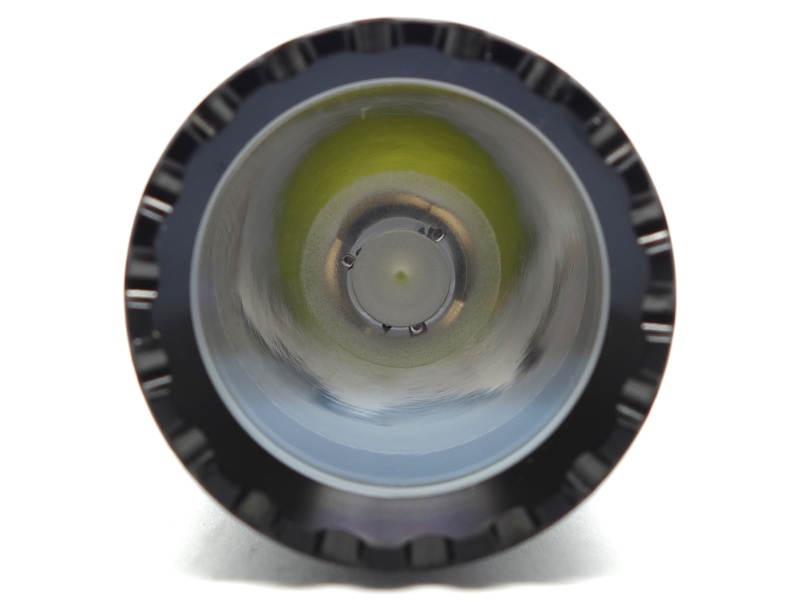
The Acebeam Defender P16 Gray comes with a Luminus SFT40 emitter and a TIR optic to produce a throwy beam with a tight hotspot.
I noticed that the light was flickering on the Low mode. Acebeam kindly sent a replacement head.
The bezel can be unscrewed from the head by using the tweezer handles. This will reveal a glass lens sitting on a shelf with rubber around it to help prevent water getting in. Behind the glass lens is the TIR optic and a large centering gasket.
The two screws appear to be for securing the driver rather than the MCPCB. They are too small to hold the MCPCB down and instead sit between holes in the MCPCB.
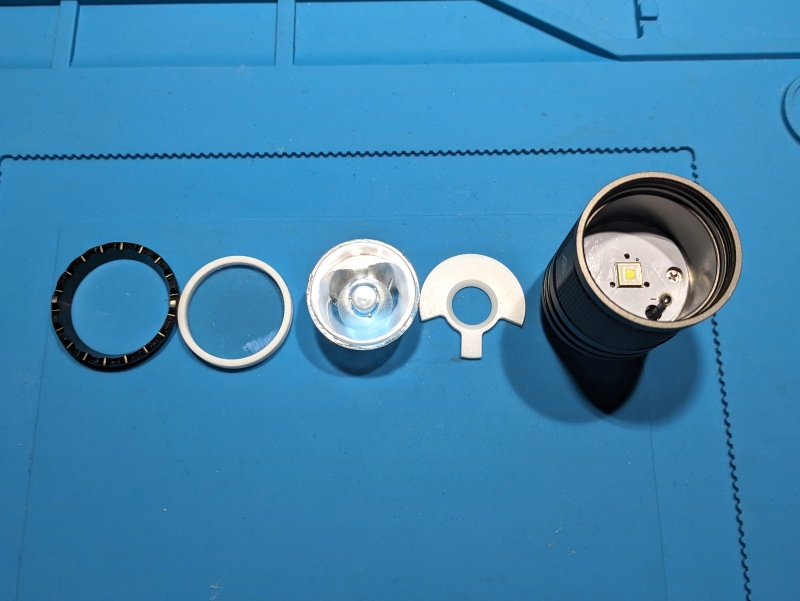
The shelf of the head is unanodised and smooth. This allows the MCPCB to more efficiently transfer heat away from the emitter.
There is some thermal paste. It would be nice if it were spread across the whole MCPCB.
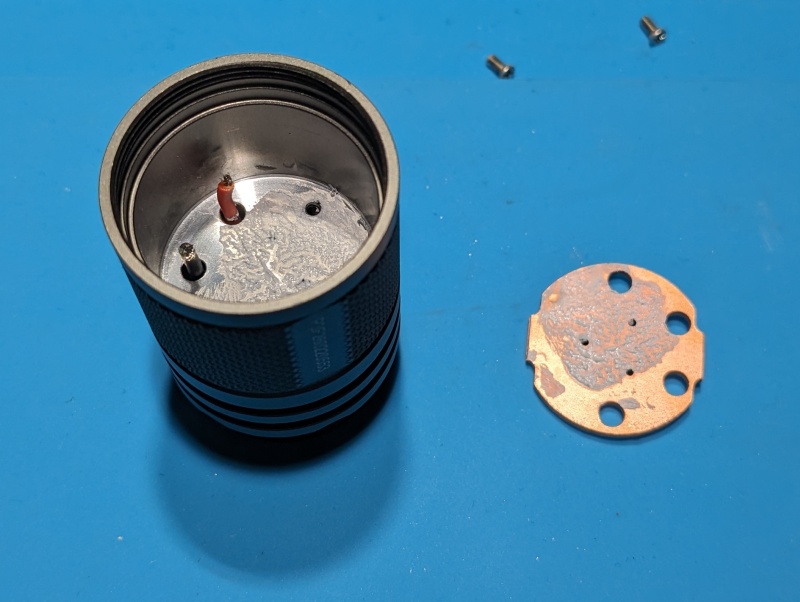
The MCPCB is about 1.5mm thick and it has a diameter of 25.65mm.
I was not able to pull the driver out non-destructively. I ended up ripping the springs off.
CCT, CRI, and duv#
I have taken Correlated Colour Temperature (CCT) and Colour Rendering Index (CRI, RA of R1-R8) measurements with the torch positioned one metre away from an Opple Light Master Pro III (G3) for Low, Med and High and two metres away for Turbo.
The CCT is around 6000K. The CRI is around 66.
The Delta u, v is positive (green) on Low and less green on higher modes.
The beam produced has a narrow hot spot that blends smoothly into a wide spill.
| Mode | CCT (K) | CRI (Ra) | x | y | Duv |
|---|---|---|---|---|---|
| Low | 5619 | 64.5 | 0.3295 | 0.3601 | 0.0107 |
| Med | 5787 | 65.7 | 0.3256 | 0.3519 | 0.0085 |
| High | 6033 | 67.2 | 0.3207 | 0.3416 | 0.0057 |
| Turbo | 6428 | 69.3 | 0.3142 | 0.3282 | 0.0020 |
Calculate Duv from CIE 1931 xy coordinates
Dimensions and size comparison#
Dimensions#
I took the following measurements using a vernier caliper.
| Measurement | Unit (mm) |
|---|---|
| Length | 130.6 |
| Head diameter | 31.8 |
| Tube diameter | 23.0 |
| Tail diameter | 26.25 |
Weight#
I took the following measurements using a digital scale.
| Weight | Unit (g) |
|---|---|
| Torch | 101.0 |
| Battery | 52.82 |
| Torch with battery | 153.82 |
Size comparison with its competition#
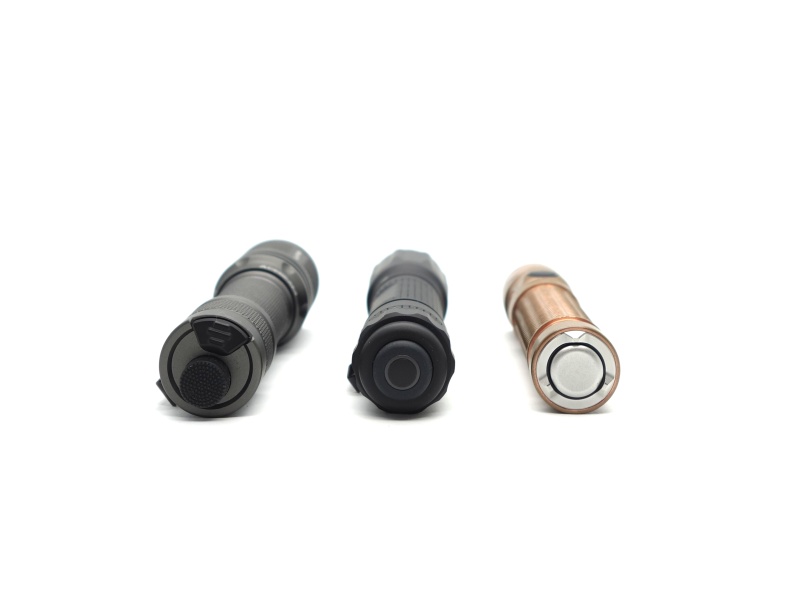
From left to right: Acebeam Defender P16 Gray, NEXTORCH TA30C, Olight Warrior Mini 2
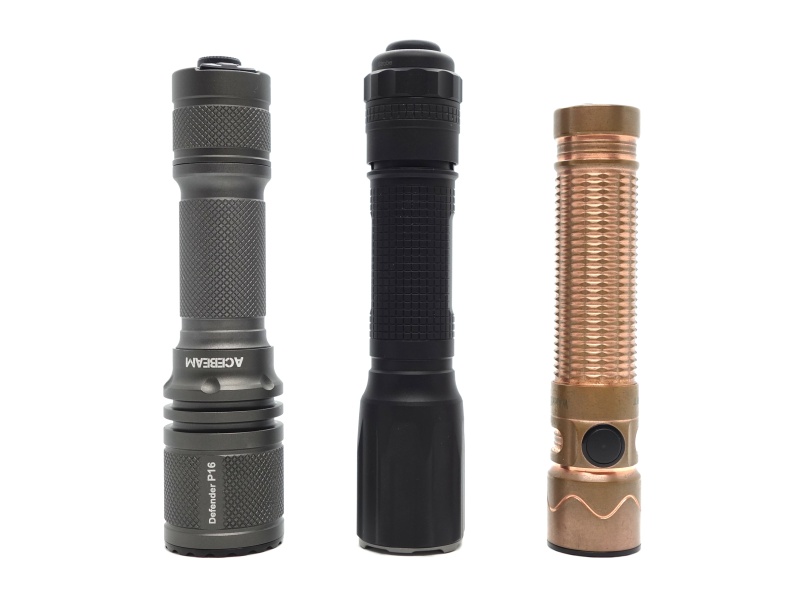
From left to right: Acebeam Defender P16 Gray, NEXTORCH TA30C, Olight Warrior Mini 2
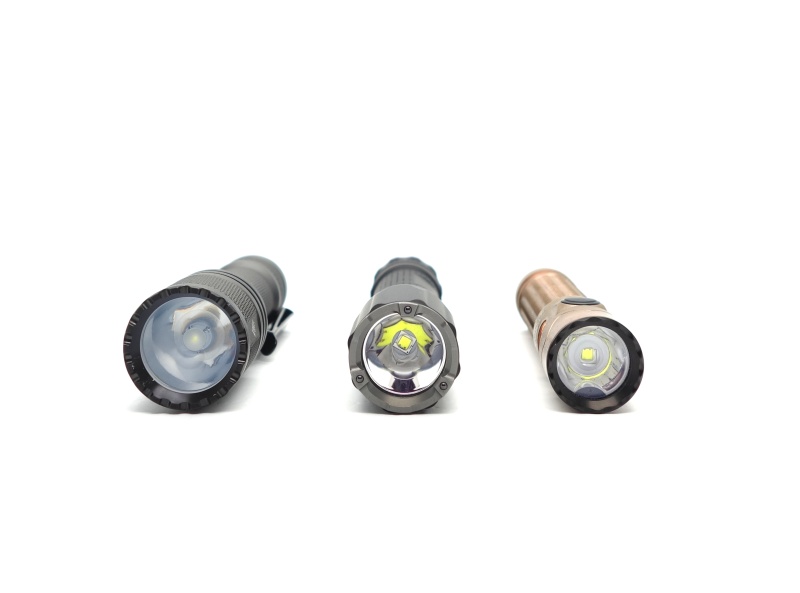
From left to right: Acebeam Defender P16 Gray, NEXTORCH TA30C, Olight Warrior Mini 2
User interface#
There are four main levels: Low, Med, High and Turbo.
Strobe is available in Tactical mode, and SOS is available in Daily mode.
You can switch between Tactical mode and Daily mode by performing the following from off:
Hold the Function Switch for > 3 seconds.
While still holding the Function Switch, click the Tactical Switch and then release both switches.
The light still start “breathing”.
Press the Function Switch and the light will either enter Strobe or SOS.
Press the Function Switch again to switch between Strobe or SOS.
Click the Tactical Switch to turn the light off while it is in Strobe to enter Tactical mode.
Click the Tactical Switch to turn the light off while it is in SOS to enter Daily mode.
When you press the Function Switch from off the light will either enter Strobe if it is in Tactical mode or Low if it is in Daily mode.
Tactical mode#
| State | Action | Result |
|---|---|---|
| Off | Half press the Tactical Switch | Momentary on (mode memory) |
| Off | Click the Tactical Switch | On (mode memory) |
| Off | Press and hold Function Switch for < 3 seconds | Momentary Strobe |
| Off | Press and hold Function Switch for > 3 seconds | Strobe |
| On | Press and hold Function Switch for > 3 seconds | Strobe |
| Strobe | Press and release Function Switch | Previous mode |
Daily mode#
| State | Action | Result |
|---|---|---|
| Off | Half press the Tactical Switch | Momentary on (mode memory) |
| Off | Click the Tactical Switch | On (mode memory) |
| Off | Press and hold Function Switch for < 3 seconds | Momentary Low |
| Off | Press and hold Function Switch for > 3 seconds | Low |
| On | Press and hold Function Switch for > 3 seconds | SOS |
| SOS | Press and release Function Switch | Previous mode |
Strobe#
Strobe has an alternating frequency.
Low voltage warning#
The light will step down between Turbo, High, Med and Low when the battery is under 20%.
The light flashed three times every minute or so when the battery was low.
Low voltage protection#
There is low voltage protection. The emitters turned off at 2.7V and the current dropped to 1 mA.
I tested low voltage protection by connecting the driver of the torch to a bench power supply and then by lowering the voltage from 4.2V to 0V.
PWM#
I did not notice any visible PWM (flickering) on the replacement head.
What I like about the UI#
- It is simple to use.
What could be improved#
- Direct access to Turbo from off would be nice.
Batteries and charging#
Battery#
The torch came with an Acebeam ARC18650H-310A 3100mAh battery inside it. I unscrewed the tailcap and removed the insulating film that was blocking the spring.
Charging#
Power supply: PinePower Desktop USB-C
USB Meter: AVHzY CT-3
Room temperature: 10 C
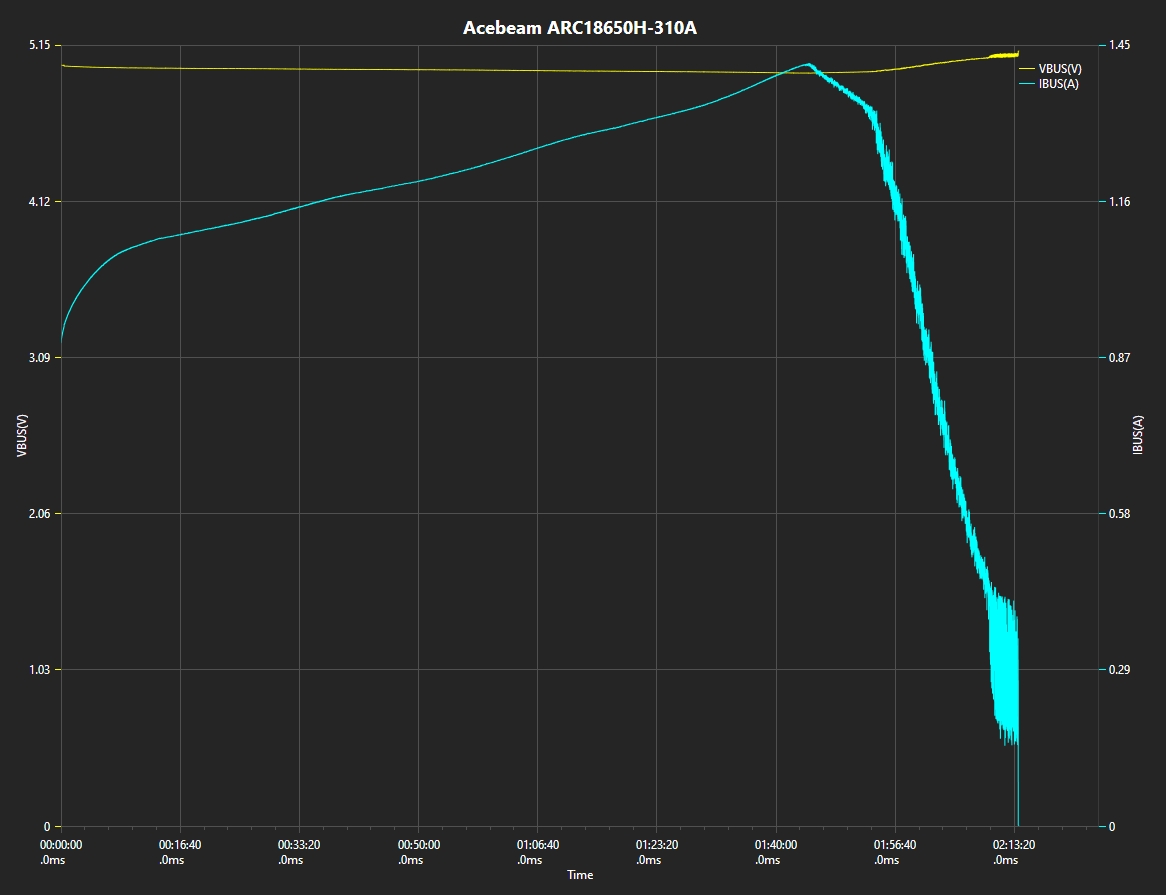
I charged the included battery from 2.75V to 4.16V using the battery’s USB-C port. It took about 2 hours 13 minutes to fully charge.
The charging rate started at around 5V 0.8A. It increased to 5V 1.4A before dropping off.
The indicator LED went red while charging and it went green when charging was complete.
Power supply compatibility#
I tried the following power supplies with the built-in USB-C charger:
| Power supply | USB Type | Protocol | Does it charge? |
|---|---|---|---|
| Apple 61W Power Adapter | USB-C | PD | Yes |
| Google Pixel Power Adapter | USB-C | PD | Yes |
| PinePower Desktop | USB-C | PD | Yes |
| PinePower Desktop | USB-A | QC | Yes |
| PinePower Desktop | USB-A | Yes |
USB-C to USB-C charging works.
Performance#
Specifications from the manual:
Tactical mode#
| FL1 STANDARD | Turbo | High | Med | Low | Strobe |
|---|---|---|---|---|---|
| Output (lumens) | 1,800 + 700 + 260 + 50 | 900 + 700 + 260 + 50 | 260 + 50 | 50 | 1800 + 700 |
| Runtime | 50s + 83min + 4min + 8min | 3min + 1h 45min + 4min + 8min | 5h + 8min | 22h | 3h 40min |
| Beam Distance (metres) | 484 | 321 | 184 | 105 | 484 |
| Beam Intensity (cd) | 58,564 | 25,760 | 8,464 | 2,756 | 58,564 |
Daily mode#
| FL1 STANDARD | Turbo | High | Med | Low | SOS |
|---|---|---|---|---|---|
| Output (lumens) | 1,800 + 700 + 260 + 50 | 900 + 700 + 260 + 50 | 260 + 50 | 50 | 1800 + 700 |
| Runtime | 50s + 83min + 4min + 8min | 3min + 1h 45min + 4min + 8min | 5h + 8min | 22h | 4h |
| Beam Distance (metres) | 484 | 321 | 184 | 105 | 484 |
| Beam Intensity (cd) | 58,564 | 25,760 | 8,464 | 2,756 | 58,564 |
Acebeam tested using an Acebeam 18650 3100mAh cell.
Lumen measurements#
Note: Lumen measurements may be off by 10% with my DIY lumen tube.
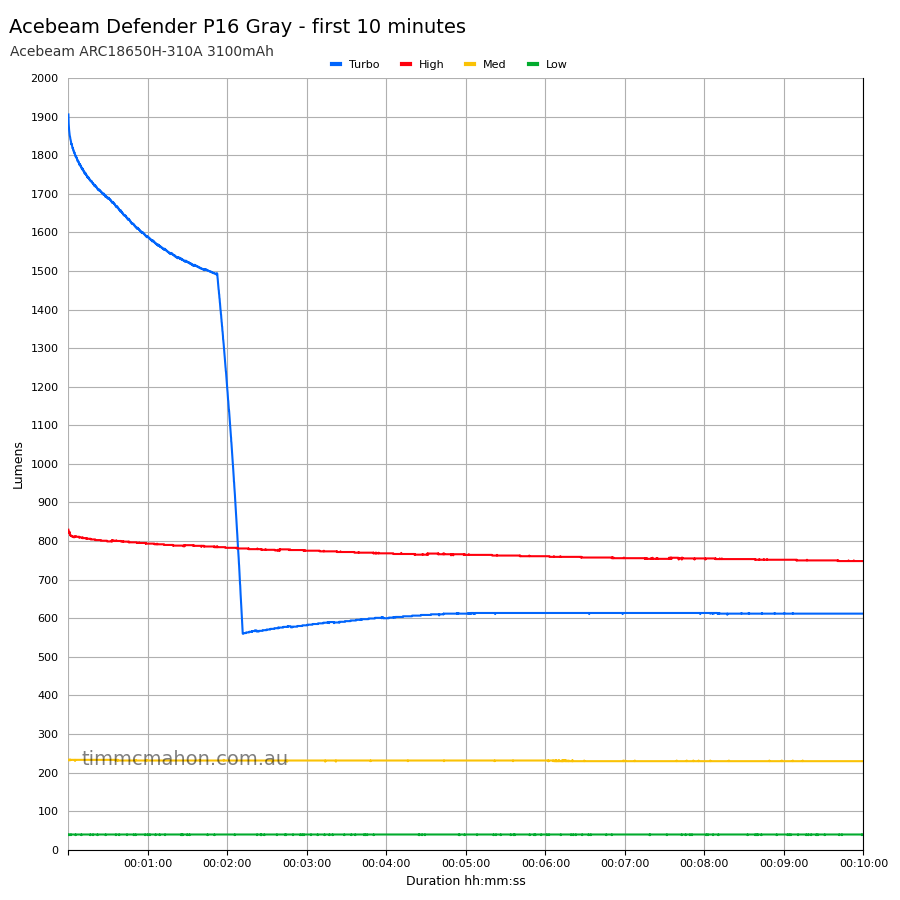
I used a bench power supply to measure the current at turn on for Low, Med and High. I could not get Turbo to activate while I had the head and tailcap attached to the bench power supply (it kept entering Strobe mode).
| Mode | Amps at start | Specs | Lumens @turn on | Lumens @30 sec | Lumens @10 min |
|---|---|---|---|---|---|
| Low | 0.09 A | 50 | 39 | 39 | 39 |
| Med | 0.52 A | 260 + 50 | 232 | 232 | 229 |
| High | 2.10 A | 900 + 700 + 260 + 50 | 829 | 799 | 748 |
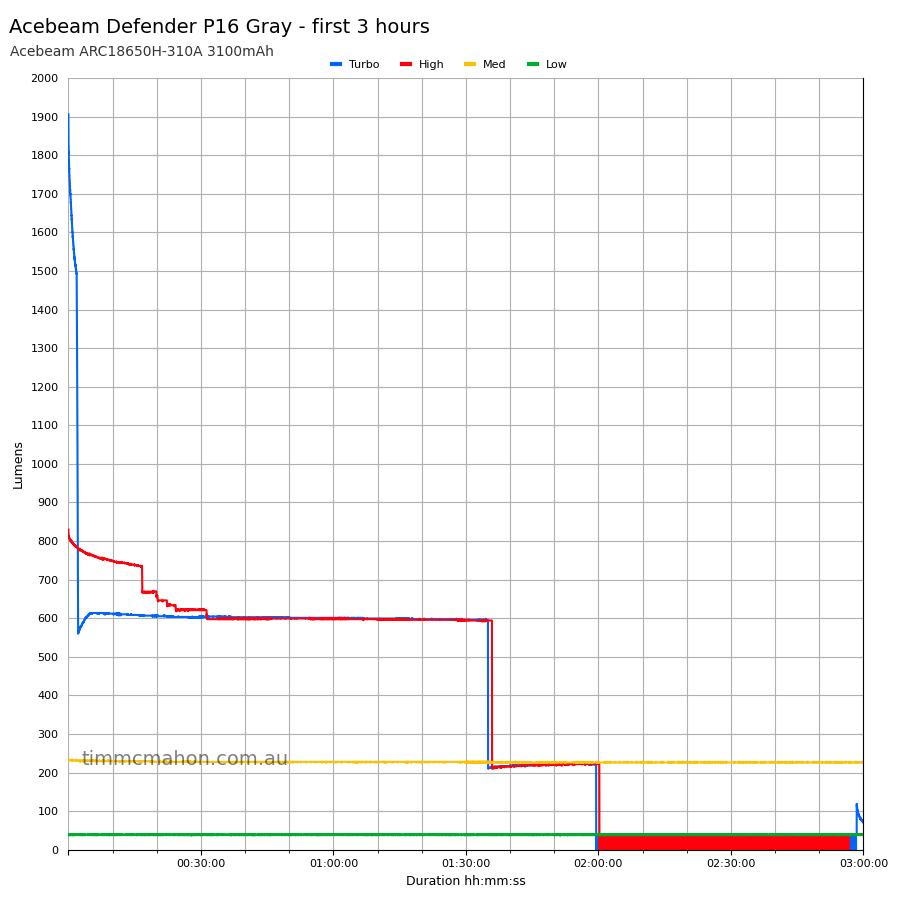
| Turbo | ? | 1,800 + 700 + 260 + 50 | 1,905 | 1,686 | 611 |
I measured 1,686 lm at 30 seconds for Turbo. This is lower than the expected 1,800 lm but it is within the margin of error for my DIY lumen tube.
Standby drain#
I have not measure the standby drain. There is a Function Switch that can turn the torch on so there may be some parasitic drain.
Runtime graphs#
I used my own DIY lumen tube with a TSL2591 sensor and forked bmengineer’s project RuTiTe to record runtimes.
The room temperature was approximately 10 C.
Runtime#
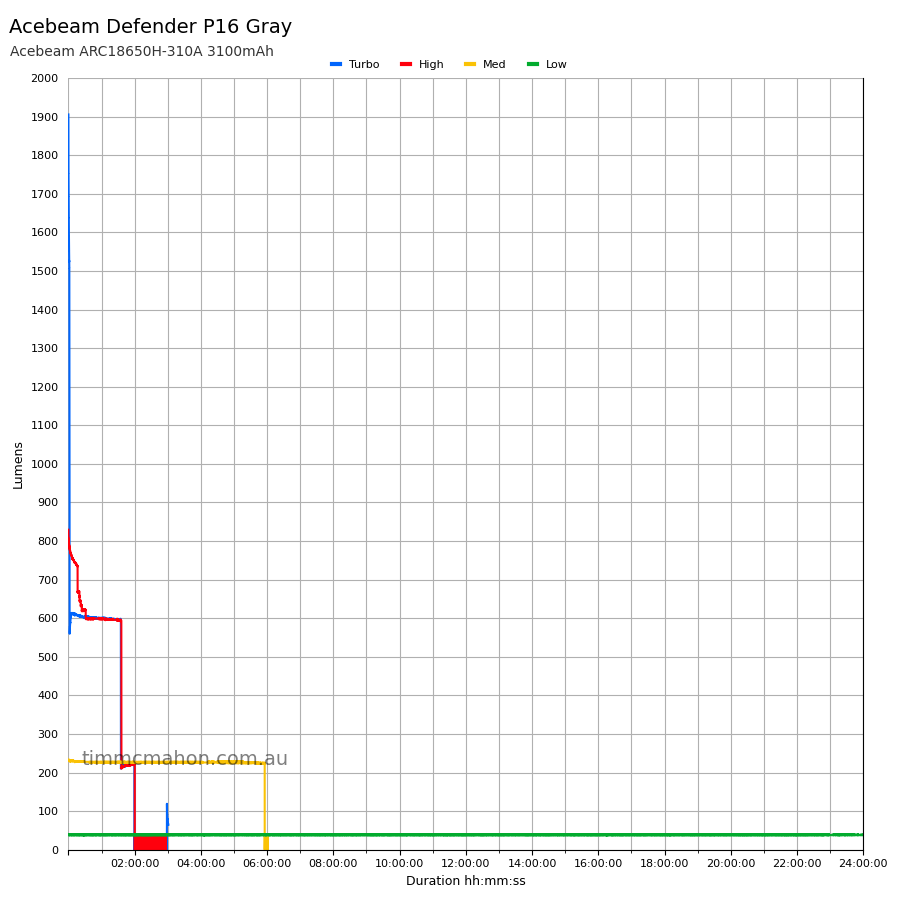
Here is a summary of the runtime results:
| Mode | User manual | Runtime result | Final voltage |
|---|---|---|---|
| Turbo | 50s + 83min + 4min + 8min | 3h+ | 2.60 |
| High | 3min + 1h 45min + 4min + 8min | 2h 56min 36s | 2.88 |
| Med | 5h + 8min | 6h+ | 2.86 |
| Low | 22h | 24h+ | 3.55 |
The runtime result is the time until my lumen tube no longer detects more than 1 lumen.
“+” indicates that the torch remained on after recording had stopped.
The light output and regulation are pretty good for an 18650 torch with a Luminus SFT40 emitter.
Throw#
I took lux measurements with a UNI-T UT383BT at 30 seconds. Low, Med, High and Turbo were measured at five metres.
| Mode | Specs (cd) | Specs (m) | Candela measured (cd) | Distance (m) |
|---|---|---|---|---|
| Low | 2,756 | 105 | 1,050 | 64 |
| Med | 8,464 | 184 | 8,475 | 184 |
| High | 25,760 | 321 | 29,950 | 346 |
| Turbo | 58,564 | 484 | 63,125 | 502 |
Low threw a bit less than expected. I tested it a few times and the results were around 64 metres.
The beam distance measured for Med, High and Turbo were better than expected.
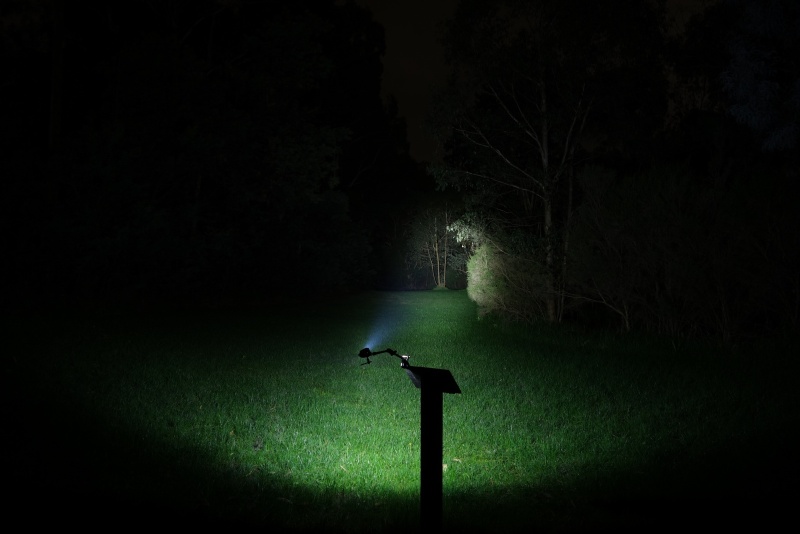
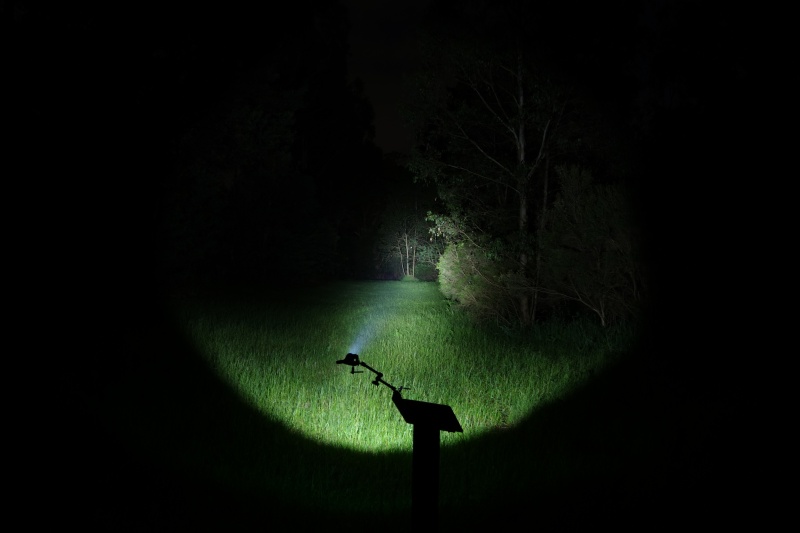
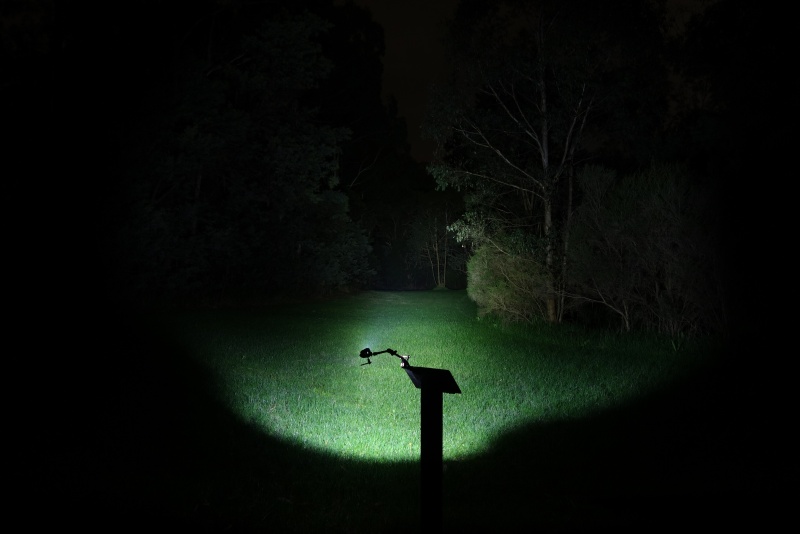
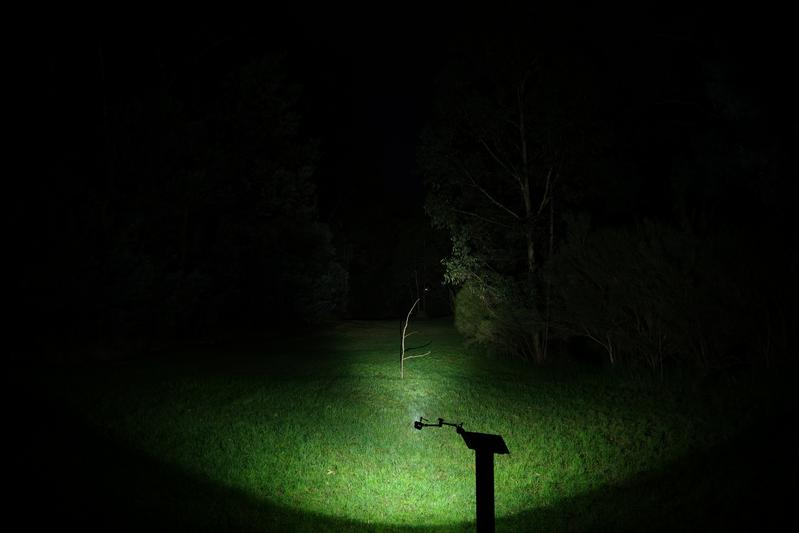
Beamshots#
I went to a local park and aimed the Acebeam Defender P16 Gray at a tree 70 metres away while using Turbo.
Beamshots were taken using a Sony RX100M2 using 3.2", f3.2, ISO 100, 5000K WB.
Acebeam Defender P16 Gray (Turbo)#
Amutorch XT35#
NEXTORCH TA30C (High)#
Olight Warrior Mini 2#
Conclusion#
The Acebeam Defender P16 Gray throws further compared to a few other tactical 18650 torches with Luminus emitters (i.e. Fenix PD35R, NEXTORCH TA30C).
I really like the beam. It has a nice throwy hot spot for identifying things further away and it has a useful spill.
The build quality is good. It is usually excellent but I have to mention that thermal paste is missing from a third of the MCPCB. It is good how the area directly behind the LED does have thermal paste. This will help with transferring the heat. But I have come to expect perfection from Acebeam! Maybe I am being too fussy?
The light output and runtimes are good for a torch with an 18650 battery.
I would honestly go up a size and consider an Acebeam P17 with a 21700 battery for longer runtimes if considering this style of torch as a weapon mounted light for hunting. It could be mounted using a scope clamp. The lack of built-in USB-C charging may be less of an issue for hunters. They may typically have a few spare batteries to swap in while out hunting for hours.
The P17 might also be better for tactical purposes. It has a strike bezel with three beads while the P16 does not have that feature.
The user interface is nice and simple but it lacks direct access to Turbo from off. You can access Strobe from off or turn it on in the last used mode (Low, Med, High or Turbo).
The P16 is lacking some tactical accessories. A tactical ring and a holster would be great additions for law enforcement and military use.
Law enforcement might prefer tactical torches with built-in charging. It is much more convenient to be able to put a torch on a charger at the end of a shift without needing to take out the battery.
The pocket clip on the P16 gets in the way of the tailcap when taking out the battery to charge it. And the threads become dirty and harder to turn after a few weeks. You need to maintain the threads properly by wiping them clean and applying some silicone grease.
What do you think of the Acebeam Defender P16? Is it better for hunting, tactical use or EDC?
Pros:#
- Comfortable size.
- Good build quality.
- Good light output and regulation.
- Throwy beam with a decent spill.
- Low voltage protection.
- Simple user interface.
Cons:#
- Pocket clip is difficult to remove.
- Threads become dirty after a few weeks.
- No direct access to Turbo from off.
- Not many accessories (tactical ring? holster?).
Price#
The Acebeam Defender P16 is AU$129.95 from liteshop.com.au at the time of writing.
The NEXTORCH TA30C is about AU$130 with a discount code. It has a Luminus SST40 so the beam distance is not as good but the reflector gives it a more defined spill compared to a TIR optic. It looks floodier and the hot spot is not as narrow. It also does not have USB-C charging built into the torch.
The Fenix PD35R at liteshop.com.au is AU$154.95. It also has a Luminus SFT40 LED but it can take an 18650 battery or two CR123A batteries. The runtimes are very similar. It has USB-C charging built into the torch.
Product page#
Promo code: SG9IP8YKT5PI
liteshop.com.au affiliate link
I may earn a commission if you use an affiliate link or a promo code. This will help fund future torch reviews and tutorials.