Manker F14 Dual Beam EDC Torch Review

Manker F14#
- Specifications
- Introduction
- Torch in use
- Build quality
- LED, bezel, lens, reflector and beam
- Size and comparison
- User interface
- Batteries and charging
- Performance
- Beamshots
- Conclusion
- Price
- Product page
Specifications#
| Brand/model | Manker F14 |
|---|---|
| LED | 1*Floodlight (Samsung LH351D 4000K 90CRI), 1*Spotlight (Osram KW CSLNM1.TG 6500K) |
| Maximum lumens | 1,250 lm |
| Maximum beam intensity | 17,956 cd |
| Maximum throw | 268 m |
| Battery | Built-in 1800mAh Li-ion |
| Onboard charging | Yes (USB-C) |
| Power bank | Yes (USB-C) |
| Material | Aluminium |
| Modes | 4 |
| Blinkies | Strobe |
| Reflector | 1*OP, 1*Smooth |
| Waterproof | IP65 |
| Review date | December 2023 |
Introduction#
The Manker F14 is a dual emitter EDC torch with a floodlight, a spotlight, built-in USB-C charging and a power bank feature.
It looks almost the same as the Manker ML03 but there are differences:
- The F14 has one floodlight and one spotlight instead of two floodlights.
- The user interface allows each light to be controlled separately or at the same time.
- The reflectors are longer and the beam distance has increased from 160 metres to 268 metres.
- The button cover is more durable now that it is made of metal.
Here is a video demonstrating the Manker F14:
Mankerlight make powerful pocket flooders and throwers. They are known for their EDC torches like the E02, E03H, E14, MC13, Striker and Timeback. They have also created large flooders like the MK38, and innovative torches like the Manker Crown.
I found out about Manker back in 2020 while on the hunt for a torch capabable of extremely low output levels.
I eventually pulled the trigger and purchased a Manker E02II with a Luminus SST20 4000K 90+ CRI emitter. Manker hit the jackpot with this emitter. It has a really nice rosy beam!
My first impression of Manker was good so I bought the Mankerlight BLF Limited EDC Muscle Combo with a Manker E14 III NW and a Manker MC13 Red (Osram KR CSLNM1.23).
The MC13 was my first impressive pocket thrower with a big TIR topic! I decided to buy a few more pocket throwers and do a comparison.
I have become a bit obsessed with EDC torches. It’s no secret that the ReyLight Pineapple Mini is one of my favourite EDC torches. So it was a nice surprise to see Rey collaborate with Manker to produce a titanium version of the Manker Striker.
The owner of Manker, Tony Chen, reached out recently to ask what Manker lights I have reviewed. To be honest, other than the comparison mentioned earlier, I haven’t done a full review of a Manker light. I have half a dozen Manker lights but I bought most of them before I started doing reviews.
Manker kindly sent this torch for review. I have not been paid for this review nor have I held back my opinions of this torch.
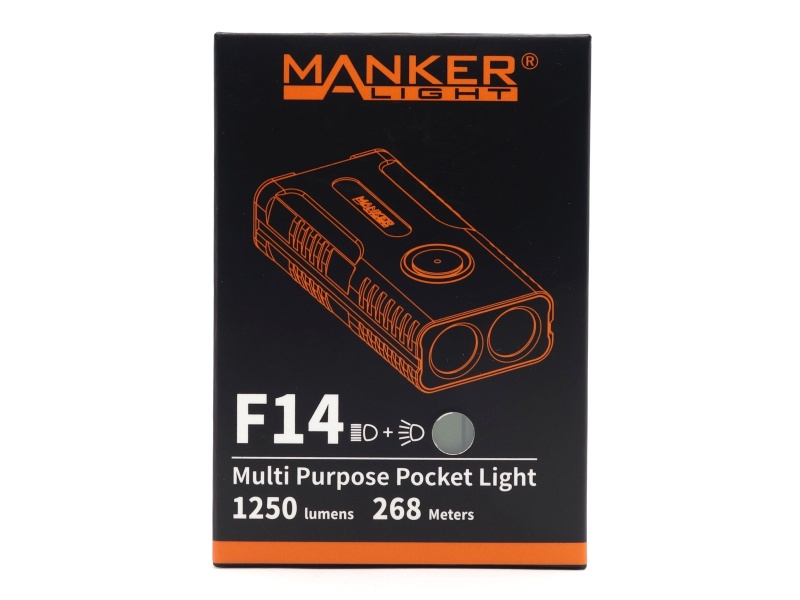
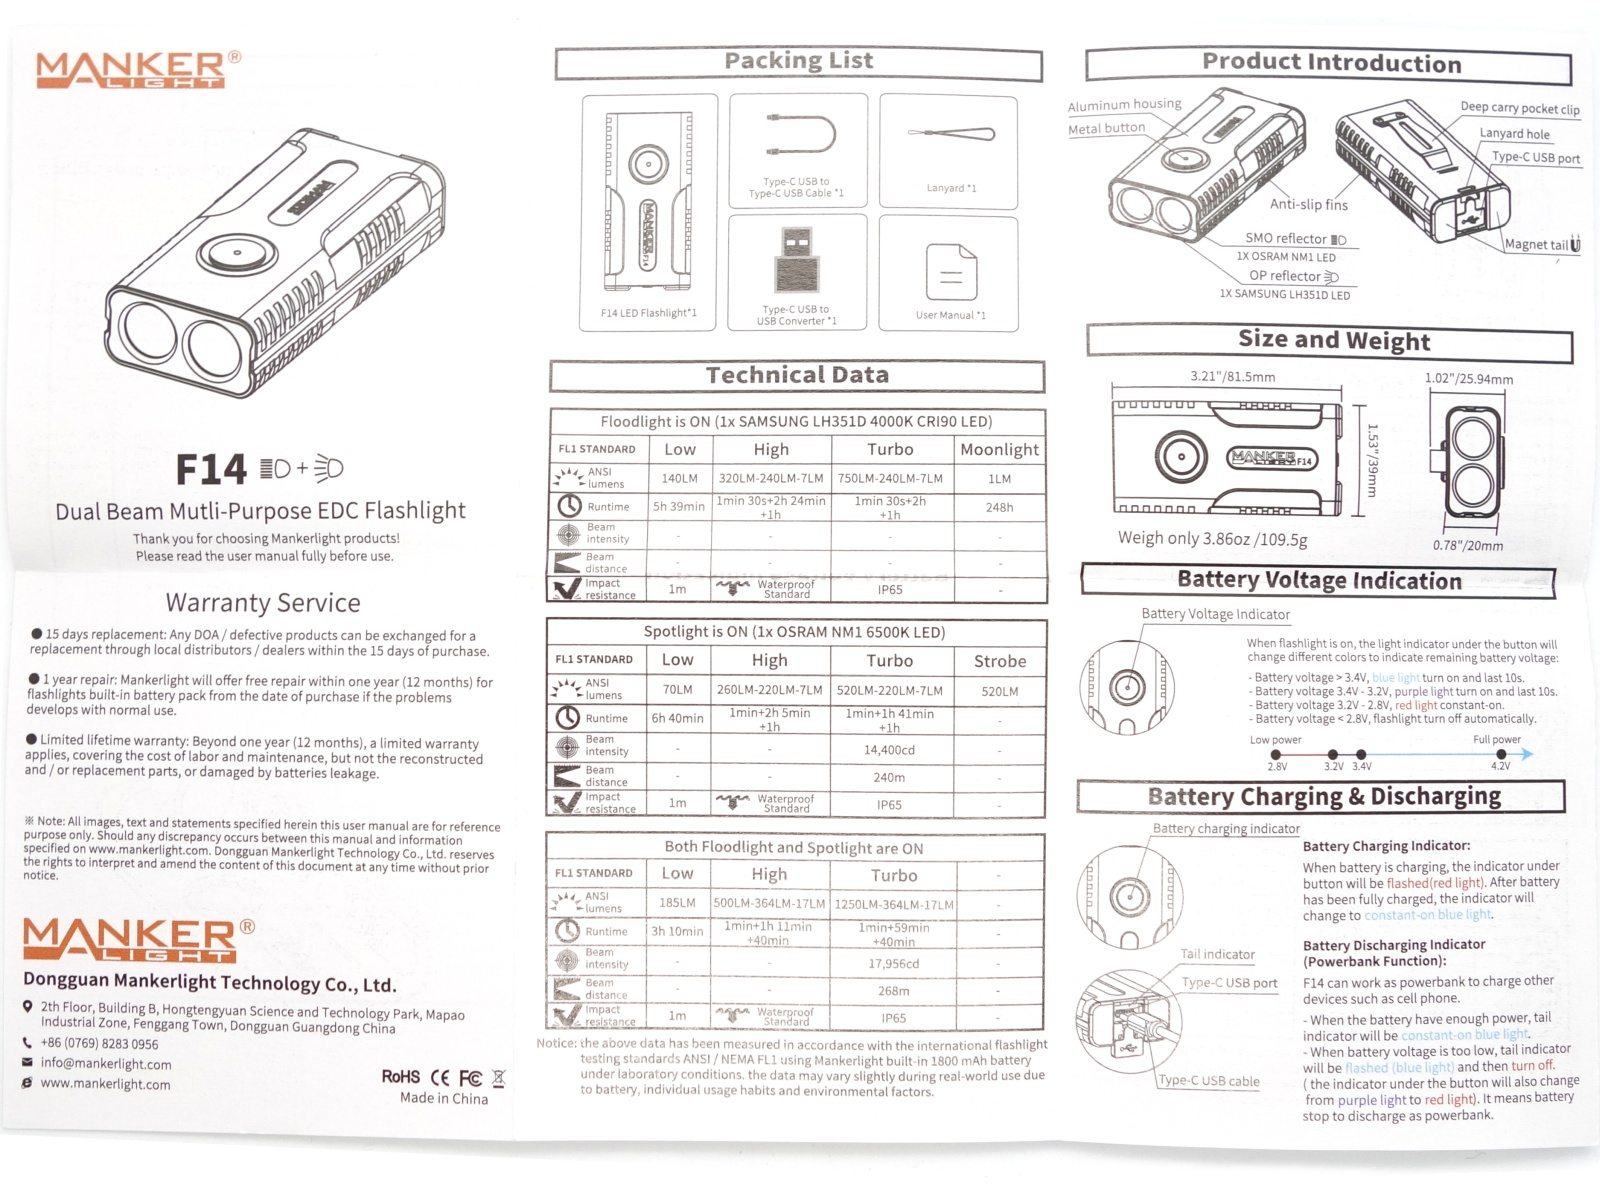
Packaging#
The Manker F14 comes in an orange and black box with an image of the torch on the front.
There is a little plastic window on the front of the box to see what the body colour of the torch is.
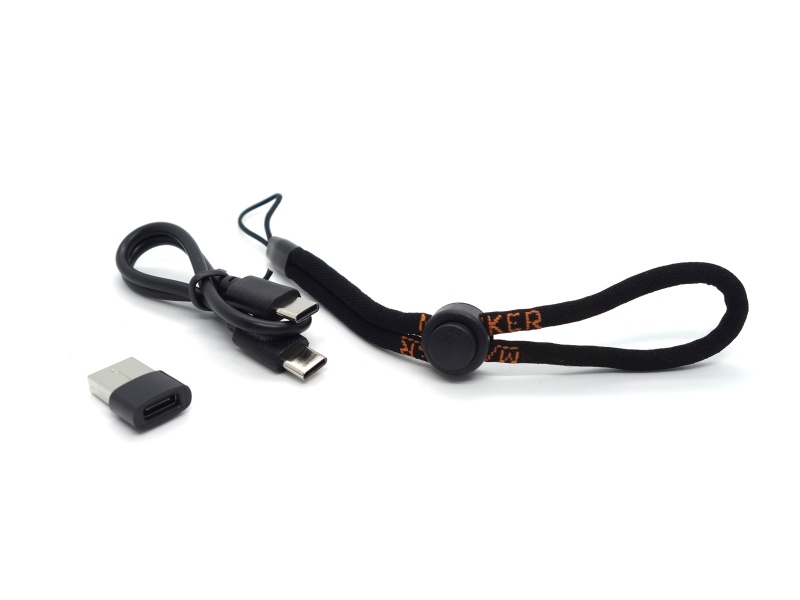
The following was included in the box:
- Manker F14.
- USB-C to USB-C cable.
- USB-A to USB-C adapter.
- Lanyard.
- User manual.
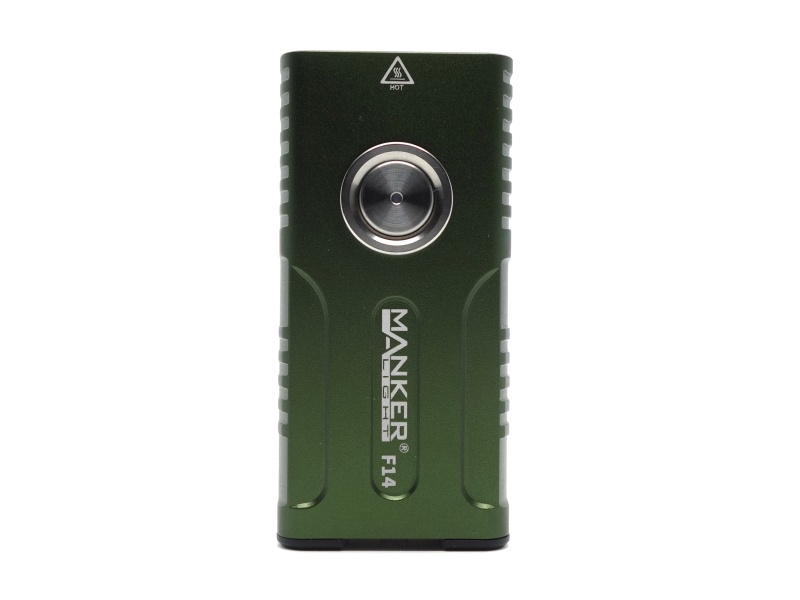
Torch in use#
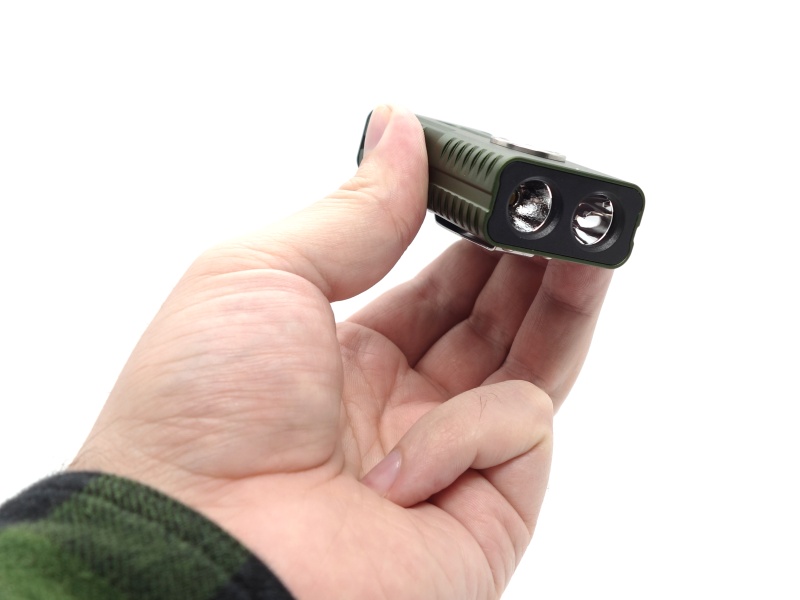
The Manker F14 fits comfortably in the coin pocket of my jeans. I sometimes forget that I am carrying it.
The torch feels relatively compact in my hand.
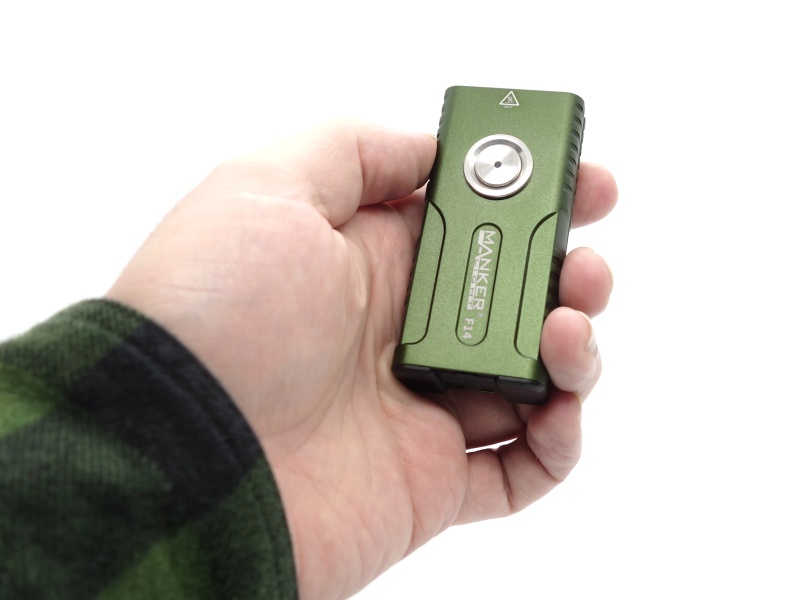
It has a decent metal button.
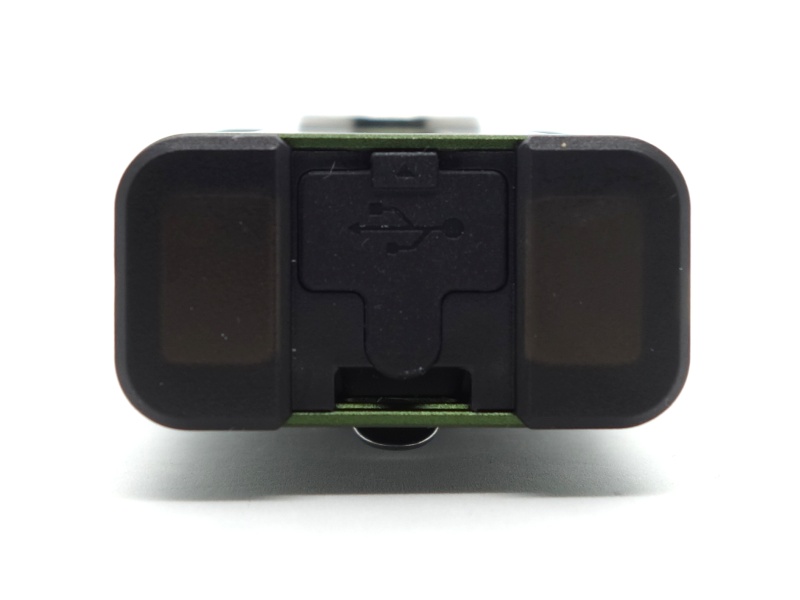
There are two strong magnets in the tail that allow the torch to be used as a work light.
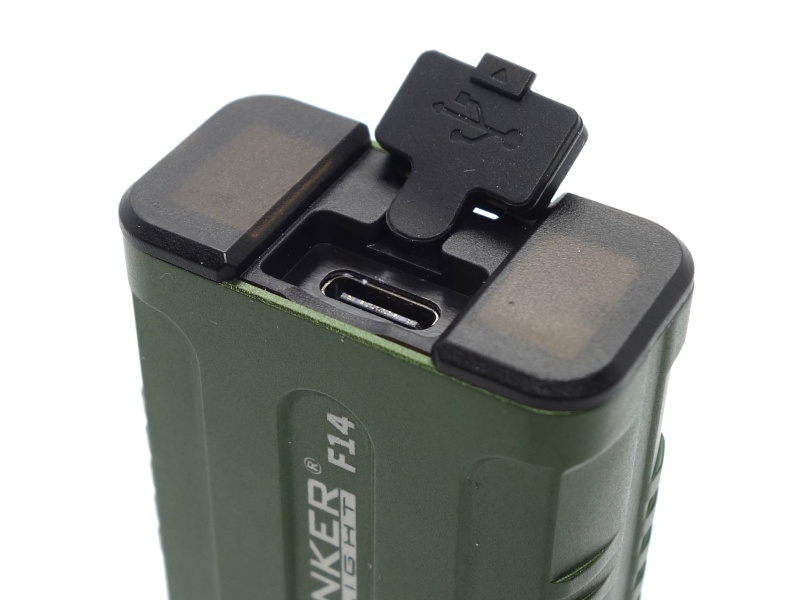
The USB-C port can be used to charge the torch or the torch can be used as a power bank.
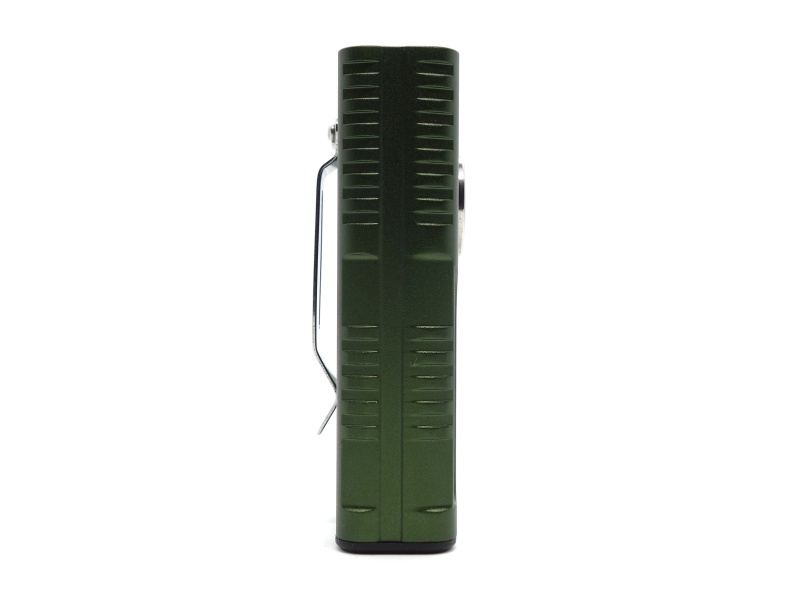
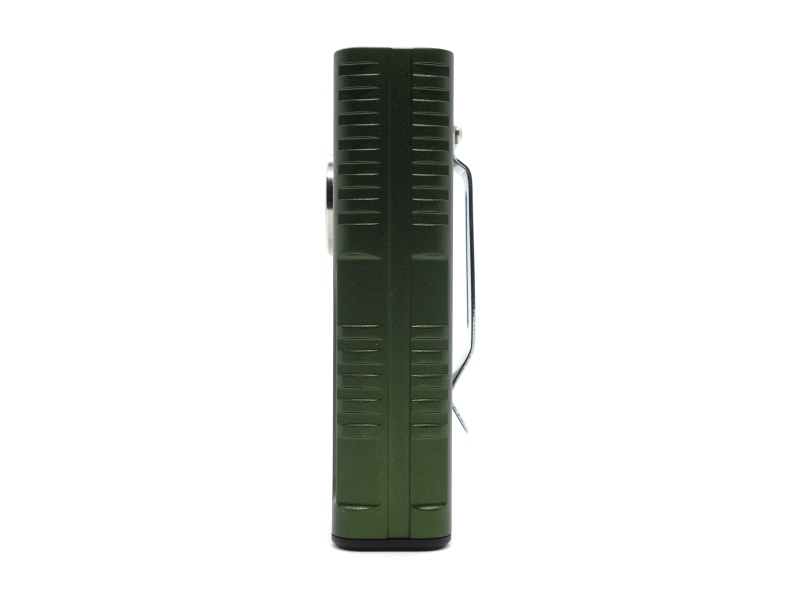
There is hole near the tail for a lanyard. The two feet with magnets in them stick out a bit so that the torch can tailstand without the lanyard or the USB port cover getting in the way.
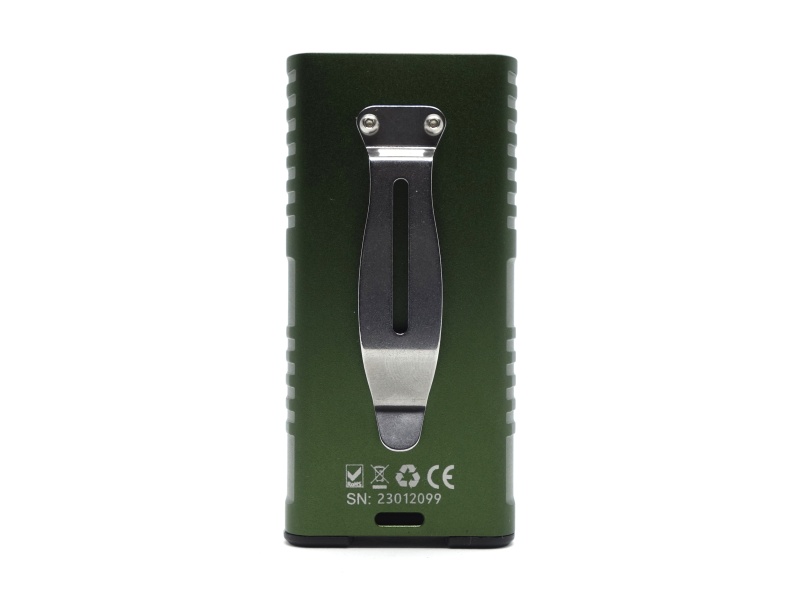
The pocket clip allows the torch to be carried with the head facing up. The torch could be attached to a hat.
Build quality#
The Manker F14 is made of aluminium and it has a green anodised finish. The bezel has a black anodised finish.
The torch is available in black and green for now. I look forward to seeing what colours and metals Manker uses in the future. I am a bit obsessed with orange for my EDC at the moment.
There is grip around the edges due to the design but the torch feels pretty smooth.
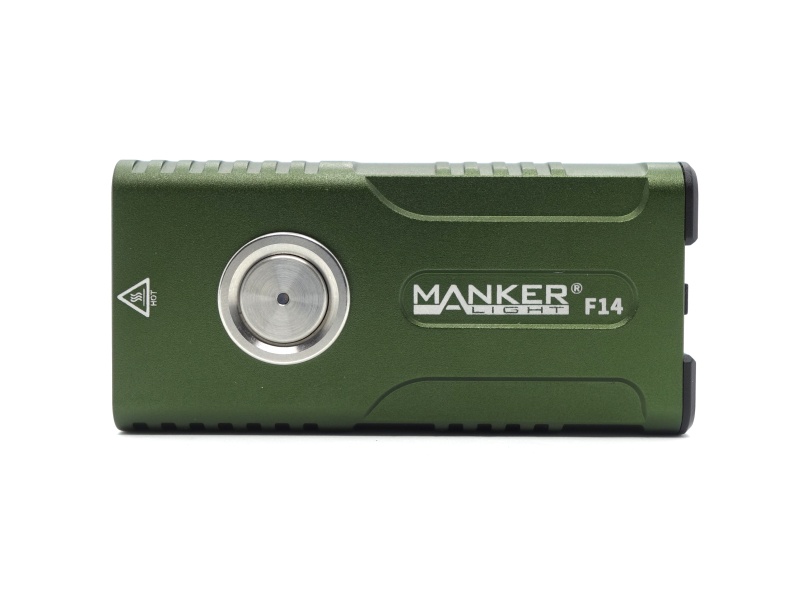
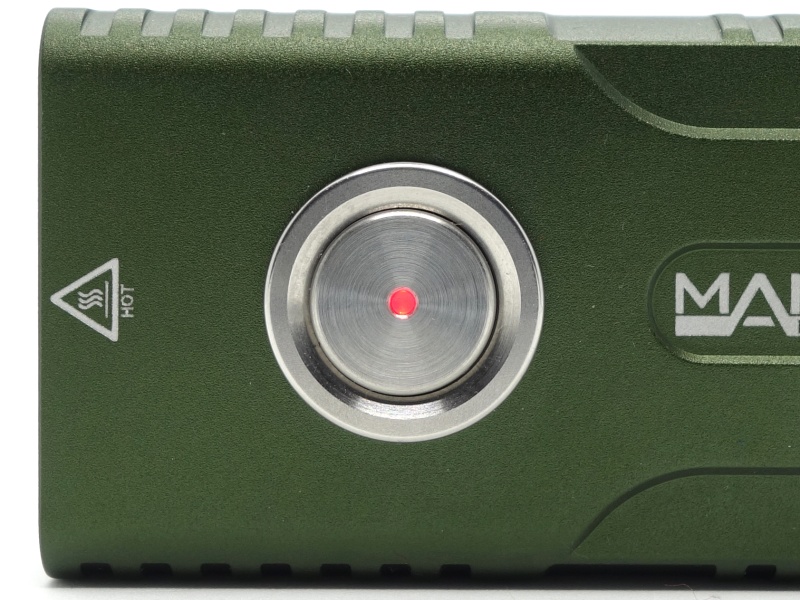
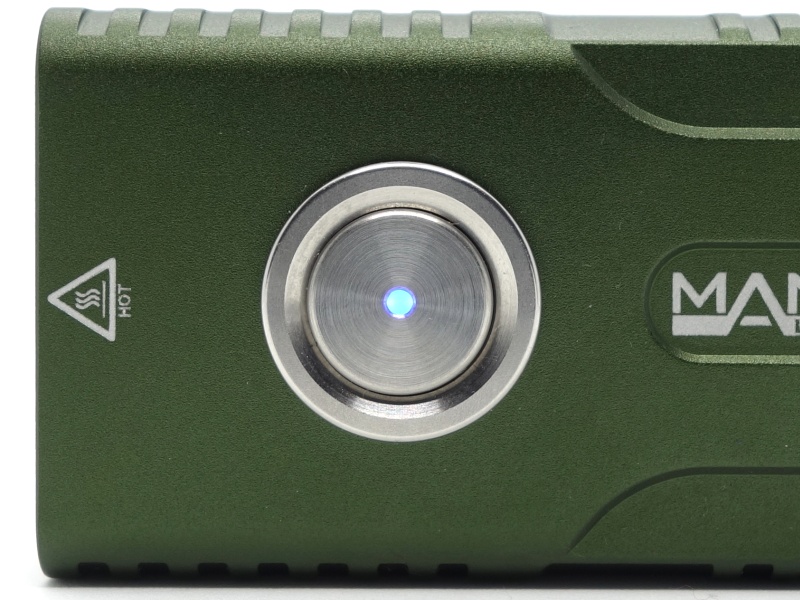
The metal button gives a satisfying click. It has an indicator light for the battery status and the charging status.
The USB-C port cover can be rotated out of the way to allow a USB-C plug to be easily inserted.
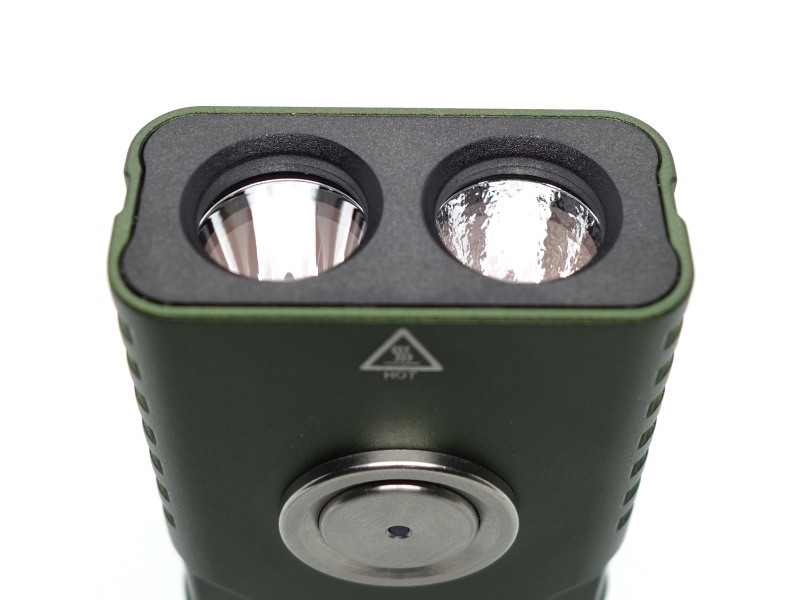
LED, bezel, lens, reflector and beam#
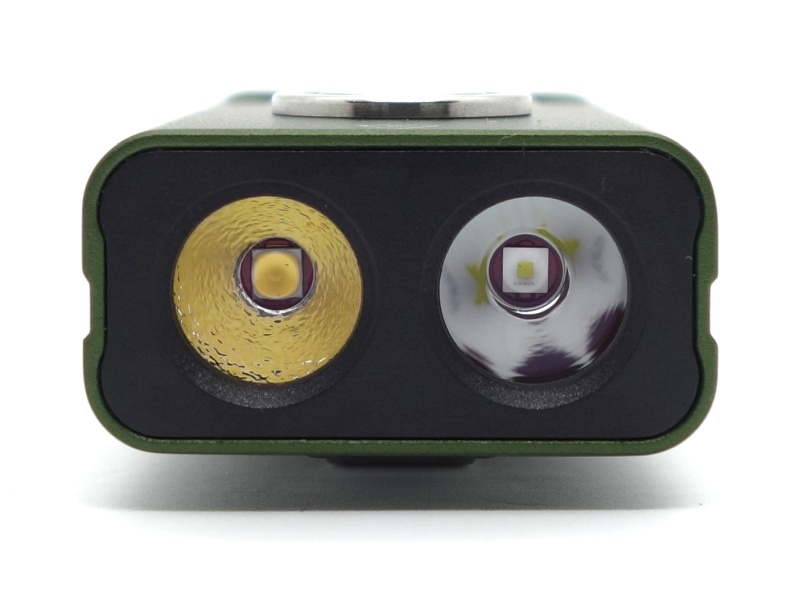
The Manker F14 has a floodlight emitter (Samsung LH351D 4000K 90 CRI) with an orange peel reflector, and a spotlight emitter (Osram NM1 6500K) with a smooth reflector.
There are glass lenses with an anti-reflective coating in front of each emitter.
I have not found a non-destructive way of opening up the Manker F14.
CCT, CRI, and duv#
I have taken Correlated Colour Temperature (CCT) and Colour Rendering Index (CRI, RA of R1-R8) measurements with the torch positioned two metres away from an Opple Light Master Pro III (G3).
The CCT of the floodlight is around 4000K and the CRI is around 92.
The Delta u, v is of the floodlight is slightly positive (green).
The floodlight produces a beam that has a wide hot spot, a slightly green corona, and a relatively narrow spill. There are some artifacts in the corona.
The CCT of the spotlight is around 6800K and the CRI is around 70.
The Delta u, v is of the spotlight is slightly negative (rosy). The hot spot looks like it may small hint of purple but the corona is definitely green.
The spotlight produces a beam that has a small intense hot spot, a green corona, and a wide purple spill. There are ring artifacts around the green corona.
| LED | Mode | CCT (K) | CRI (Ra) | x | y | Duv |
|---|---|---|---|---|---|---|
| Floodlight | Low | 4070 | 93.0 | 0.3801 | 0.3850 | 0.0039 |
| Floodlight | High | 4083 | 92.7 | 0.3792 | 0.3833 | 0.0034 |
| Floodlight | Turbo | 4062 | 92.1 | 0.3790 | 0.3790 | 0.0015 |
| Spotlight | Low | 6641 | 69.6 | 0.3115 | 0.3204 | -0.0007 |
| Spotlight | High | 6780 | 70.2 | 0.3097 | 0.3171 | -0.0015 |
| Spotlight | Turbo | 6916 | 70.8 | 0.3081 | 0.3141 | -0.0022 |
Calculate Duv from CIE 1931 xy coordinates
Dimensions and size comparison#
Dimensions#
I took the following measurements using a digital caliper.
| Measurement | Unit (mm) |
|---|---|
| Length | 81.48 |
| Width | 38.98 |
| Height | 20.07 |
| Height with clip | 24.68 |
| Button diameter | 12.19 |
Weight#
I took the following measurements using a digital scale.
| Weight | Unit (g) |
|---|---|
| Torch | 113.44 |
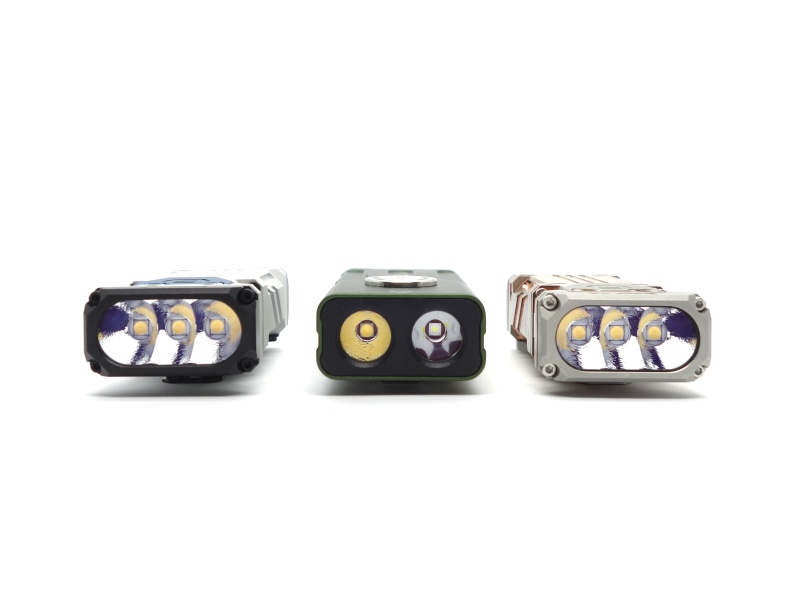
Size comparison with its competition#
From left to right: Wuben X2 White, Manker F14, Wuben X2 Copper
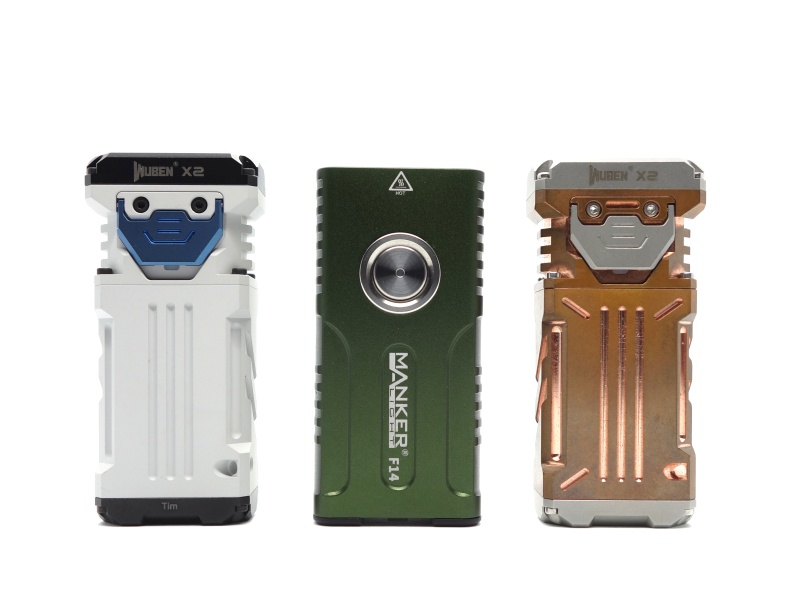
From left to right: Wuben X2 White, Manker F14, Wuben X2 Copper
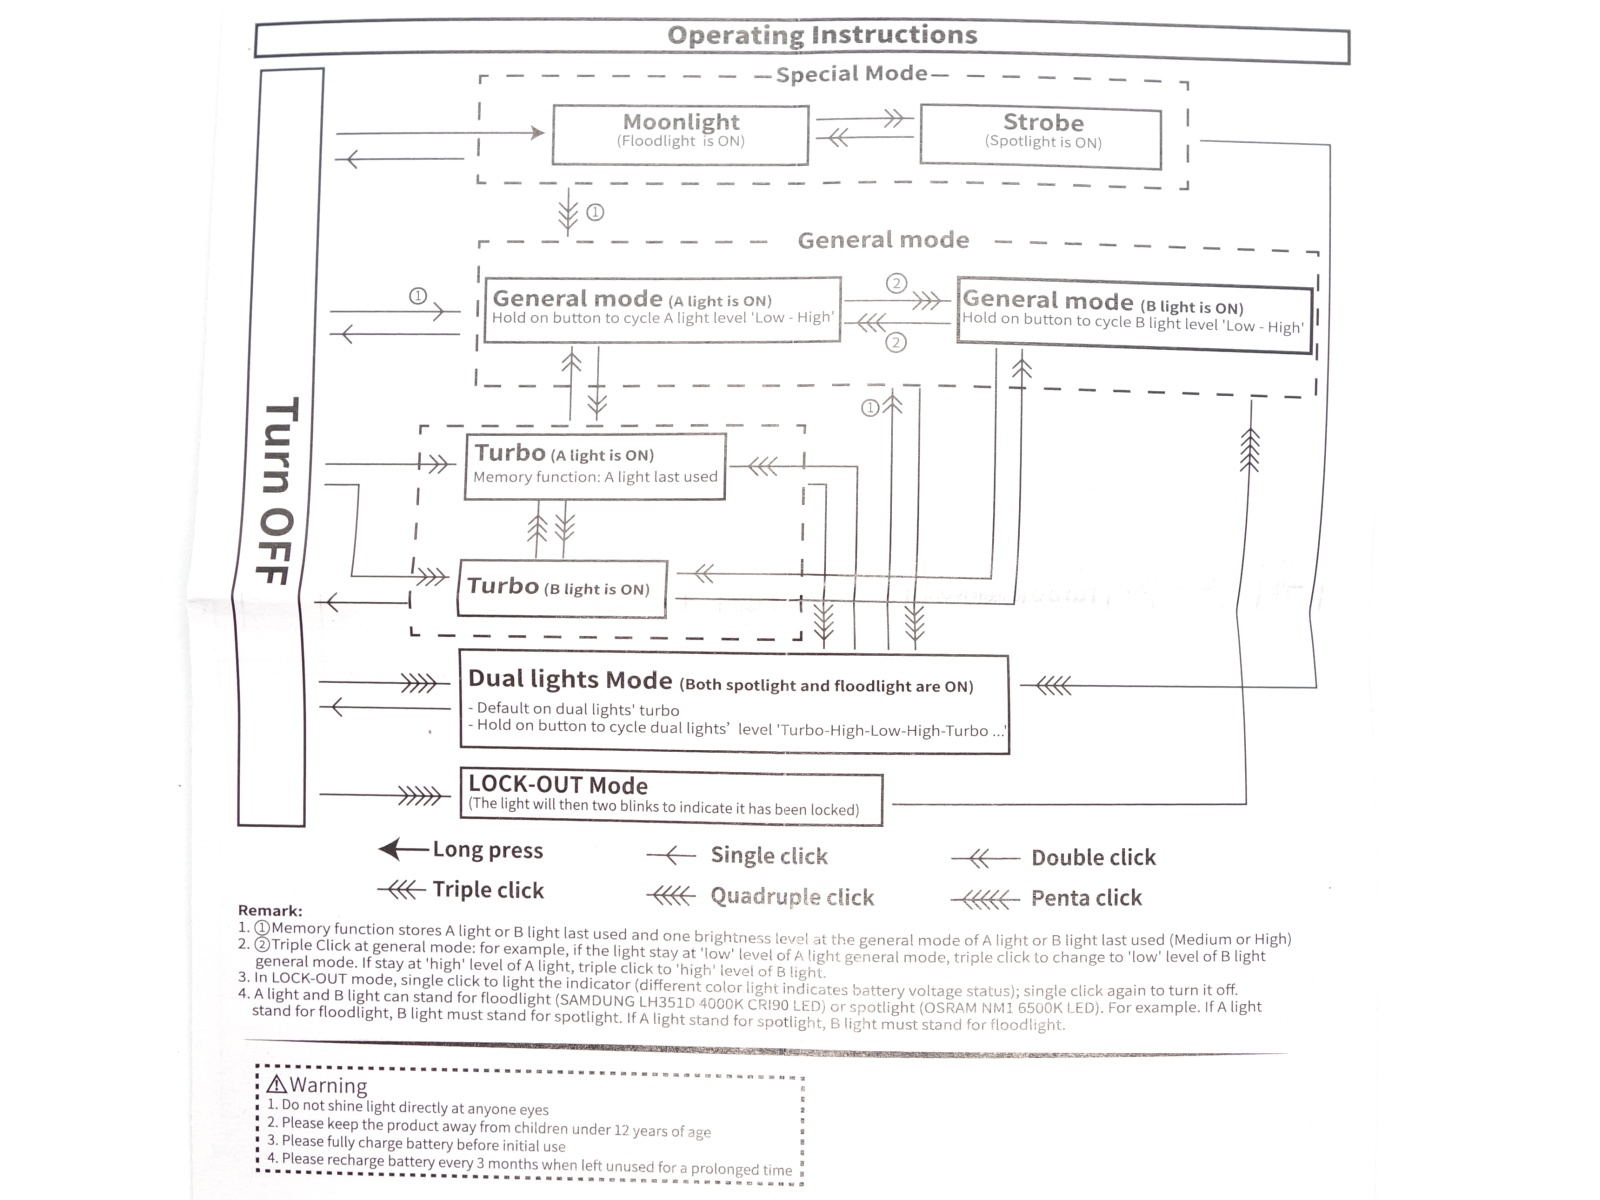
User interface#
The F14 has an electronic side switch to control the torch.
Two emitters can be controlled individually or at the same time. For example: The Floodlight could be on High while the Spotlight is off. The Spotlight could be on High while the Floodlight is off. Both emitters could be on High.
| Mode | State | Action | Result |
|---|---|---|---|
| Off | Press and hold | Floodlight Moonlight | |
| Off | Click | General (Memory) | |
| Off | Two clicks | Turbo (Floodlight or Spotlight) | |
| Off | Three clicks | Turbo (Toggle between Floodlight and Spotlight) | |
| Off | Four clicks | Dual lights (Turbo) | |
| Off | Five clicks | Lock | |
| Locked | Off | Five clicks | Unlock and go to General |
| On | Click | Off | |
| Special | Floodlight Moonlight | Two clicks | Spotlight Strobe |
| Special | Floodlight Moonlight | Three clicks | General (Memory) |
| Special | Spotlight Strobe | Two clicks | Floodlight Moonlight |
| Special | Any | Four clicks | Dual lights (Turbo) |
| General | Any | Press and hold | Cycle (Low, High) |
| General | Any | Two clicks | Turbo |
| General | Any | Three clicks | Toggle between Floodlight and Spotlight |
| General | Any | Four clicks | Dual lights (Turbo) |
| Turbo | Turbo | Hold | General (High) |
| Turbo | Turbo | Three clicks | Toggle between Floodlight and Spotlight |
| Turbo | Turbo | Two clicks | General (Memory) |
| Dual lights | Any | Press and hold | Cycle (Turbo, High, Low, High, Turbo) |
| Dual lights | Any | Two clicks | General (Memory) |
| Dual lights | Any | Three clicks | Turbo |
Mode memory#
There is mode memory for the General Mode. Low or High will be memorised.
There is no mode memory for the Dual lights mode. It defaults to Turbo.
Strobe#
Strobe appears to have a constant frequency. The lumen output is similar to Turbo.
I noticed a clicking sound while using Strobe.
Battery voltage indicator#
A light in the button will display a particular colour when the torch is on to indicate the battery level.
| Battery voltage | Button light indicator | Duration |
|---|---|---|
| > 3.4V | Blue light | 10 seconds |
| 3.2V - 3.4V | Purple light | 10 seconds |
| 2.8V - 3.2V | Red light | Constantly on |
| <2.8V | Torch turns off |
PWM#
I did not notice any visible PWM (flickering).
What I like about the UI#
- Shortcut to Moonlight from off.
- There is a lock-out mode.
- There is a shortcut to Turbo from off.
- Triple clicking in the General Mode will switch between lights while staying at the same output level (e.g. High).
What could be improved#
A momentary Moonlight while the torch is locked would be nice.
A shortcut from off to the Floodlight or the Spotlight would be nice. There is no shortcut to turn on a specific light (except Moonlight). Clicking once will go to the General Mode but it could be the Spotlight or the Floodlight. I have to remember what light I was using.
A shortcut to Strobe from off would be nice. It is a bit odd to access Strobe by holding the button from off and then by double clicking.
The ability to cycle up (Low, High, Turbo) would be nice. The torch cycles down (Turbo, High, Low) when it is in Turbo mode and I hold the button.
It would be nice if the Dual lights mode behaved in the same way as the General Mode. There is no mode memory for Dual lights. It defaults to Turbo. I think that the Dual lights mode should be added to the General Mode group as third cycle group. Four clicks could be used for the lock-out mode. And some other combination could be used to cycle between Floodlight, Spotlight and Dual lights.
Batteries and charging#
Battery#
The Manker F14 has a built-in 1800mAh Li-ion battery.
Charging#
Power supply: PinePower Desktop USB-C PD
USB Meter: AVHzY CT-3 (recommended by LiquidRetro)
Room temperature: 19 C
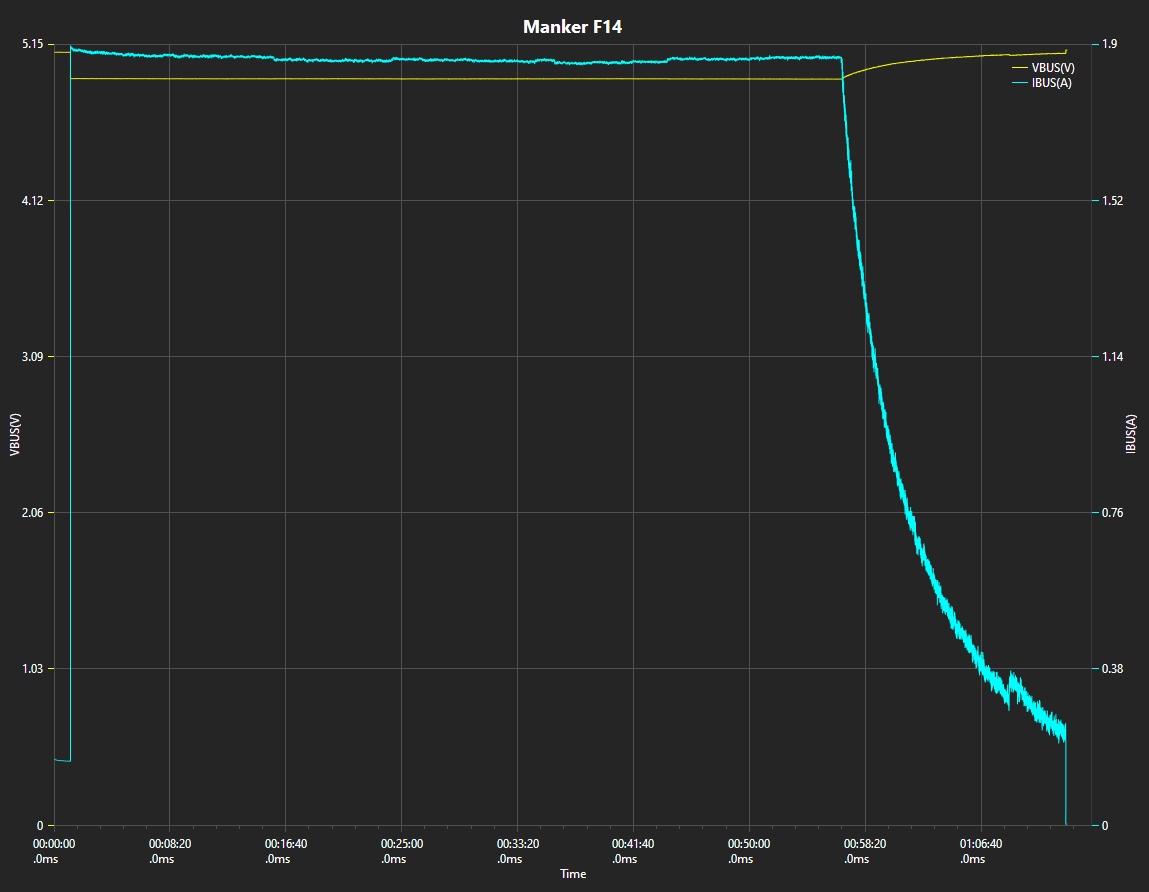
I charged the Manker F14 using the USB-C port. Charging completed after 1 hours 14 minutes. The charging rate was approximately 5V 1.9A. I noticed the charging rate reach 5V 3A while using a QC3 power supply.
Charging status indicator#
The charging status indicator flashes red while charging and it becomes a constant blue charging is complete.
Power supply compatibility#
I tried the following power supplies with the built-in USB-C charger:
| Power supply | USB Type | Protocol | Does it charge? |
|---|---|---|---|
| Apple 61W Power Adapter | USB-C | PD | Yes |
| Google Pixel Power Adapter | USB-C | PD | Yes |
| PinePower Desktop | USB-C | PD | Yes |
| PinePower Desktop | USB-A | QC | Yes |
| PinePower Desktop | USB-A | Yes |
USB-C to USB-C charging works.
Power bank#
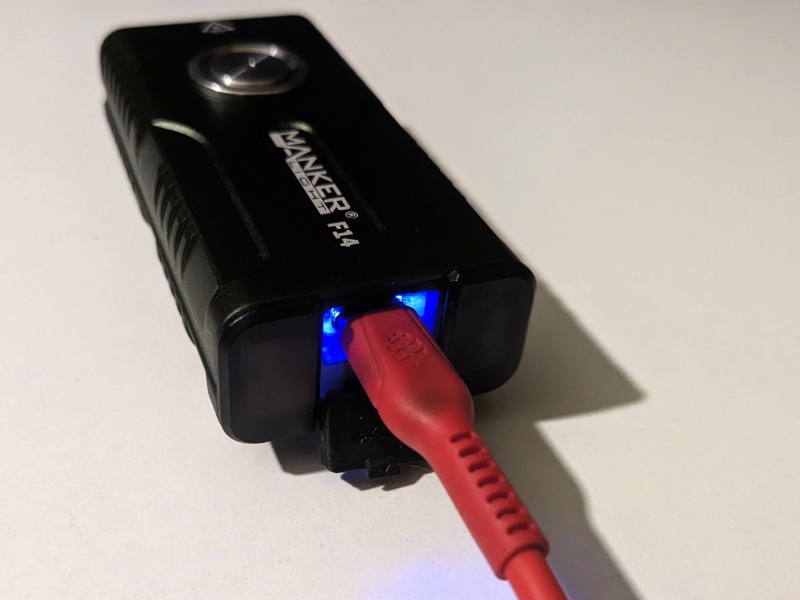
I was able to use the Manker F14 to charge my phone. The charging rate was approximately 5V 1.8A.
There is a indicator light near the USB-C port that turns on when the power bank is in use.
| Battery voltage | Tail light indicator | Button light indicator |
|---|---|---|
| Voltage is ok | Blue light | |
| Low voltage | Blue light flashing | Red light |
The torch will stop acting as a power bank when the voltage is too low.
Performance#
Specifications from the user manual:
Floodlight
| FL1 STANDARD | Low | High | Turbo | Moonlight |
|---|---|---|---|---|
| Output (lumens) | 140 | 320 + 240 + 7 | 750 + 240 + 7 | 1 |
| Runtime | 5h 39min | 1min 30s + 2h 24min + 1h | 1min 30s + 2h + 1h | 248h |
| Beam Distance (metres) | ||||
| Beam Intensity (cd) |
Spotlight
| FL1 STANDARD | Low | High | Turbo | Strobe |
|---|---|---|---|---|
| Output (lumens) | 70 | 260 + 220 + 7 | 520 + 220 + 7 | 520 |
| Runtime | 6h 40min | 1min + 2h 5min + 1h | 1min + 1h 41min + 1h | |
| Beam Distance (metres) | 240 | |||
| Beam Intensity (cd) | 14,400 |
Both
| FL1 STANDARD | Low | High | Turbo |
|---|---|---|---|
| Output (lumens) | 185 | 500 + 364 + 17 | 1,250 + 364 + 17 |
| Runtime | 3h 10min | 1min + 1h 11min + 40min | 1min + 59min + 40min |
| Beam Distance (metres) | 268 | ||
| Beam Intensity (cd) | 17,956 |
Manker performed tests using the built-in 1800mAh battery.
Lumen measurements#
| LED | Mode | Specs | Lumens @turn on | Lumens @30 sec | Lumens @10 min |
|---|---|---|---|---|---|
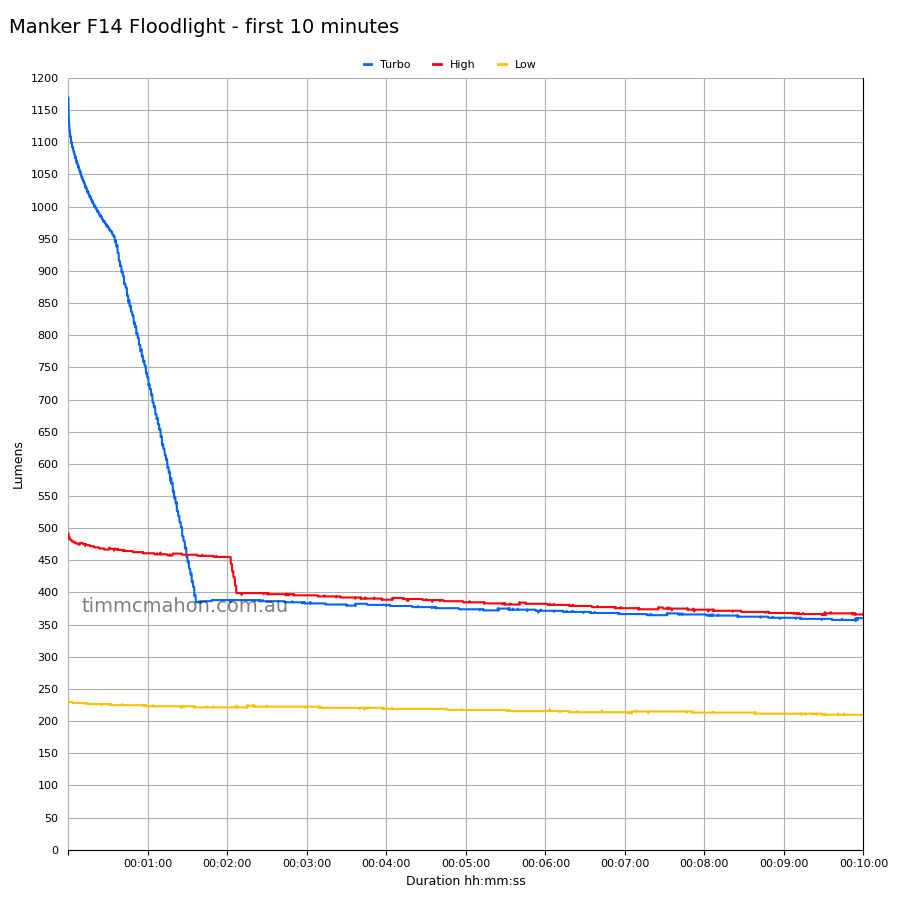
| Floodlight | Low | 140 | 230 | 226 | 209 |
| Floodlight | High | 320 + 240 | 491 | 466 | 367 |
| Floodlight | Turbo | 750 + 240 | 1,169 | 968 | 360 |
| Spotlight | Low | 70 | 82 | 81 | 76 |
| Spotlight | High | 260 + 220 | 313 | 300 | 233 |
| Spotlight | Turbo | 520 + 220 | 455 | 409 | 233 |
| Both | Low | 185 | 271 | 269 | 251 |
| Both | High | 500 + 364 | 669 | 637 | 443 |
| Both | Turbo | 1,250 + 364 | 1,516 | 1,212 | 440 |
There is a big jump in output from Moonlight to Low. I think the mode spacing would be better if Low was renamed to Medium and if an additional Low mode with 20 lumens is added.
Moonlight was too low for my DIY lumen tube to measure (less than one lumen).
Runtime graphs#
I used my own DIY lumen tube with a TSL2591 sensor and forked bmengineer’s project RuTiTe to record runtimes.
Note: Lumen measurements may be off by 10% with my DIY lumen tube.
The room temperature was approximately 19 C.
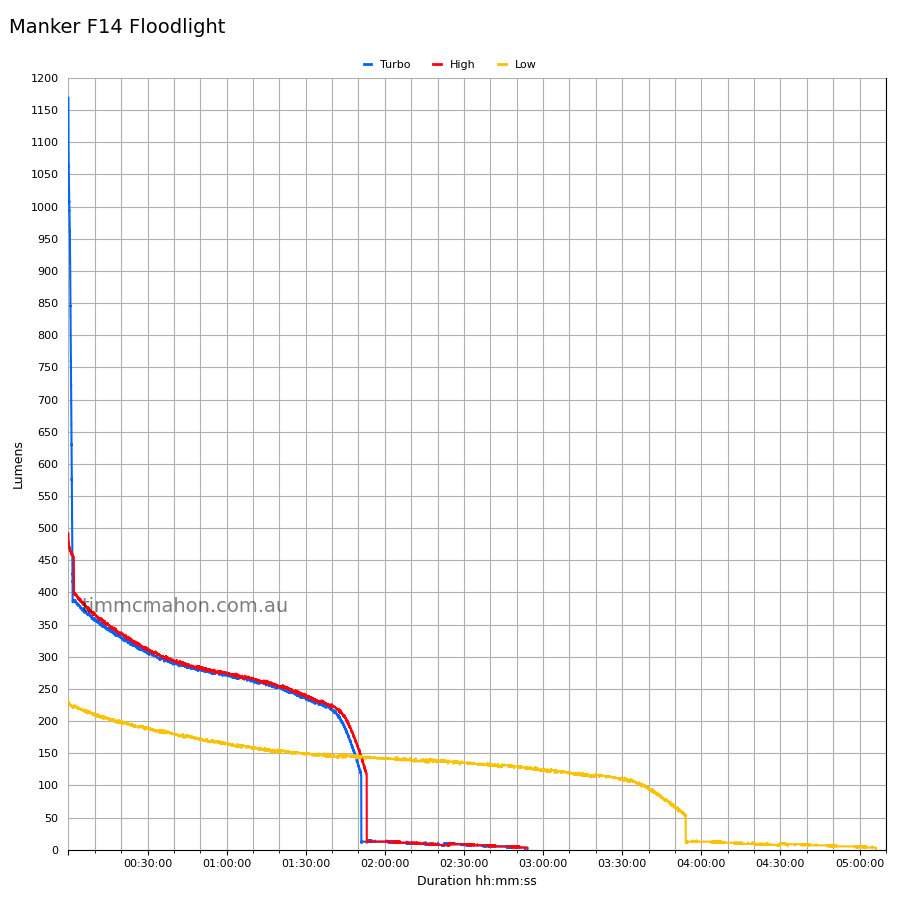
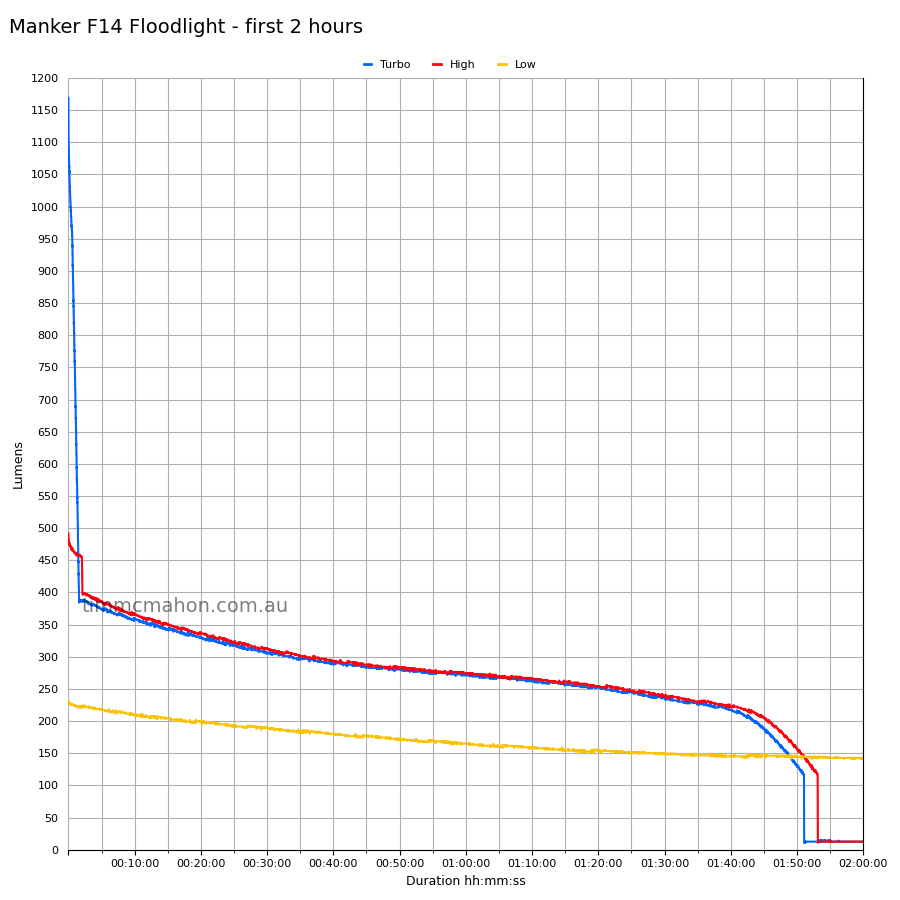
Floodlight#
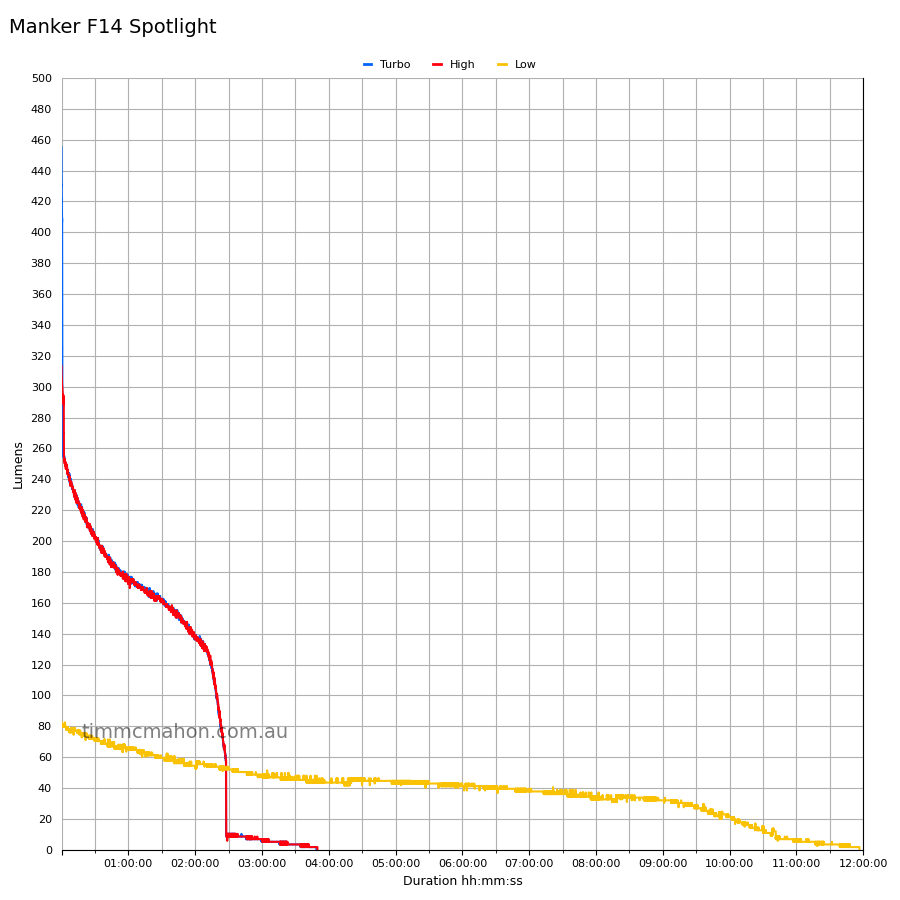
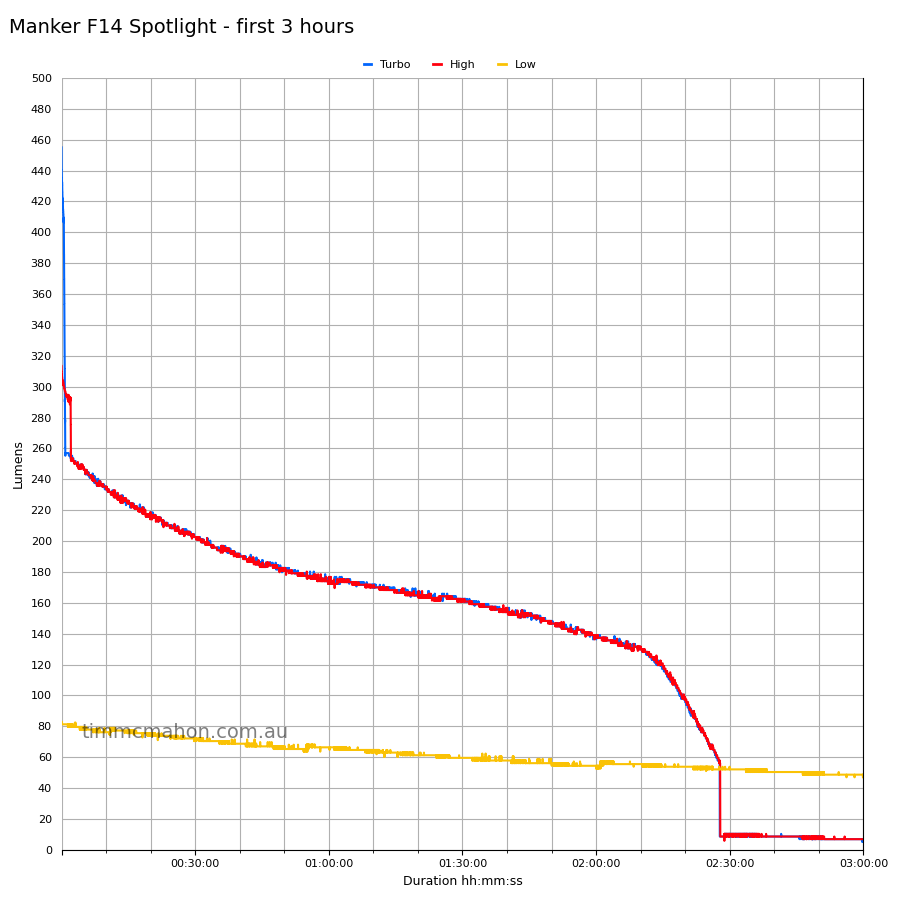
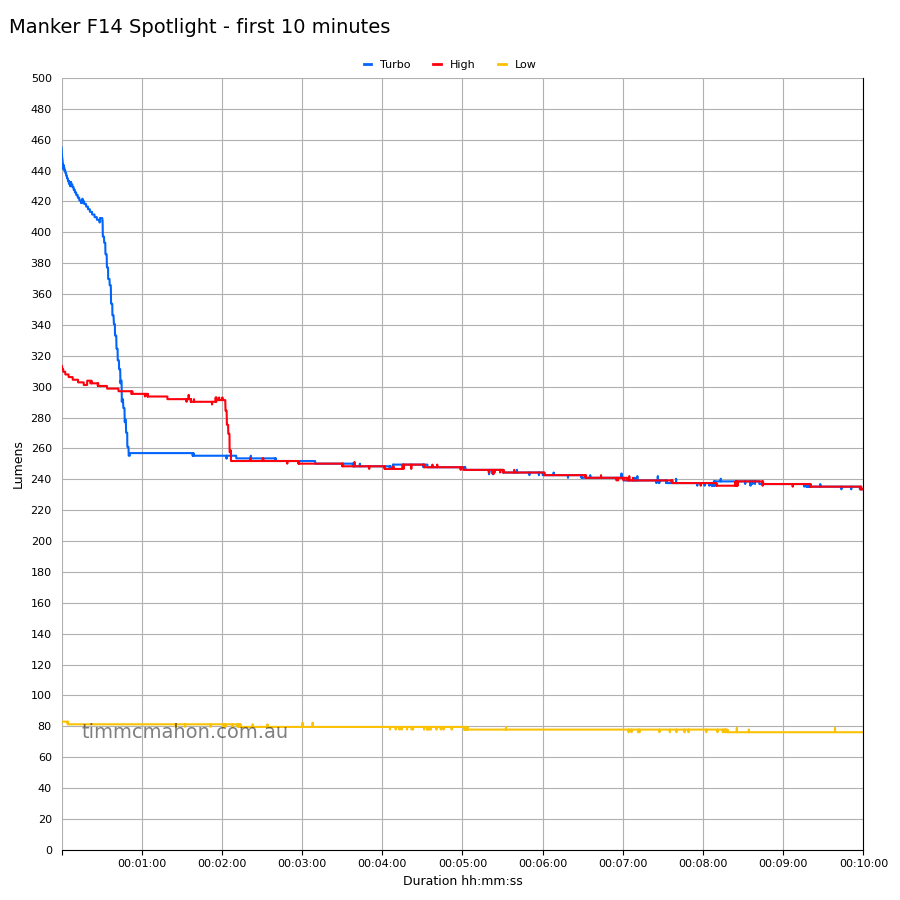
Spotlight#
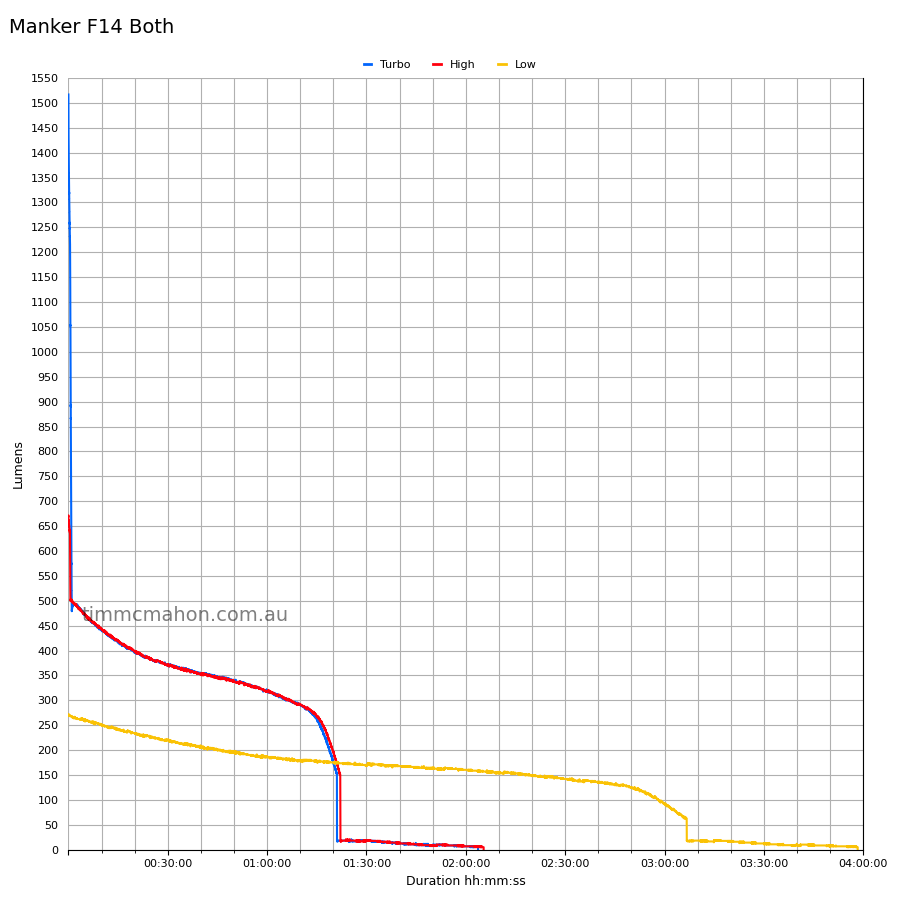
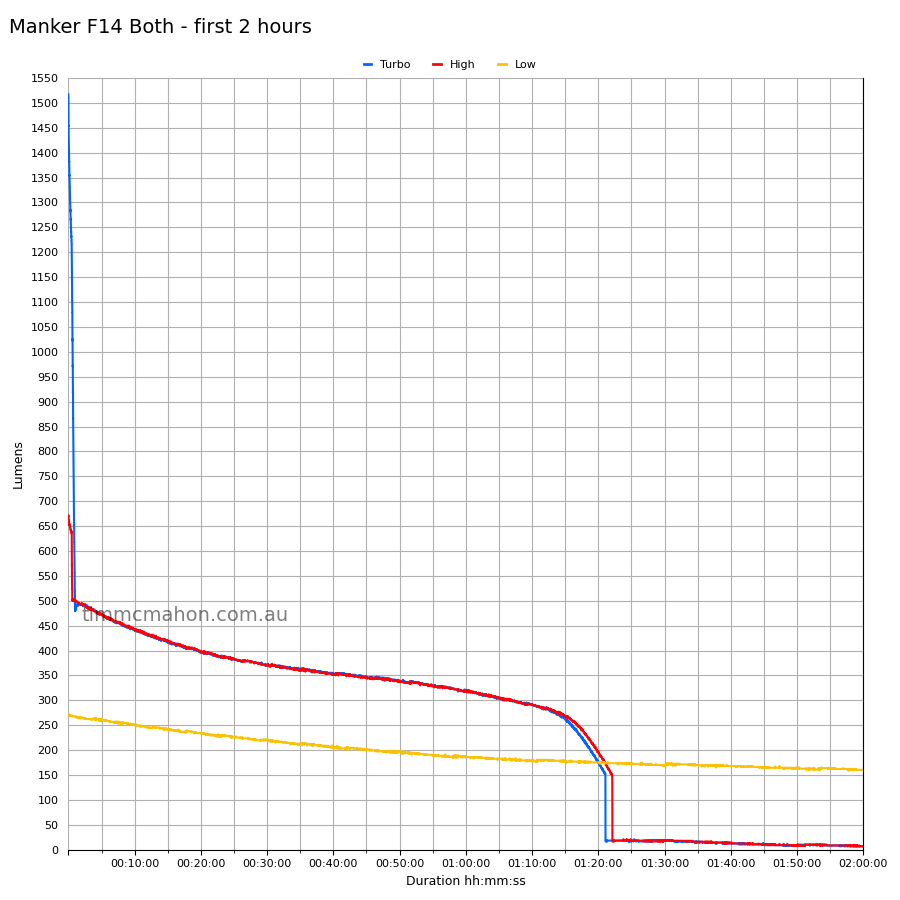
Floodlight + Spotlight (Both)#
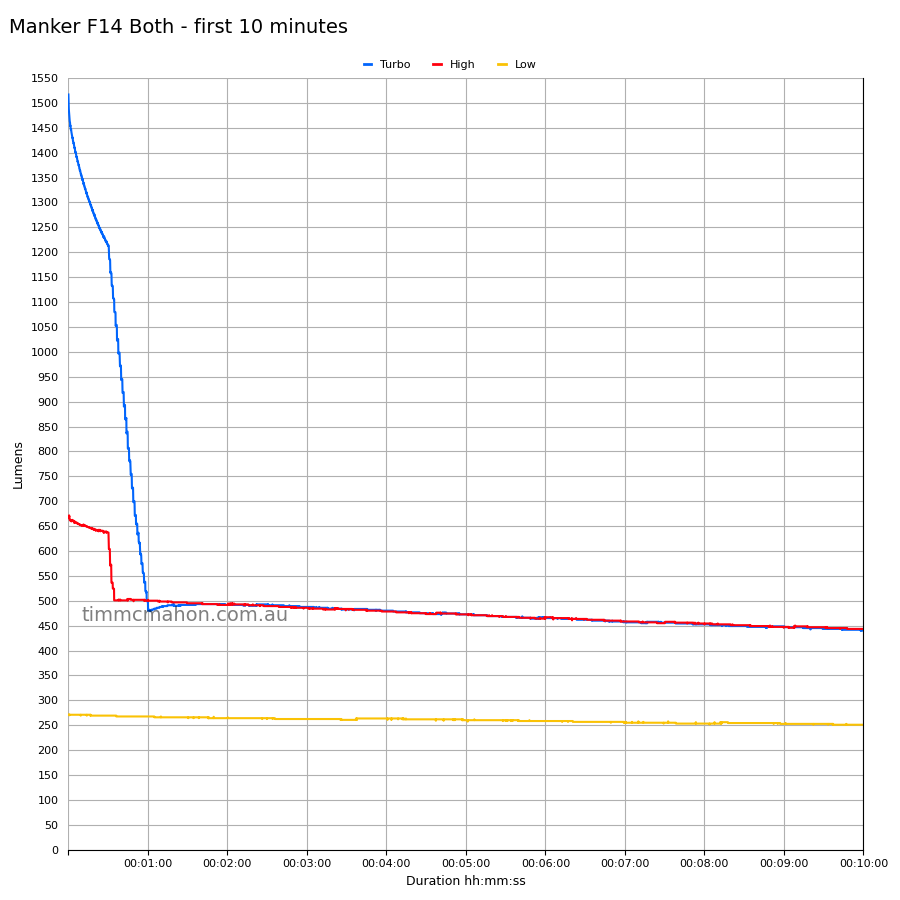
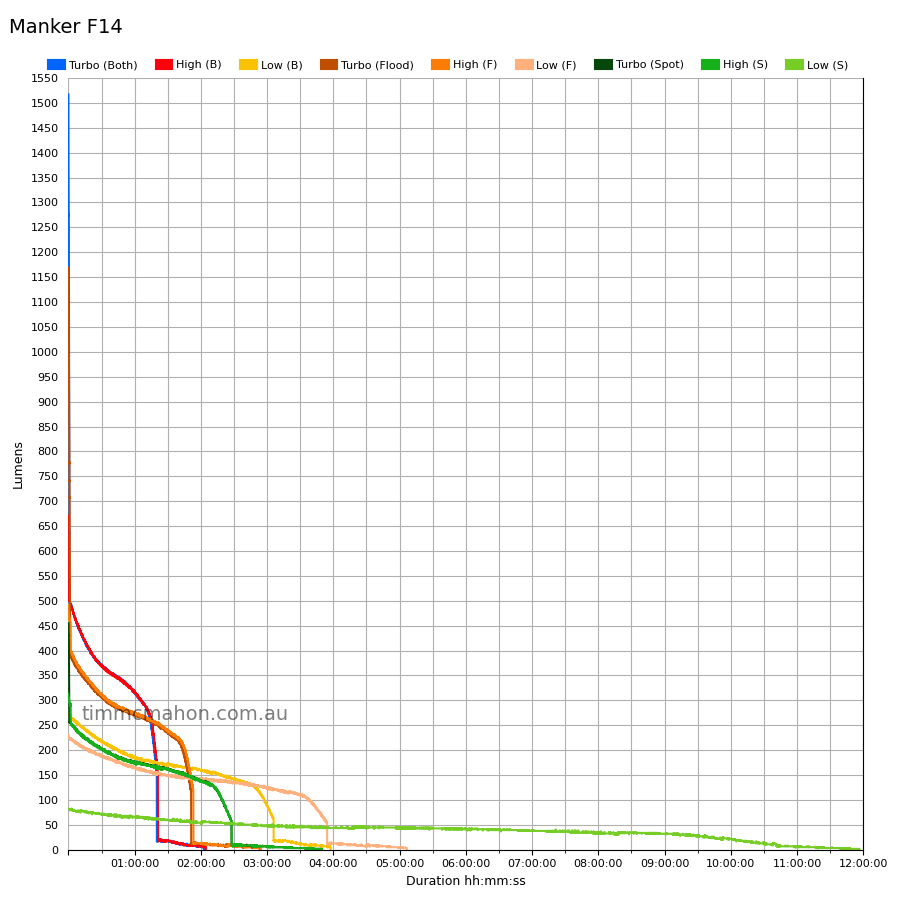
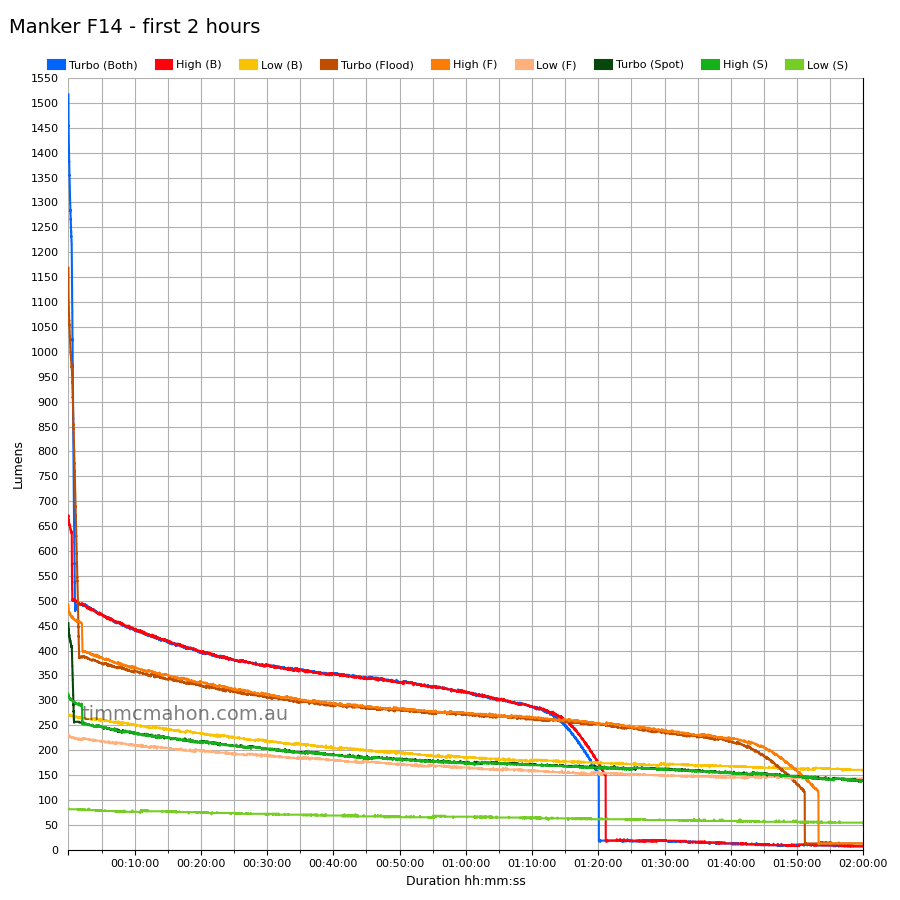
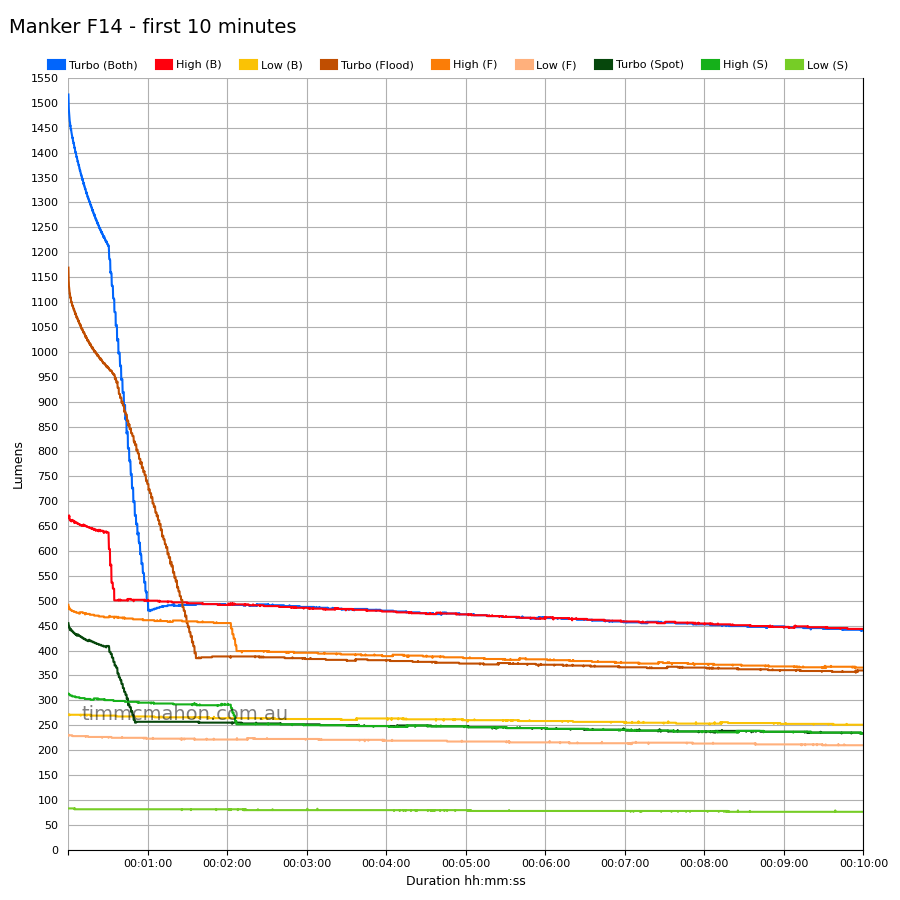
All runtimes#
Runtime#
Here is a summary of the runtime results:
| LED | Mode | User manual | Runtime | Turn off |
|---|---|---|---|---|
| Floodlight | Turbo | 3h 1min 30s | 1h 51min 2s | 2h 53min 8s |
| Floodlight | High | 3h 25min 30s | 1h 53min 7s | 2h 54min 8s |
| Floodlight | Low | 5h 39min | 3h 54min 4s | 5h 6min 11s |
| Spotlight | Turbo | 2h 42min | 2h 27min 35s | 3h 48min 39s |
| Spotlight | High | 3h 6min | 2h 28min 8s | 3h 50min 1s |
| Spotlight | Low | 6h 40min | 10h 44min 45s | 11h 56min 30s |
| Both | Turbo | 1h 40min | 1h 20min 2s | 2h 2min 39s |
| Both | High | 1h 52min | 1h 21min 4s | 2h 4min 19s |
| Both | Low | 3h 10min | 3h 6min 40s | 3h 58min 18s |
“Runtime” is the time until the output reduces to 10% of the output at 30 seconds (as per the ANSI/PLATO FL1 2019 Standard).
“Turn off” is the time until my DIY lumen tube no longer detects more than one lumen.
“+” indicates that the light remained on after recording had stopped.
The runtime results are pretty good but they fell short of ANSI/NEMA FL1 claims (i.e. the output dropped below 10% sooner than expected).
I would have liked to see the Manker F14 sustain a constant output for an hour or two. The output gradually drops over time.
The Floodlight lasts about 4 to 5 hours on Low while the Spotlght can last almost 12 hours on Low. Imagine the runtime if the torch had a 20 lumen mode!
Throw#
I took lux measurements with a UNI-T UT383BT at 30 seconds. Each mode was measured at five metres.
| LED | Mode | Specs (cd) | Specs (m) | Candela measured (cd) | Distance (m) |
|---|---|---|---|---|---|
| Spotlight | Low | 2,800 | 105 | ||
| Spotlight | High | 10,475 | 204 | ||
| Spotlight | Turbo | 14,400 | 240 | 14,325 | 239 |
| Floodlight | Low | 725 | 53 | ||
| Floodlight | High | 1,650 | 81 | ||
| Floodlight | Turbo | 3,825 | 123 | ||
| Both | Low | 2,975 | 109 | ||
| Both | High | 10,150 | 201 | ||
| Both | Turbo | 17,956 | 268 | 17,700 | 266 |
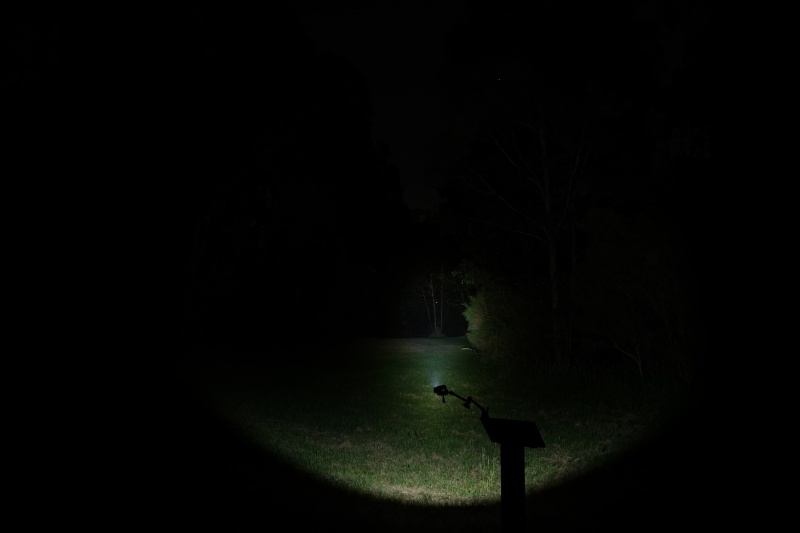
Beamshots#
I went to a local park and aimed the Manker F14 at a tree 70 metres away while using Turbo.
Beamshots were taken using a Sony RX100M2 using 3.2", f3.2, ISO 100, 5000K WB.
Manker F14 Spotlight (Turbo)#
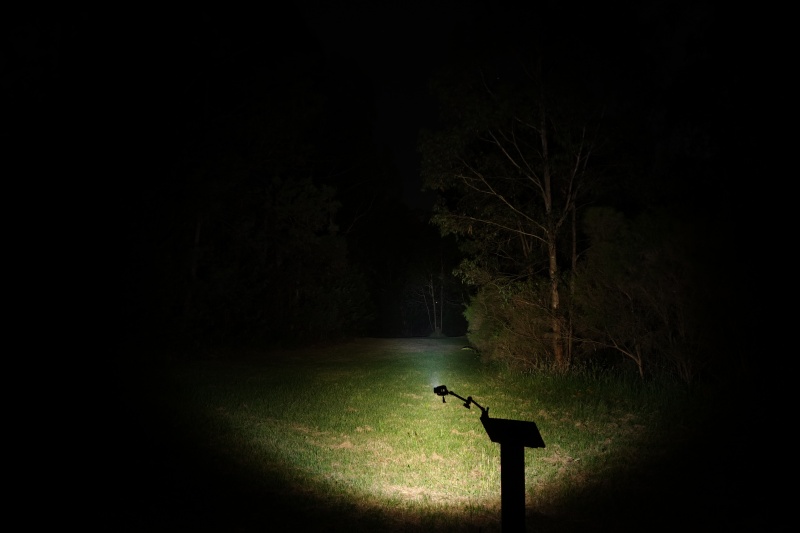
Manker F14 Floodlight (Turbo)#

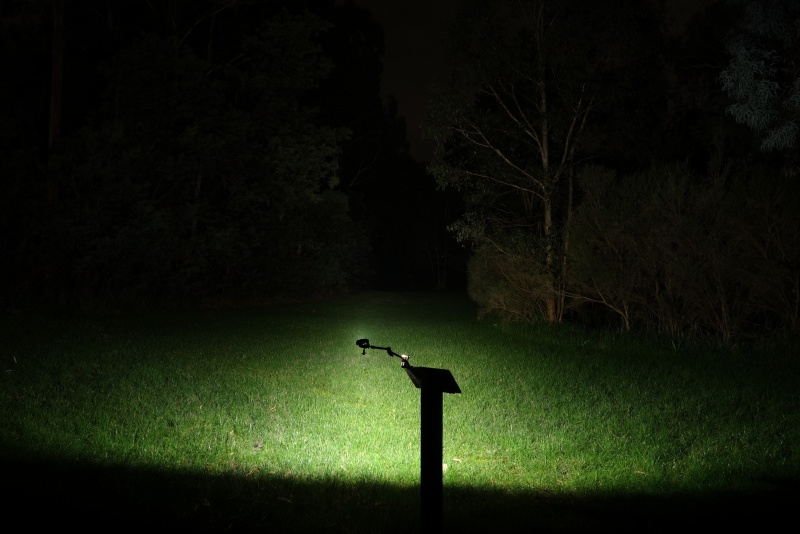
Manker F14 Both (Turbo)#
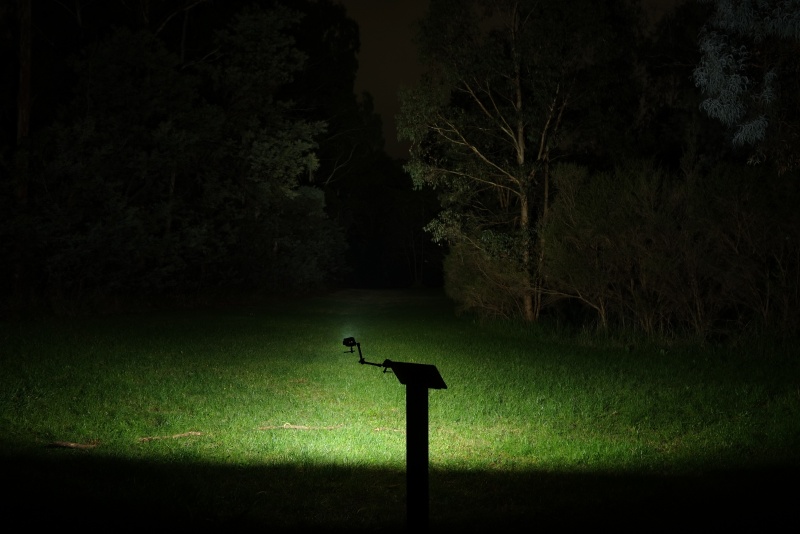
Wuben X2 White (Turbo)#
Wuben X2 Copper (Turbo)#
Conclusion#
The Manker F14 was a nice surprise! I was not expecting Manker to send it. But I am glad that they did!
Despite being much wider than a AAA or a AA sized torch, the F14 fits discretely in my pocket for every day carry.
The fast charging and fast power bank make this an ideal choice for travelling. It can be quickly topped up or it could be used as an emergency power supply (e.g. phone ran out of power).
It would be even better if user replaceable 14500 cells were used. I can appreciate small EDC torches having built-in Li-ion battery packs but at this size, I would expect some user replaceable batteries. Multi-chemistry support (Alkaline, Ni-MH, Li-ion) would be even better.
The user interface diagram was a bit intimidating. I managed to figure it out and I am now comfortable using the torch for a few weeks.
The beam distance that I measured was extremely close to Mankers claims. It has decent throw for such small torch.
The choice of Osram NM1 emitter is great for throw! But the Samsung LH351D really should be swapped out for a Nichia 519A or something with a really nice tint for EDC enthusiasts. Then again, at least the LH351D has a high CRI and it can produe a higher lumen output.
The lumen output was slightly higher than expected for the Floodlight and a little lower than expected for the Spotlight.
The mode spacing could be improved. I think that this torch should have a 20 lumen mode for Low. There is a big jump from Moonlight (less than one lumen) to Low. I measured 230 lumens at turn on for Low (Floodlight).
The runtimes are good but they fell short of Mankers claims.
Although I spend a lot of time testing, I feel as though numbers aren’t always the most important thing. I really enjoy carrying and using this torch. The Manker F14 sparks joy. It feels right at home in my pocket as an EDC torch and I can highly recommend it.
Pros:#
- Excellent build quality.
- Good lumen output.
- Good beam distance.
- High CRI floodlight.
- Fast USB-C charging.
- Fast power bank.
- Magnets in the tailcap.
Cons:#
- Complex user interface.
- Mode spacing.
- Runtimes were shorter than expected.
Price#
The Manker F14 is US$49.95 from mankerlight.com.
The Wuben X2 White is US$98 and the Wuben X2 Copper is US$158. While the X2 lacks some features like a power bank and magnets in the tailcap, the lumen output is slightly higher and the driver is able to maintain a constant lumen output.
Product page#
15% off with promo code: TIM15
Manker F14 at mankerlight.com (affiliate link)
I may earn a commission if you use an affiliate link or a promo code. This will help fund future torch reviews and tutorials.