Wuben E7 Torch Review

Wuben E7 Torch#
- Specifications
- Introduction
- Torch in use
- Build quality
- LED, bezel, lens, reflector and beam
- Size and comparison
- User interface
- Batteries and charging
- Performance
- Beamshots
- Conclusion
- Price
- Product page
Specifications#
| Brand/model | Wuben E7 |
|---|---|
| LED | 2*Osram P9 |
| Maximum lumens | 1,800 lm |
| Maximum beam intensity | 4,356 cd |
| Maximum throw | 132 m |
| Battery | 1*18350 |
| Onboard charging | Yes (USB-C) |
| Material | Aluminium |
| Modes | 4 |
| Blinkies | Strobe, SOS |
| Reflector | TIR |
| Waterproof | IP68 |
| Review date | November 2023 |
UPDATE: 23rd October 2024
Reverse polarity protection#
I went ahead and bought the Wuben E7 while it was on sale on Amazon to do a follow up reverse polarity protection test (don’t try at home!).
Reverse polarity protection now works.
The new driver has E7-B3 on it near the spring. The older driver had E7-B1.
UPDATE: 1st December 2023
If you have a Wuben E7, DO NOT insert an unprotected cell in reverse!#
An unprotected cell may be shorted if a battery is inserted in reverse. This will damage the driver and it could cause a fire.
The included protected 18350 cell works as expected and did not get warm or damage the driver.
I inserted an unprotected 18650 cell in reverse, screwed the tailcap on, and the torch started to smoke! The driver has been burnt and no longer works.
The Wuben E7 should be recalled#
While reviewing the Wuben E7, I noticed the tailcap spark when I tried to put the tailcap on with an 18350 cell inserted in reverse but nothing else happened. I asked a few community members and they weren’t able to reproduce this issue.
Wuben sent a second Wuben E7 (neutral white). This time I tried to insert an unprotected 18650 cell in reverse and the driver started smoking. The torch became warm to touch and it no longer works.
Wuben recommends using a protected 18350 or 18650 cell.
Safety warning: Wuben E7 short circuit
Introduction#
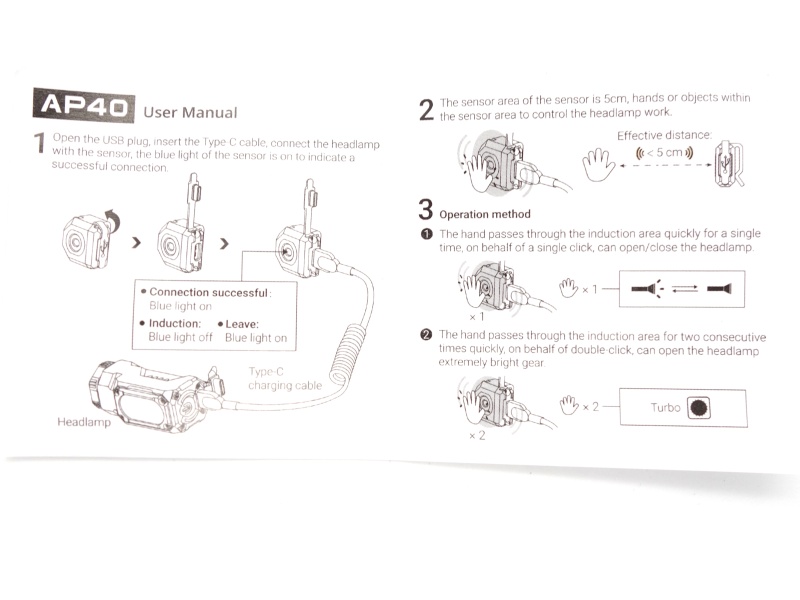
The Wuben E7 is a new tool by Wuben. The torch can be converted into a headlamp with an optional headband. The runtime can be extended with an optional 18650 extension tube. And the torch can be controlled by waving a hand in front of the optional sensor.
Wuben have opted to provide the headband, 18650 extension tube and the sensor as optional accessories to give people more control over how they use their E7.
The design of the Wuben E7 is clearly influenced by the Wuben X0 but there are some pretty big differences:
- There are two emitters!
- The tailcap can be easily unscrewed by hand.
- There is an optional 18650 extension tube available.
- The pocket clip has a deeper carry and it is more flexible.
- The user interface is basic (no programming mode).
- The CNC’d button is smaller instead of being one big fidget toy that hides the USB-C port.
- The USB-C port is next to the button and it has a rubber weatherproofing cover.
- The USB-C port can supply power to external accessories like a new optional Wuben AP40 Gesture Sensor.
Wuben sent this torch for review. I have not been paid for this review nor have I held back my opinions of this torch.
Here is a video of the Wuben E7:
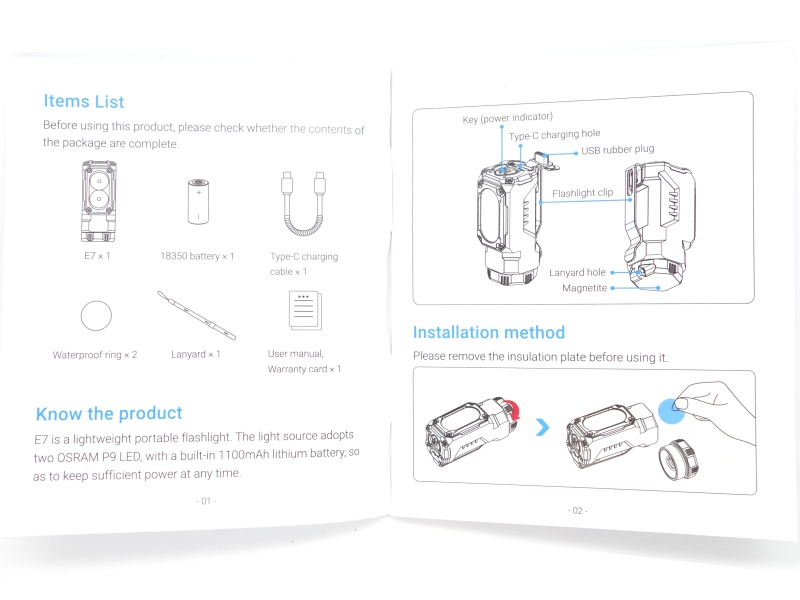
Packaging#
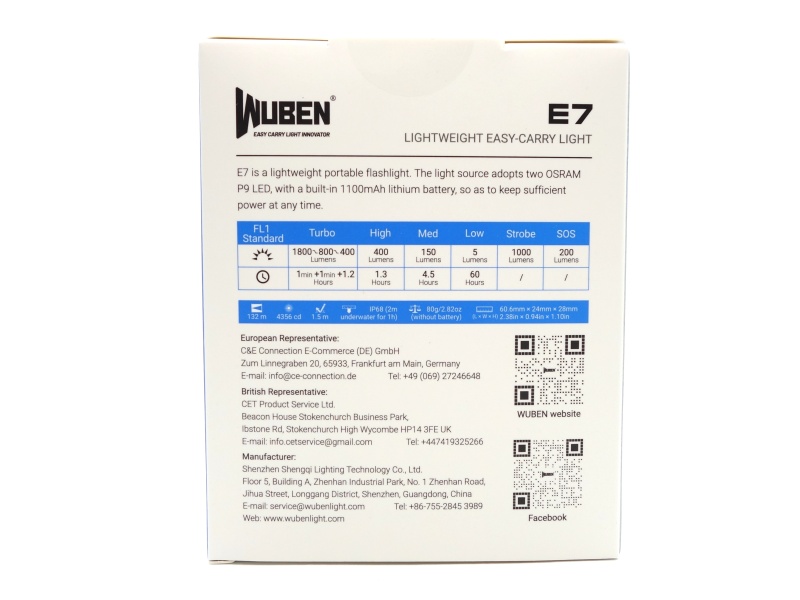
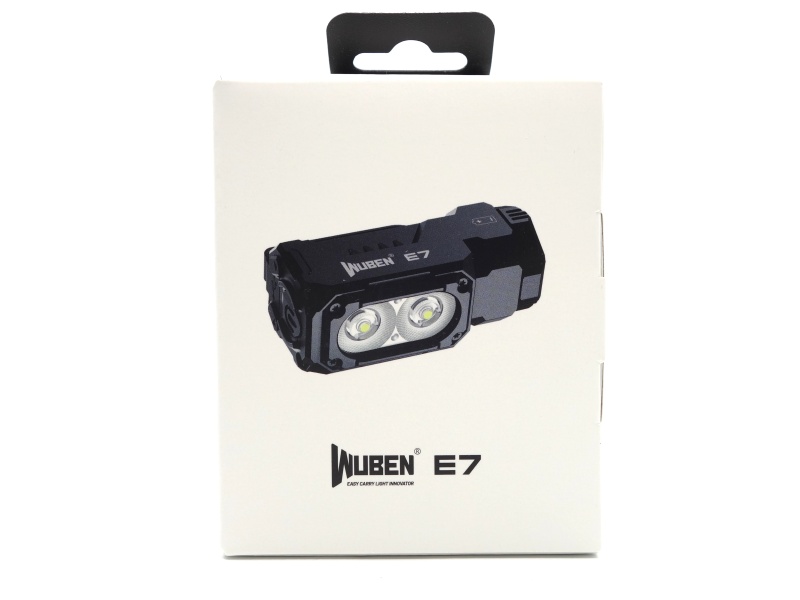
The Wuben E7 comes in a white and blue box with an image of the E7 on the front and specifications on the back.
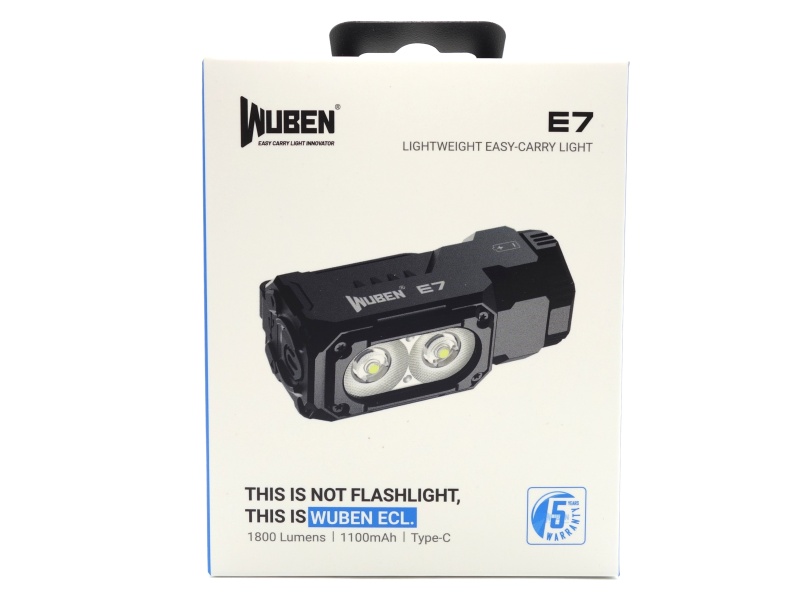
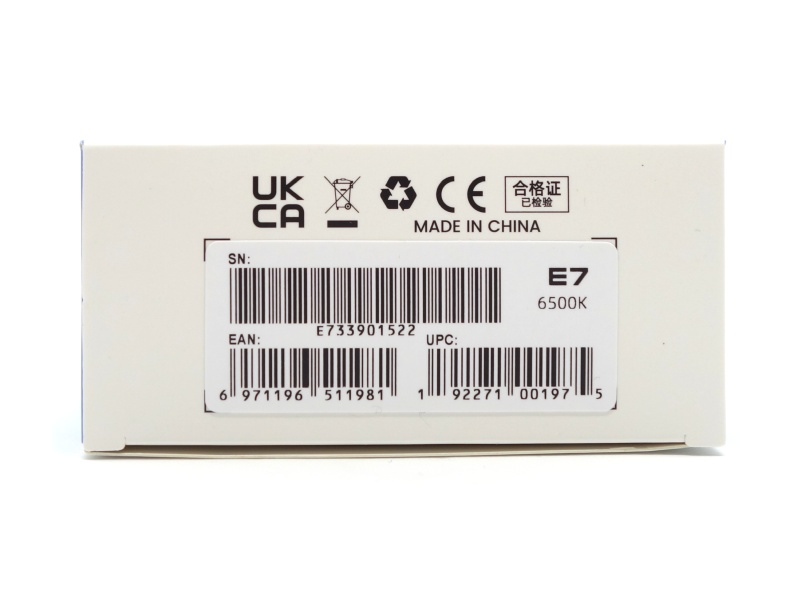
Inside the white and blue box is another box with an image of the E7 on the front and details about the specific torch on a label on the bottom (i.e. serial number, 6500K colour temperature).
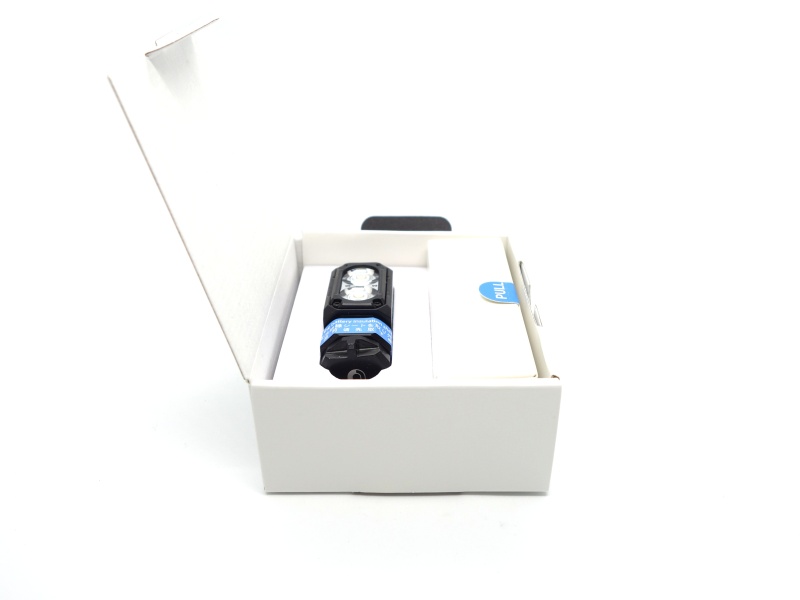
The following was included in the box:
- Wuben E7.
- Wuben ABJ1100C 18350 1100mAh 3.6V battery.
- USB-C to USB-C cable.
- Two spare o-rings.
- Lanyard.
- User manual.

Wuben kindly provided a headband, extension tube and a sensor for review.
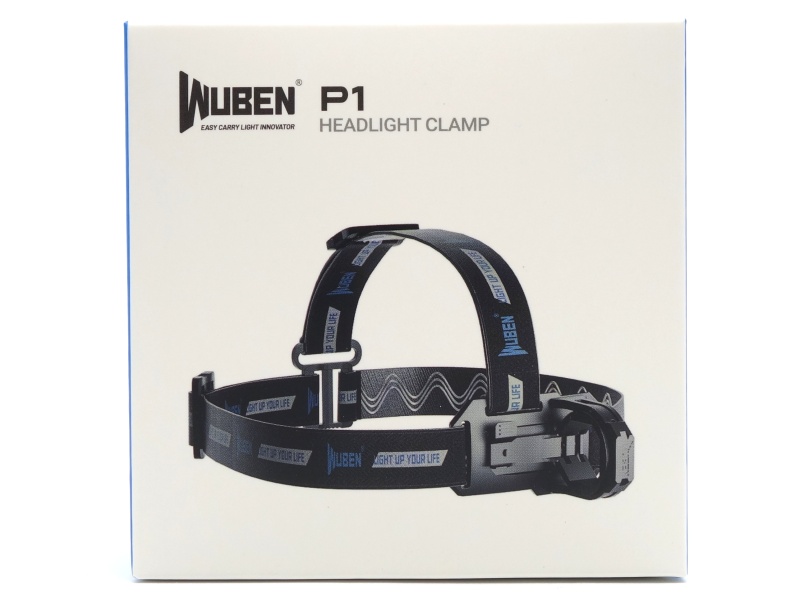
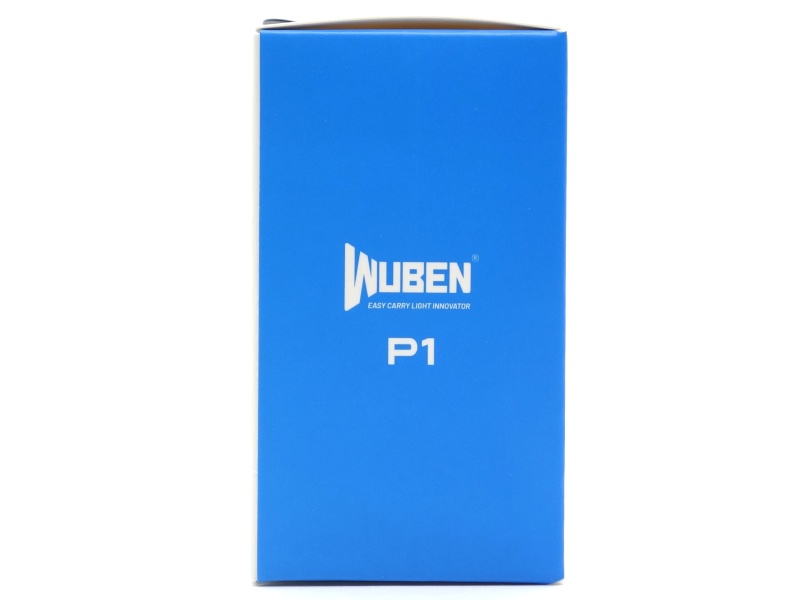
Optional Wuben P1 headband:
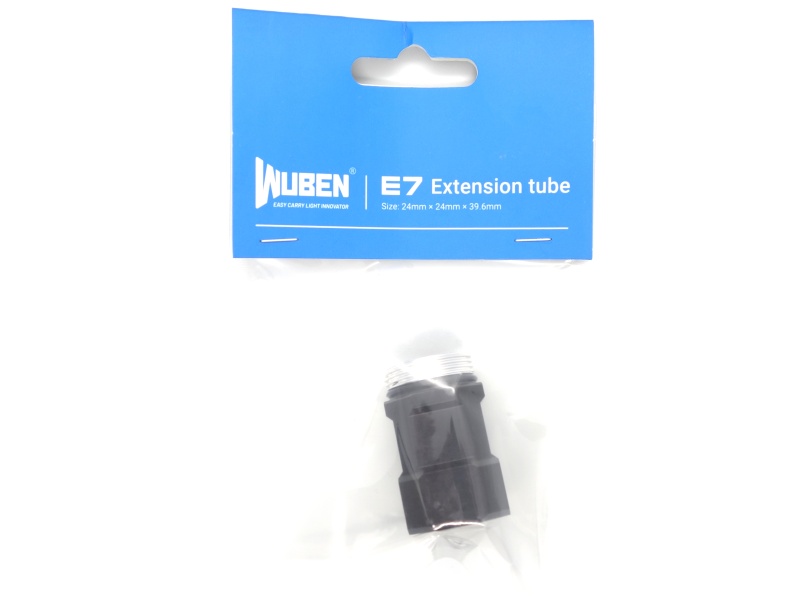
Optional Wuben E7 18650 extension tube:
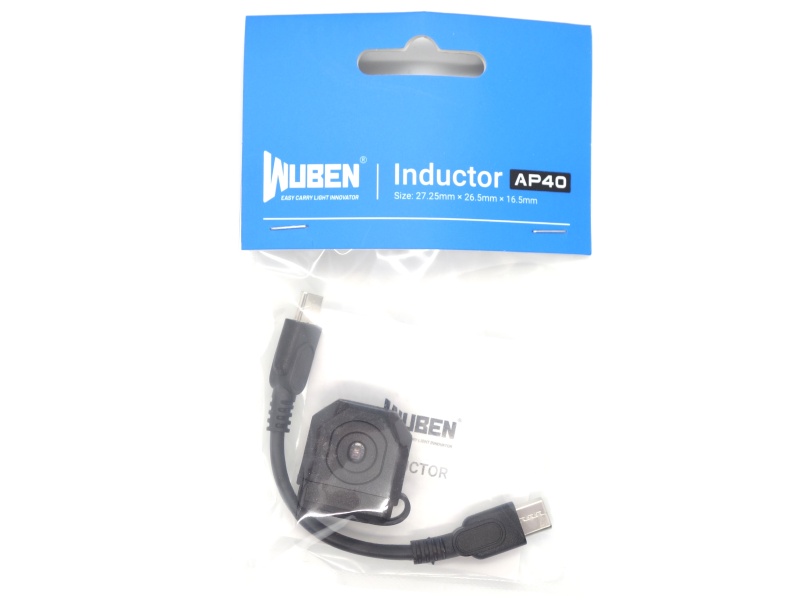
Optional Wuben AP40 Gesture Sensor:
User manual#
I like the quality of the user manual. It is a little book with heaps of diagrams to help explain how the torch works. The paper feels glossy and strong.

Torch in use#
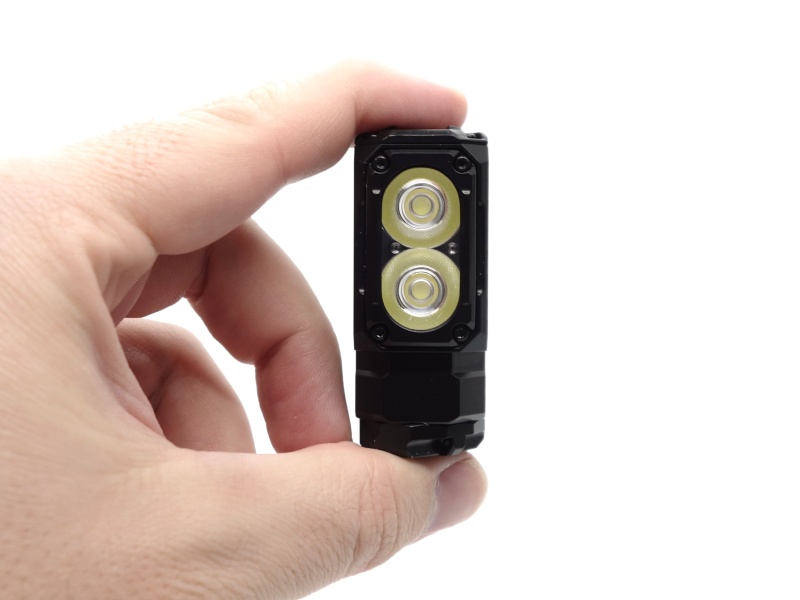
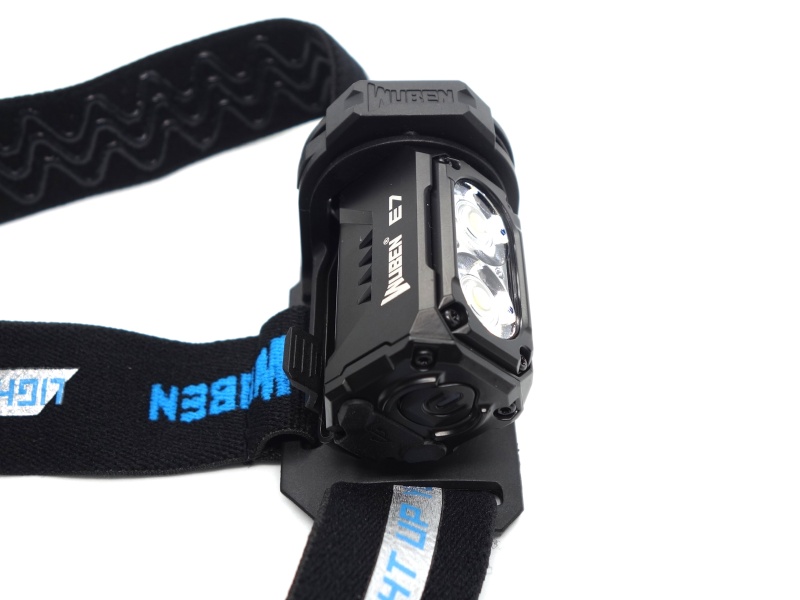
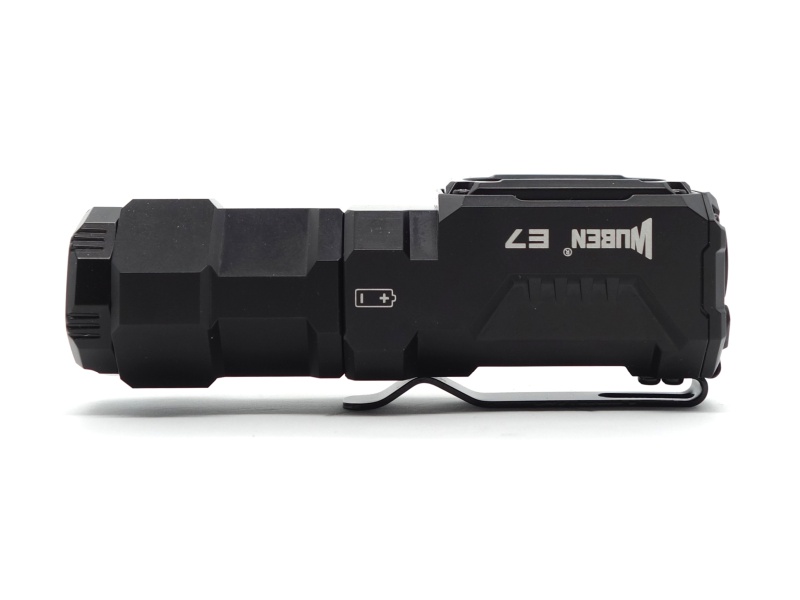
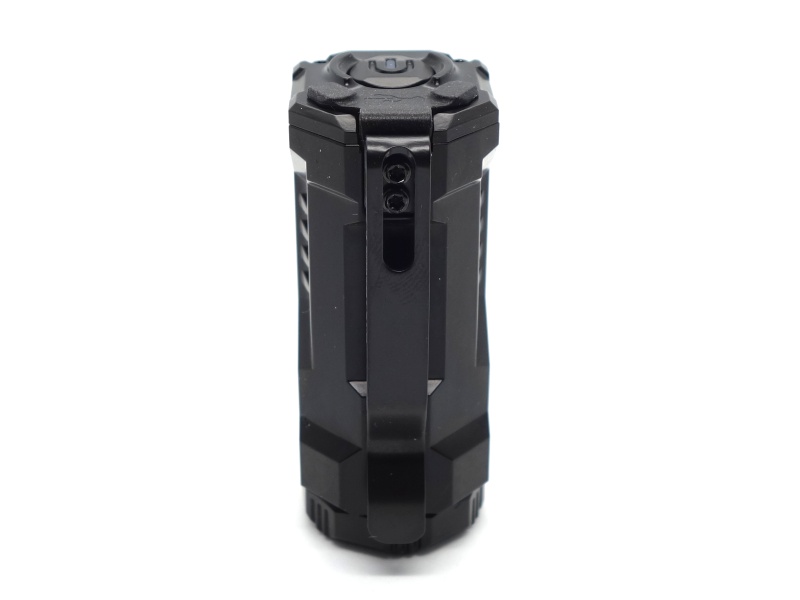
The Wuben E7 feels pretty small in my hand. I find myself pinching it on the sides to hold it.
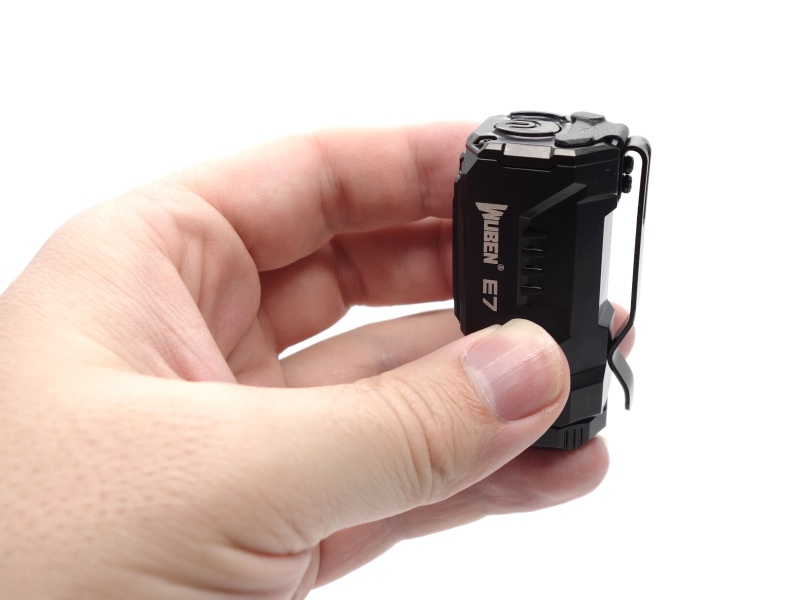
The flexible deep carry pocket clip hooks onto the strap of a backpack easily.
The tailcap has had an upgrade compared to the Wuben X0. It can be unscrewed by hand!
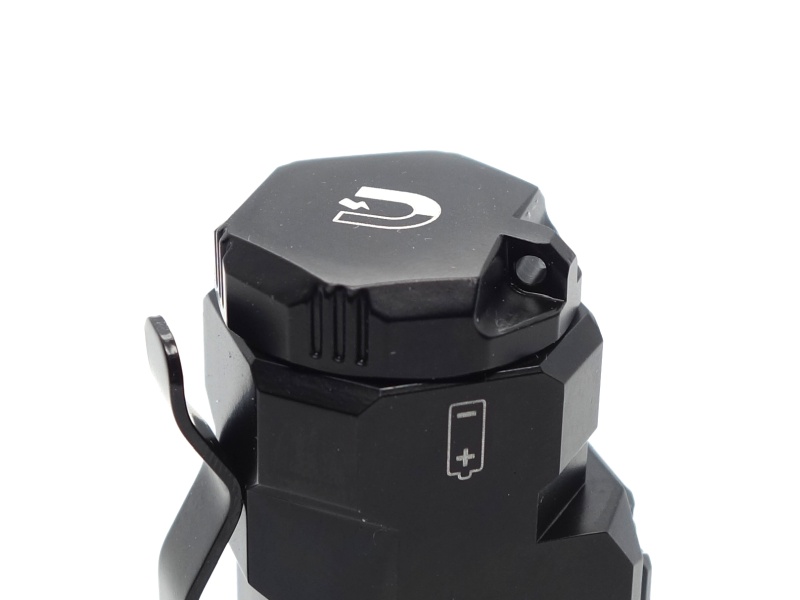
There is a strong magnet and a lanyard hole in the tailcap.
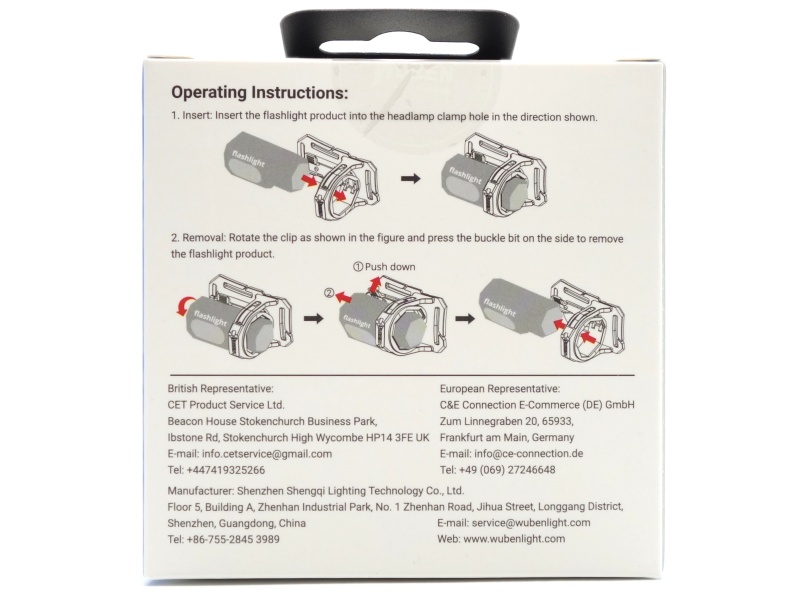
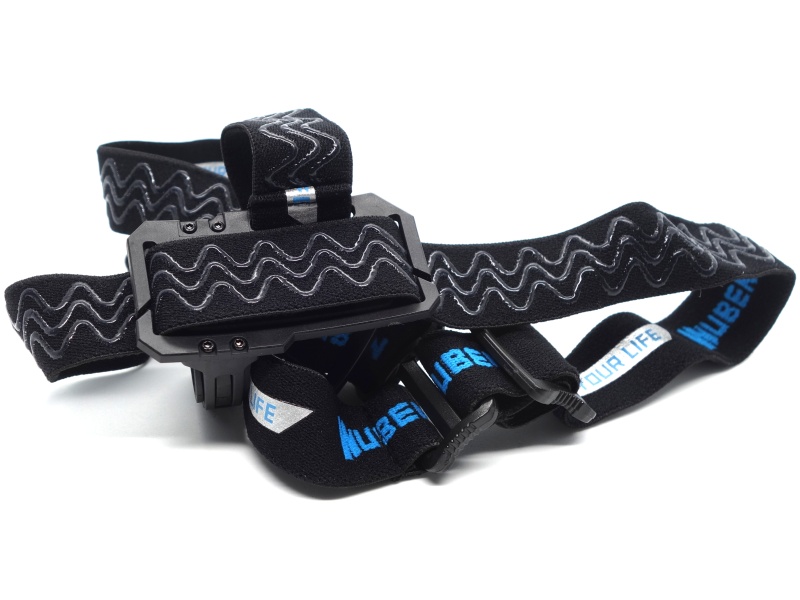
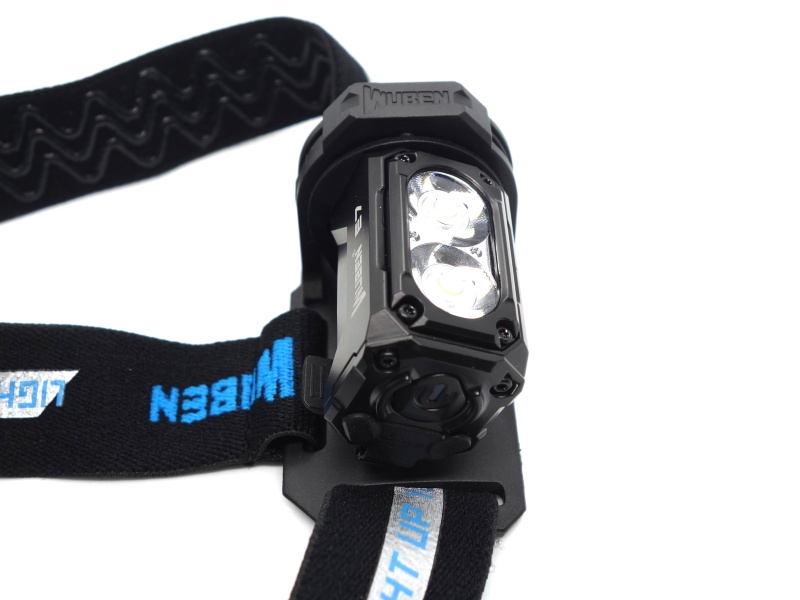
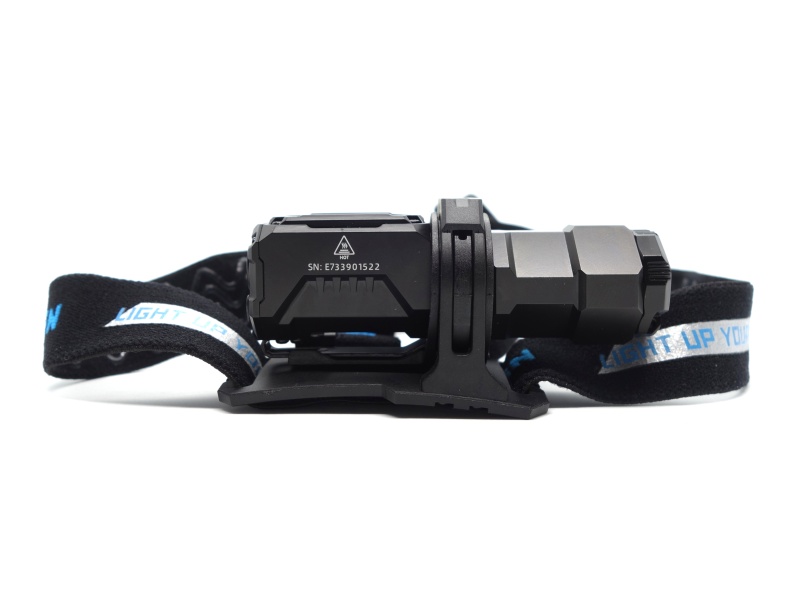
Wuben P1 Headband (optional)#
The headband fits my big head and it feels comfortable with extra grip on the inner side of the headband. There is reflective material on the outer side of the headband.
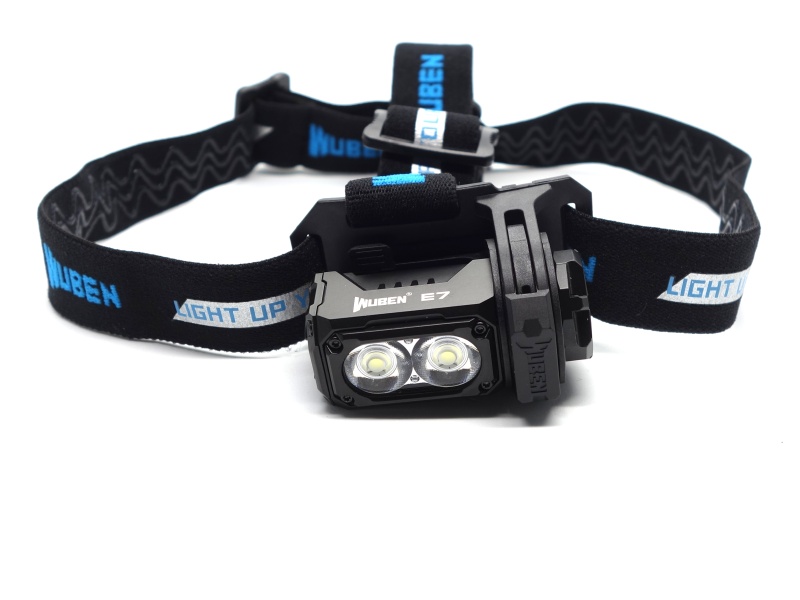
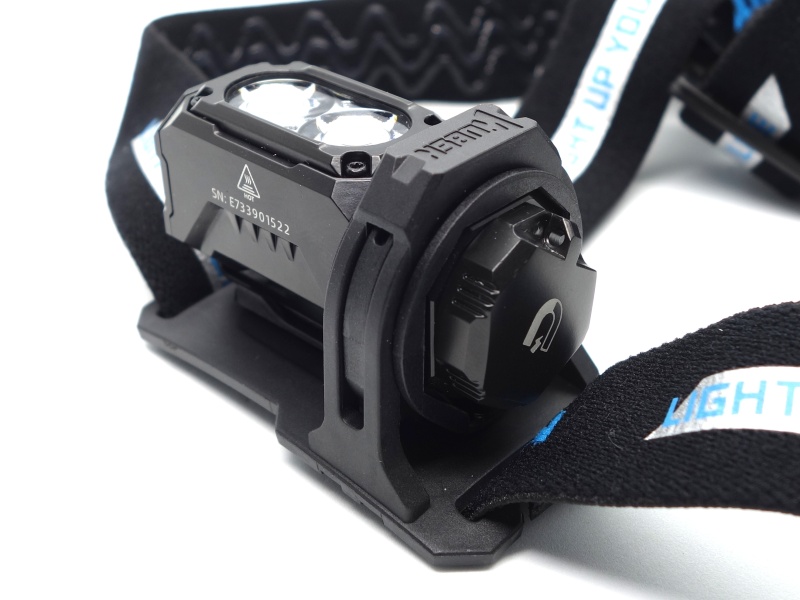
The Wuben E7 slides into the mount of the headband easily and it makes a clicking sound when it is secure.
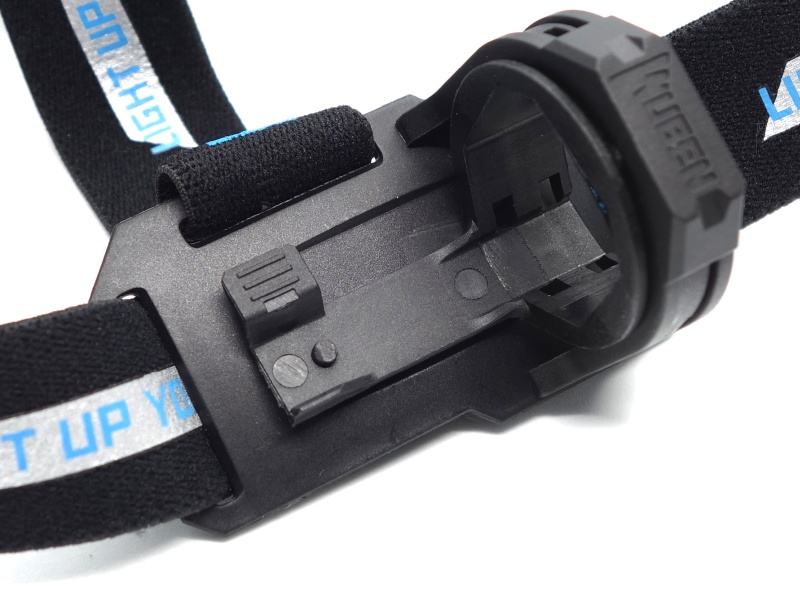
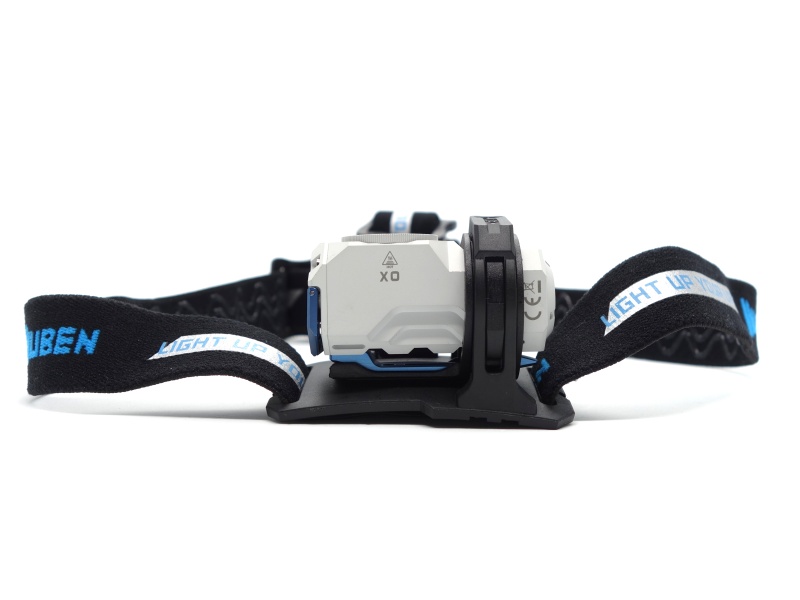
See that circle notch in the mount? It fits perfectly in the pocket clip of a Wuben X0.
That little lever near the notch can be pressed down to release the torch so that it may be removed from the mount.
I love how Wuben made the headband mount compatible with the Wuben X0!
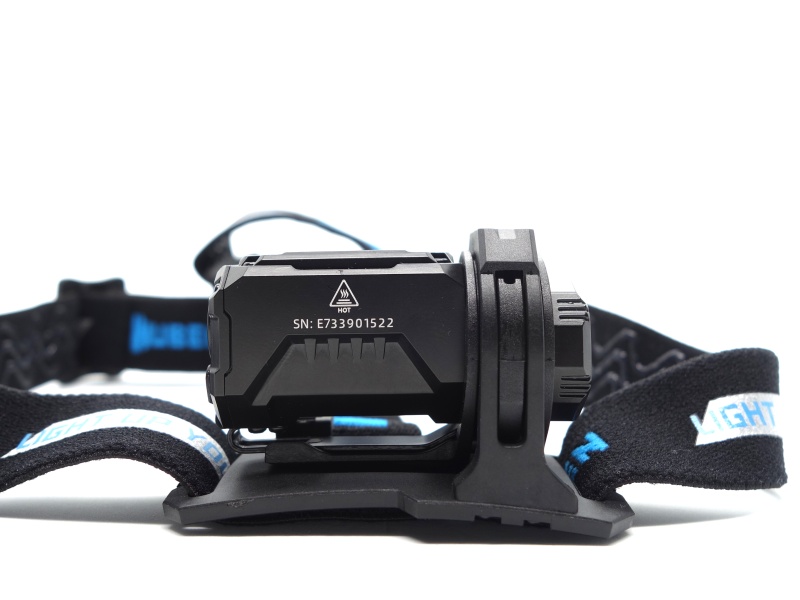
The torch can be rotated into one of nine positions in the mount. There is a clicking sound when rotating the torch into a position.
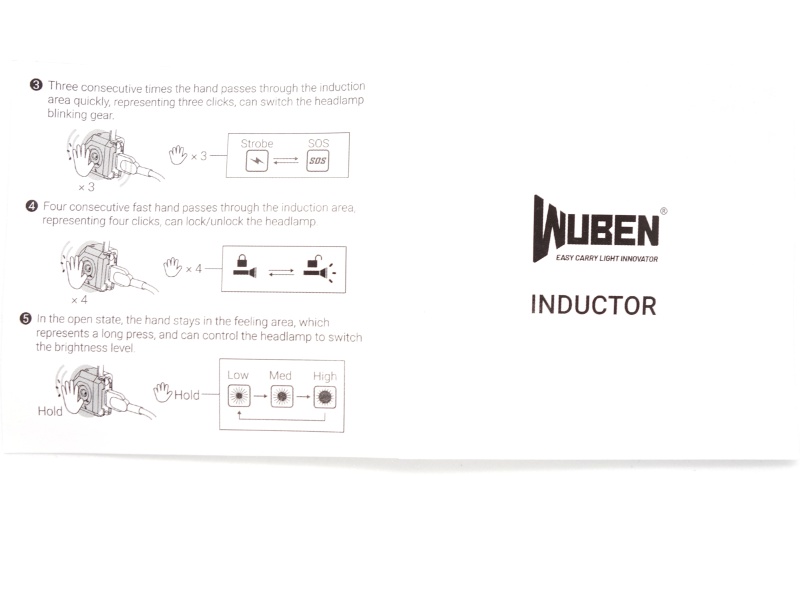
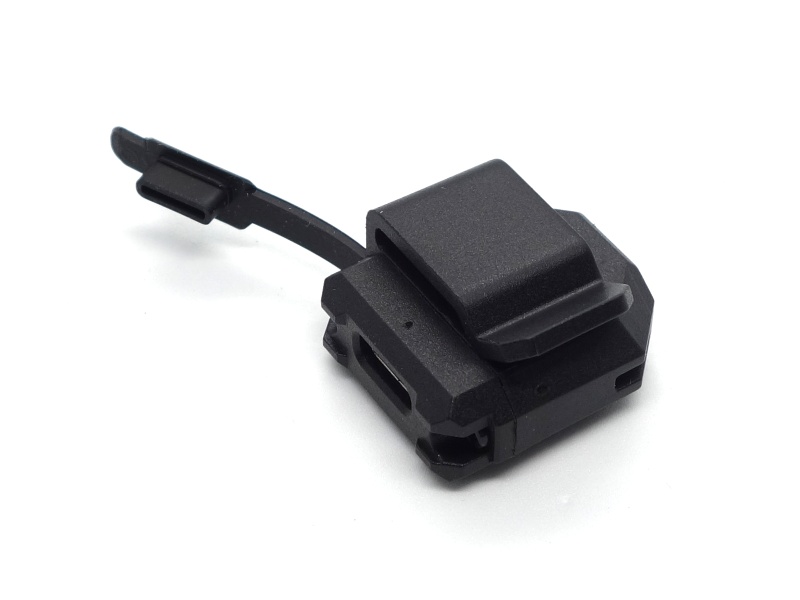
Wuben AP40 Gesture Sensor (optional)#
A sensor with a short USB-C cable can be plugged into the Wuben E7 so that waving a hand in front of the sensor performs the same action as clicking the button.
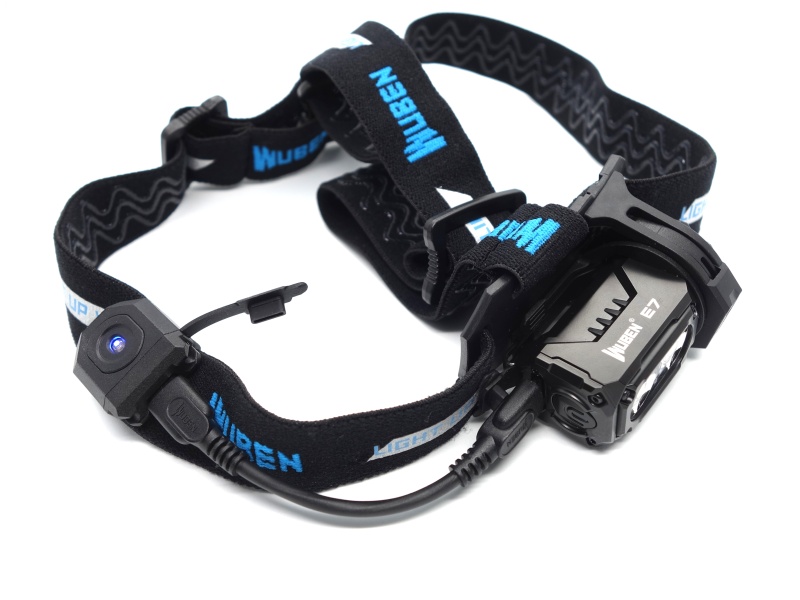
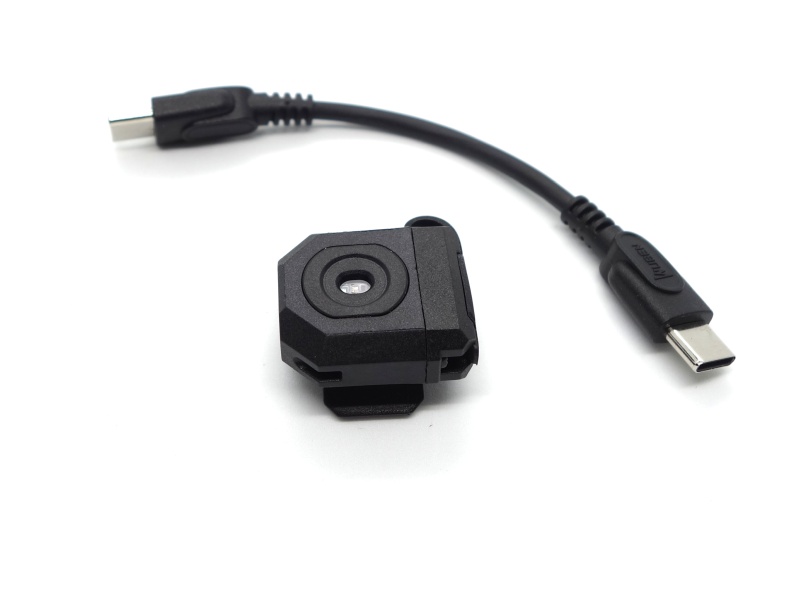
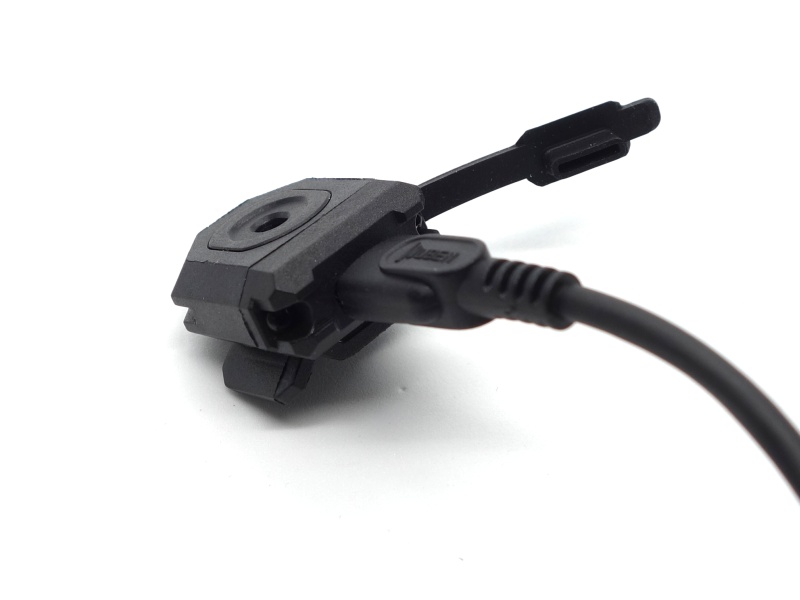
There is a clip on the back. A blue light appears when the sensor is connected. The sensor does not work with my Wuben X0.
Wuben E7 18650 extension tube (optional)#
An optional extension tube is available to extend the tube length so that it can take an 18650 cell.
The extension tube can be used with a headband mount.
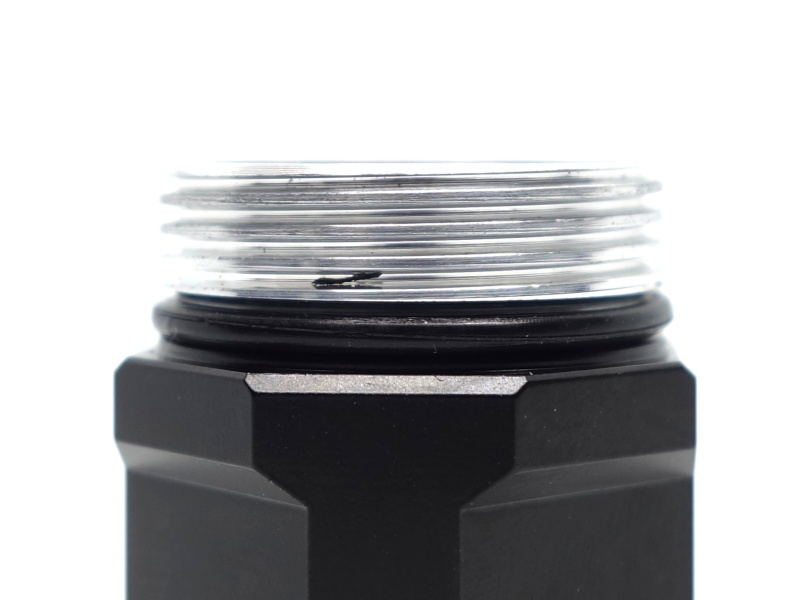
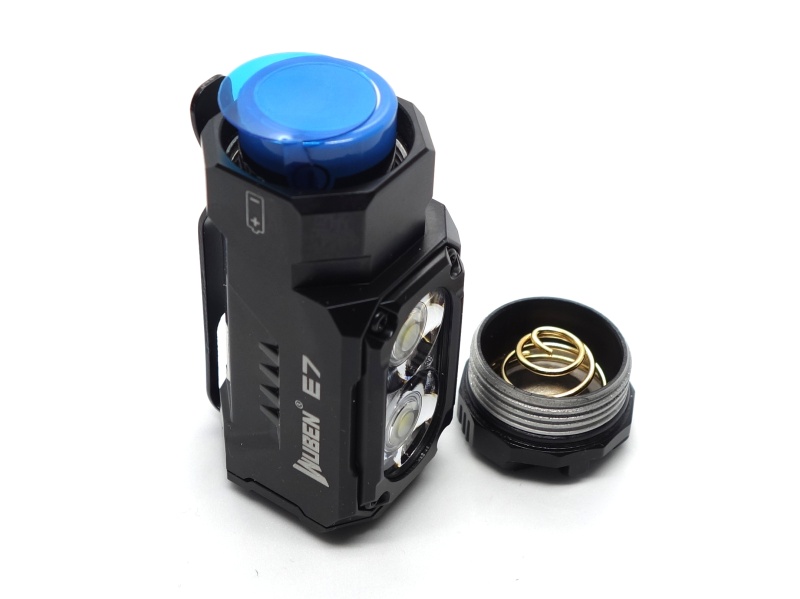
Build quality#
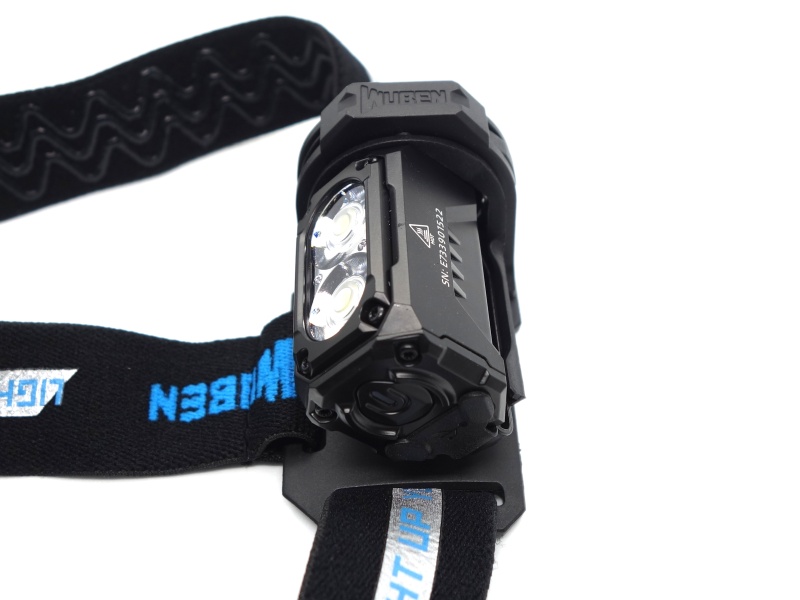
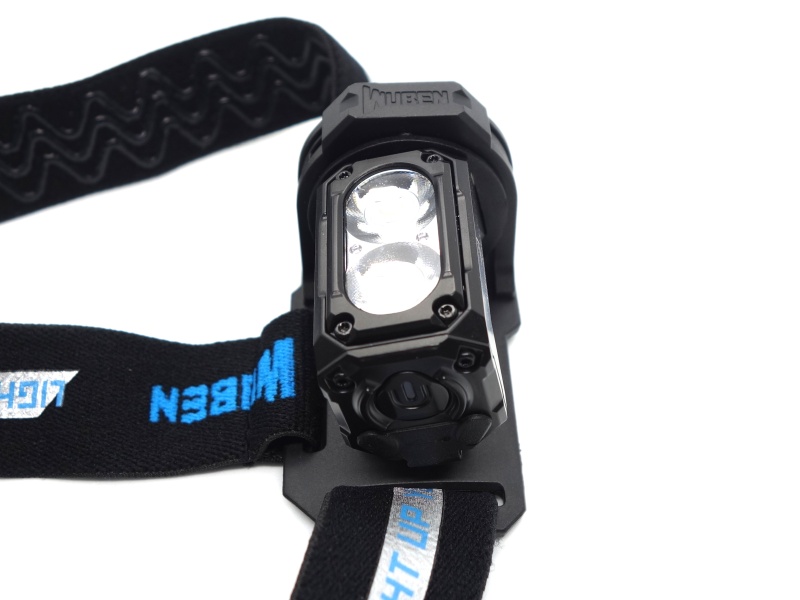
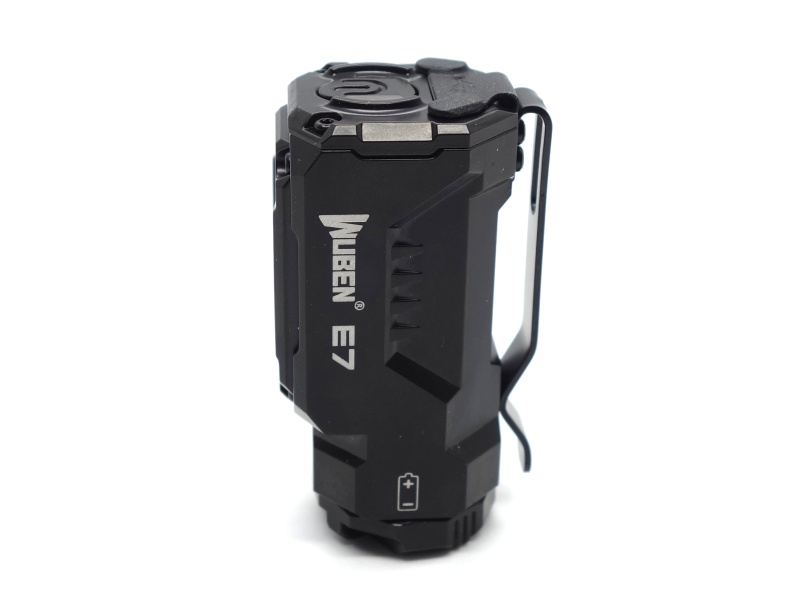
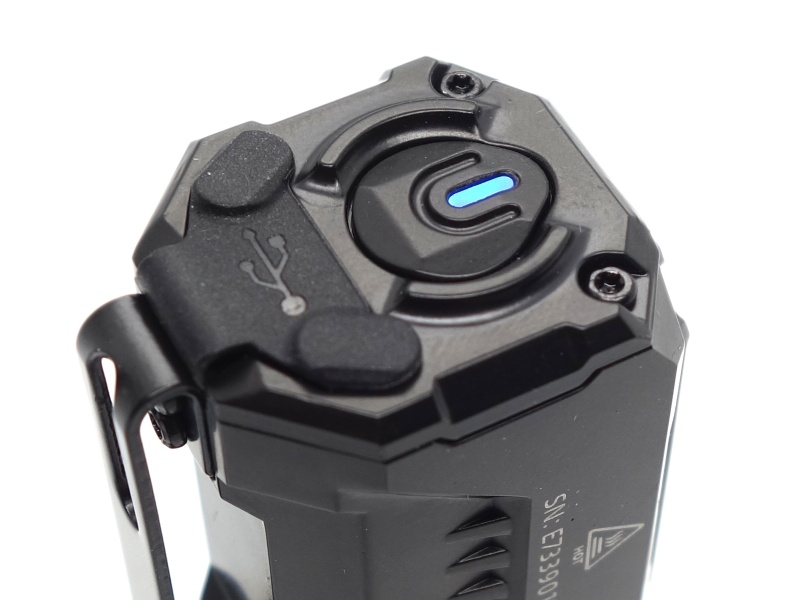
The Wuben E7 has a matte black anodised finish. There are no sharp edges.
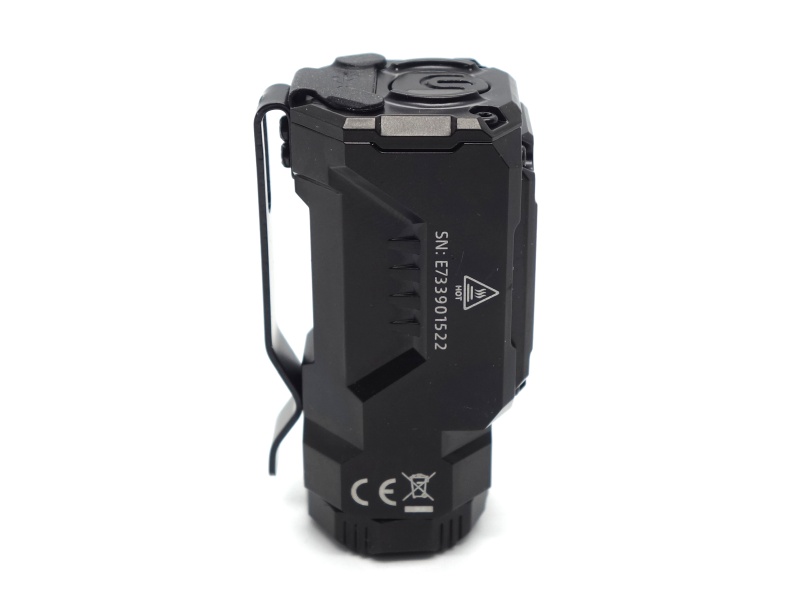
The CNC’d button has a battery and charging status indicator.
I like how there are two raised edges to help prevent the button from being accidentally clicked.
The tailcap turns smoothly despite there not being much lubricant on the threads. The tailcap is unanodised so it cannot be turned to physically lock the torch out.
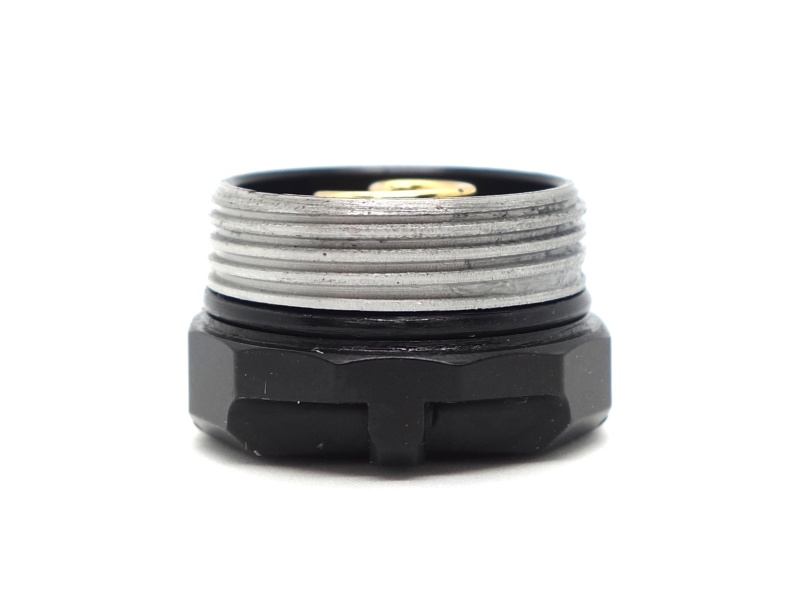
Usually a tailcap screws onto a tube rather than into a tube. I find it interesting that an 18350 cell rests inside the tailcap of the Wuben E7. This means that the inside diameter of the tailcap may impact whether or not a cell will fit (more on that below).
Here is a photo of the driver:
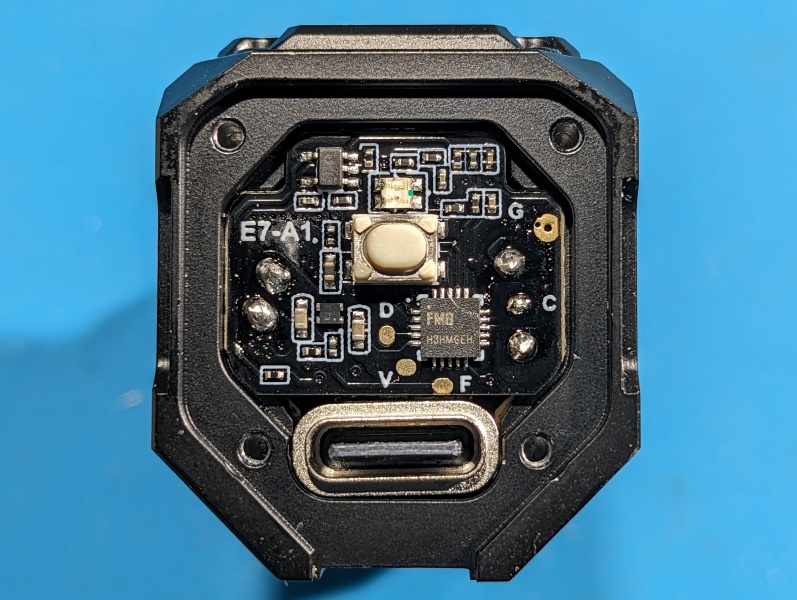
The driver has an FMD (Fremont Micro Devices) microcontroller.
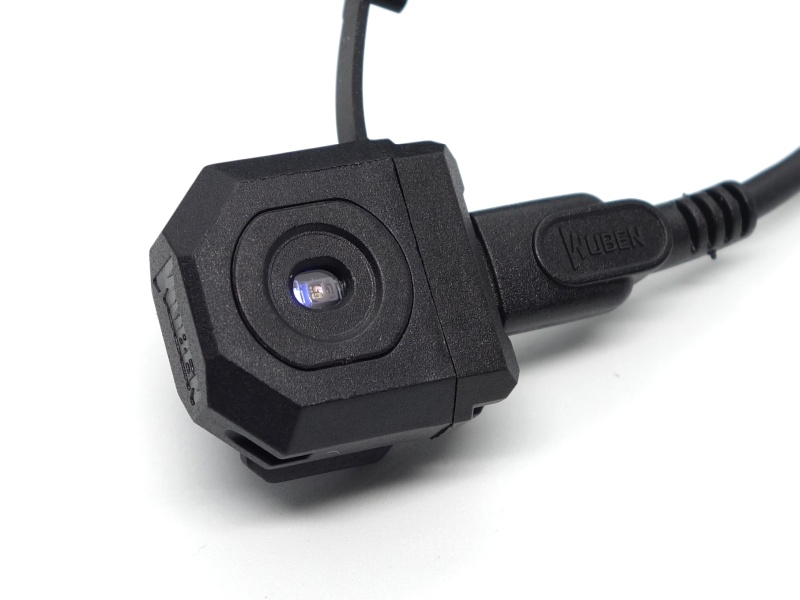
LED, bezel, lens, reflector and beam#
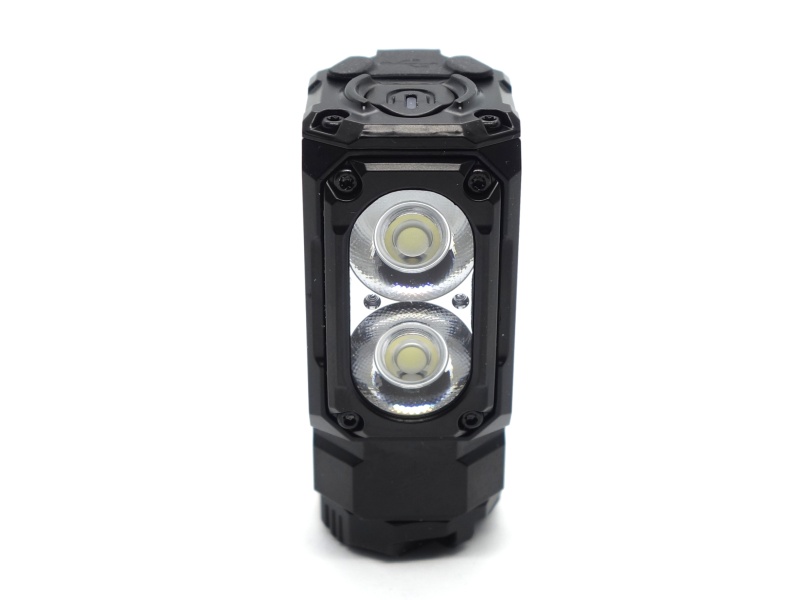
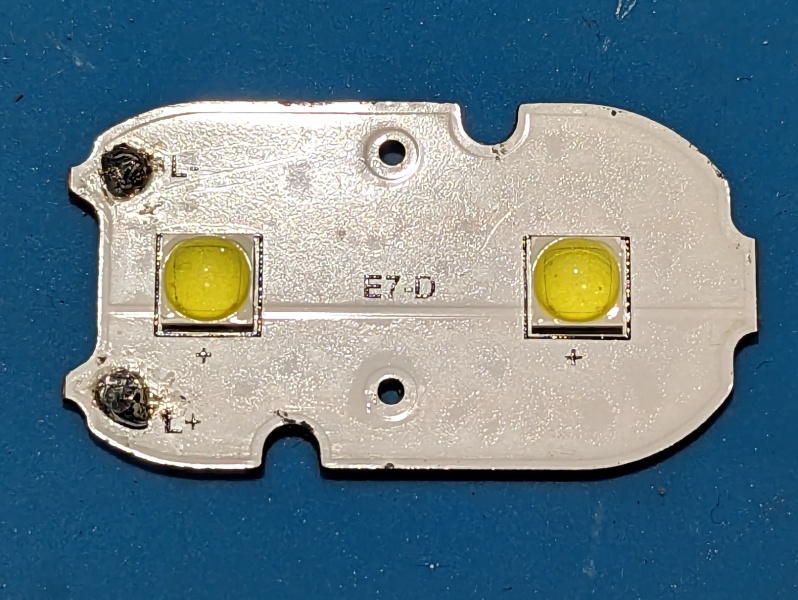
The Wuben E7 has two cool white Osram P9 6500K emitters behind a TIR optic. It is also available with two neutral white Osram 5000K emitters.
The bezel has four screws that can be removed with a T5 Torx bit. It takes a bit of effort to pry the bezel off a waterproofing gasket. I was able to pry the bezel off by putting my thumbnail between the TIR optic and the bezel.
There is a black shelf in the head of the Wuben E7 for the copper MCPCB and the two Osram P9 emitters to sit on. I found plenty of thermal paste between the shelf and the MCPCB.
Normally manufacturers remove anodising from the shelf so that the raw aluminium shelf and the copper MCPCB have a better connection. This allows heat to more easily transfer away from the emitters. Perhaps removing the anodising makes very little difference for this type of torch.
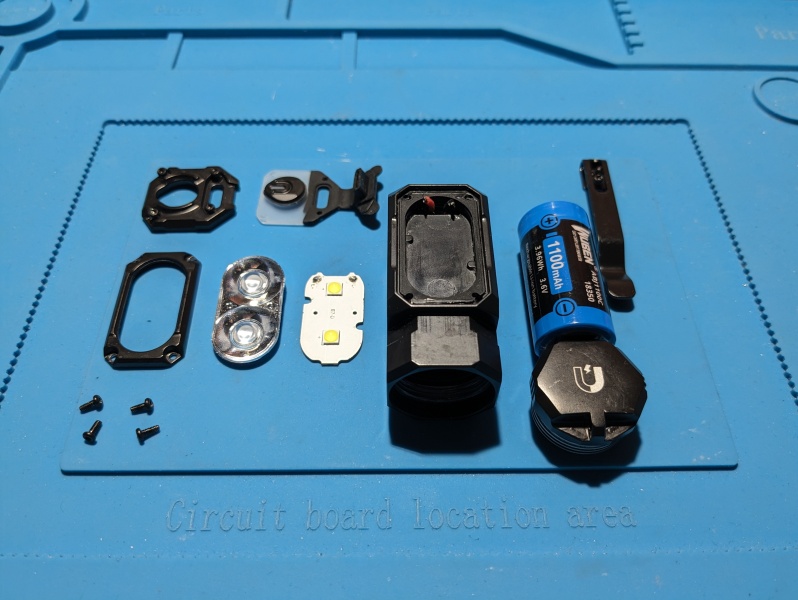
The TIR optic pops out. It has two little stands that help align it with two holes in the MCPCB.
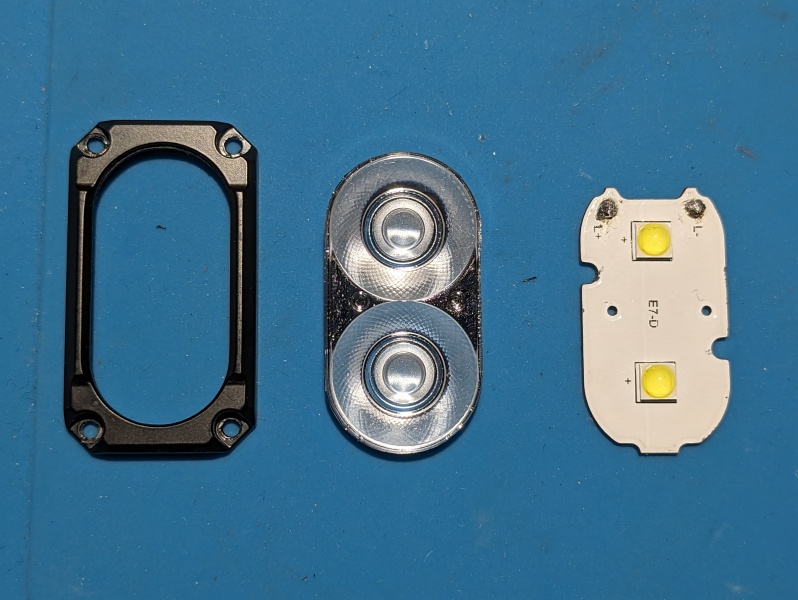
Here are the two Osram P9 emitters:
Uh, oh.#
It looks like I may have damaged the driver by applying too much heat while removing the wires from the MCPCB to see if there is thermal paste. The battery sparks if I put it in backward and try to close the tailcap (warning: dangerous activity).
I asked a fellow Aussie reviewer, Darren Yeo, if he could try to put the cell in backwards and press the tailcap down without screwing it in. He did, and the battery didn’t spark. Reverse polarity potection appears to work as intended.
CCT, CRI, and duv#
I have taken Correlated Colour Temperature (CCT) and Colour Rendering Index (CRI, RA of R1-R8) measurements with the torch positioned one metre away from an Opple Light Master Pro III (G3).
6500K#
The CCT of the Wuben E7 Cool White is around 6600K. The CRI is around 73.
The Delta u, v is slightly positive (green) on lower modes and close to pure white on Turbo.
The beam has a smooth white oval-shaped hotspot with a slightly green corona and a spill that fades outward. The TIR optic looks similar to the one used in the Wuben X3 but the beam is smoother.
| Mode | CCT (K) | CRI (Ra) | x | y | Duv |
|---|---|---|---|---|---|
| Low | 6293 | 71.7 | 0.3163 | 0.3326 | 0.0033 |
| Med | 6584 | 74.0 | 0.3117 | 0.3257 | 0.0020 |
| High | 6616 | 74.0 | 0.3113 | 0.3249 | 0.0018 |
| Turbo | 6921 | 74.9 | 0.3072 | 0.3185 | 0.0006 |
5000K#
The CCT of the Wuben E7 Neutral White is around 4917K. The CRI is around 69.
The Delta u, v is positive (green).
| Mode | CCT (K) | CRI (Ra) | x | y | Duv |
|---|---|---|---|---|---|
| Low | 4818 | 69.1 | 0.3516 | 0.3661 | 0.0046 |
| Med | 4912 | 69.3 | 0.3487 | 0.3648 | 0.0051 |
| High | 4925 | 69.2 | 0.3483 | 0.3641 | 0.0049 |
| Turbo | 5015 | 69.7 | 0.3454 | 0.3599 | 0.0040 |
Calculate Duv from CIE 1931 xy coordinates
Dimensions and size comparison#
Dimensions#
I took the following measurements using a digital caliper.
| Measurement | Unit (mm) |
|---|---|
| Length | 60.69 |
| Head width | 24.10 |
| Head diagonal | 28.94 |
| Head depth with pocket clip | 32.80 |
| Tube width | 24.14 |
| Tube diagonal | 26.85 |
| Tube inside diameter | 18.62 |
| Tailcap inside diameter | 18.72 |
| Tail width | 23.9 |
| Extension tube length | 39.82 |
| Extension tube inside diameter | 18.88 |
| Extension tube width | 24.03 |
| Extension tube diagonal | 26.9 |
| Sensor width | 26.97 |
| Sensor height | 24.99 |
| Sensor depth | 16.1 |
| Battery length | 39.3 |
| Battery diameter | 18.4 |
| TIR optic length | 31.24 |
| TIR optic height | 16.25 |
| TIR optic thickness | 3.76 |
| TIR optic thickness with feet | 4.56 |
Weight#
I took the following measurements using a digital scale.
| Weight | Unit (g) |
|---|---|
| Torch | 53.67 |
| Headband | 56.84 |
| Battery | 25.88 |
| Torch with headband | 110.51 |
| Torch with battery | 79.55 |
| Torch with headband and battery | 136.39 |
| Extension tube | 14.89 |
| Sensor | 7.84 |
| Sensor USB-C cable | 5.14 |
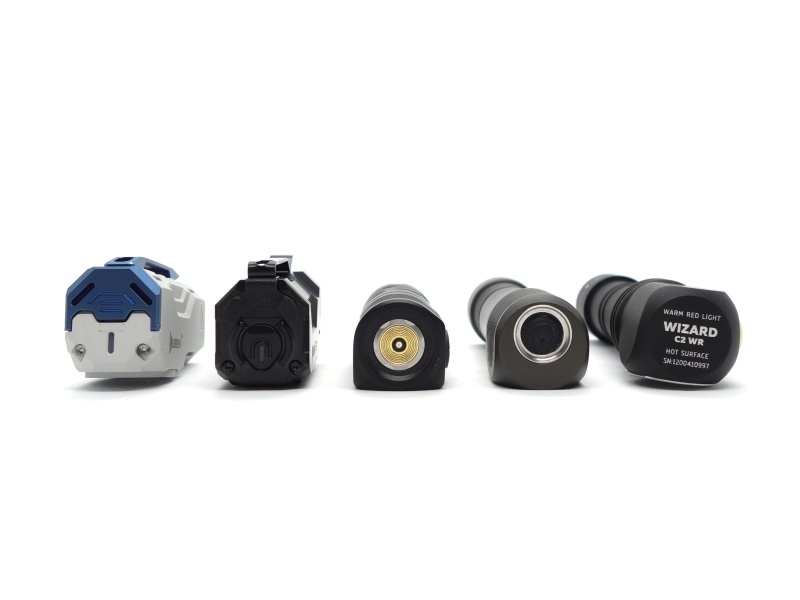
Size comparison with its competition#
From left to right: Wuben X0, Wuben E7, Skilhunt H04 RC Mini, ZebraLight H600Fc Mk IV, Armytek Wizard C2 WR Warm
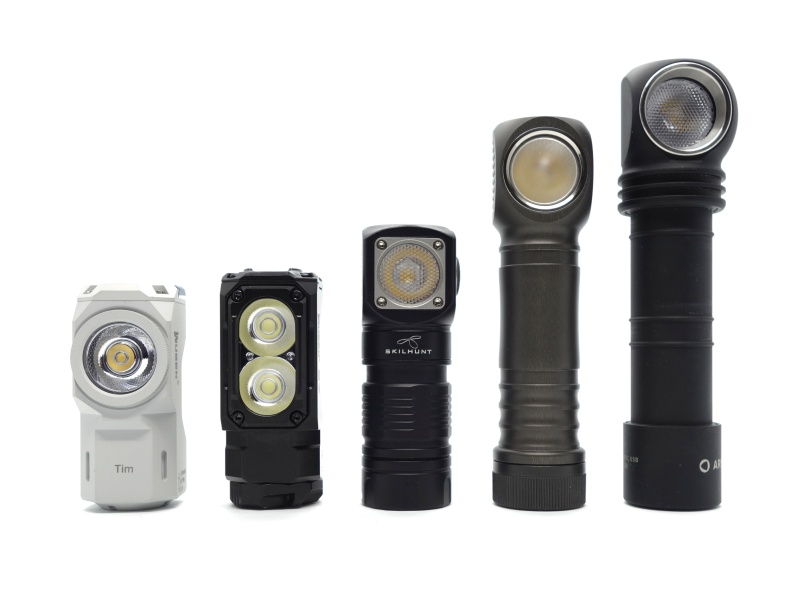
From left to right: Wuben X0, Wuben E7, Skilhunt H04 RC Mini, ZebraLight H600Fc Mk IV, Armytek Wizard C2 WR Warm
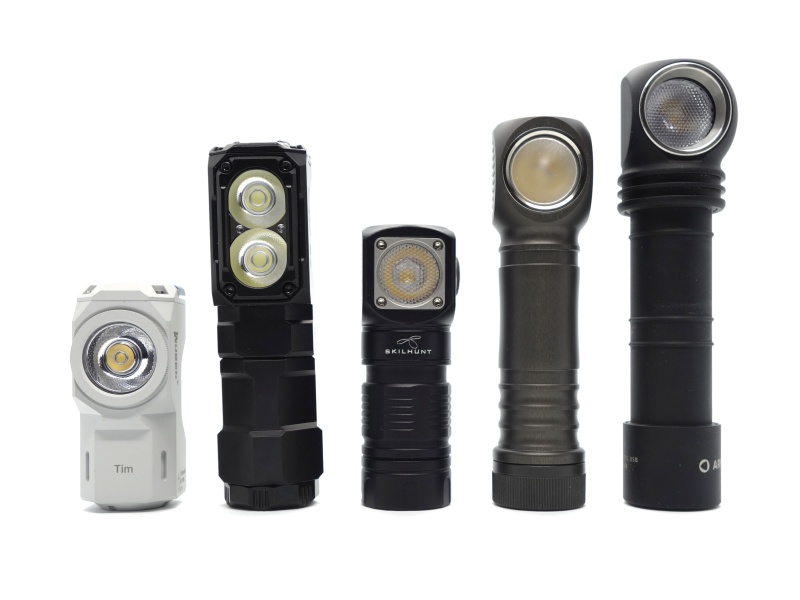
From left to right: Wuben X0, Wuben E7, Skilhunt H04 RC Mini, ZebraLight H600Fc Mk IV, Armytek Wizard C2 WR Warm
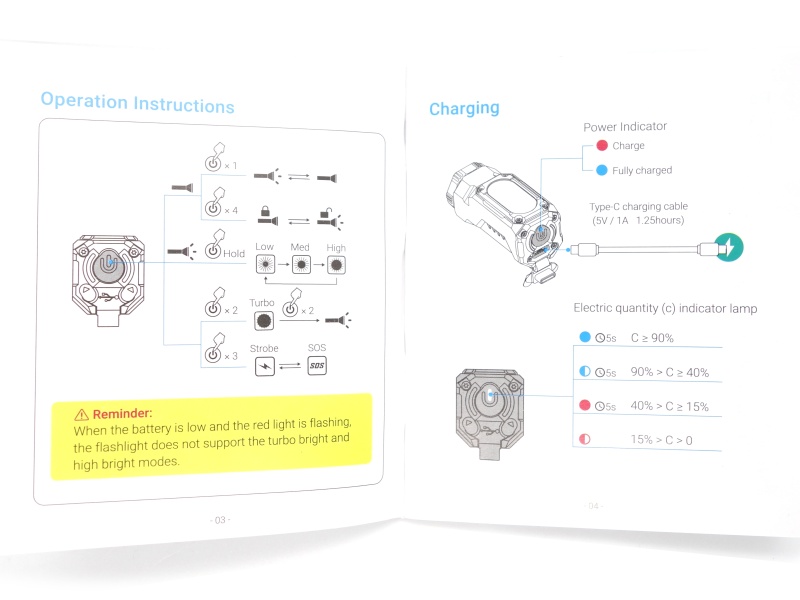
User interface#
The Wuben E7 has an electronic switch on the head with a battery status indicator.
There are three main modes: Low, Med, High. And three extra modes: Turbo, Strobe and SOS.
| State | Action | Result |
|---|---|---|
| Off | Hold | Nothing |
| Off | Click | On (mode memory) |
| Any | Two clicks | Turbo |
| Any | Three clicks | Strobe |
| Off | Four clicks | Lock-out |
| On | Hold | Cycle (Low, Med, High) |
| On | Click | Off |
| Lock-out | Click | Battery status indicator flashes three times |
| Lock-out | Four clicks | Low |
| Strobe | Click | Off or mode memory |
| Strobe | Three clicks | Cycle (Strobe, SOS) |
| Turbo | Hold | Low |
| Turbo | Click | Off |
The torch will flash three times when entering lock-out mode.
Mode memory does not include Turbo, SOS or Strobe.
Strobe#
Strobe has an alternating frequency.
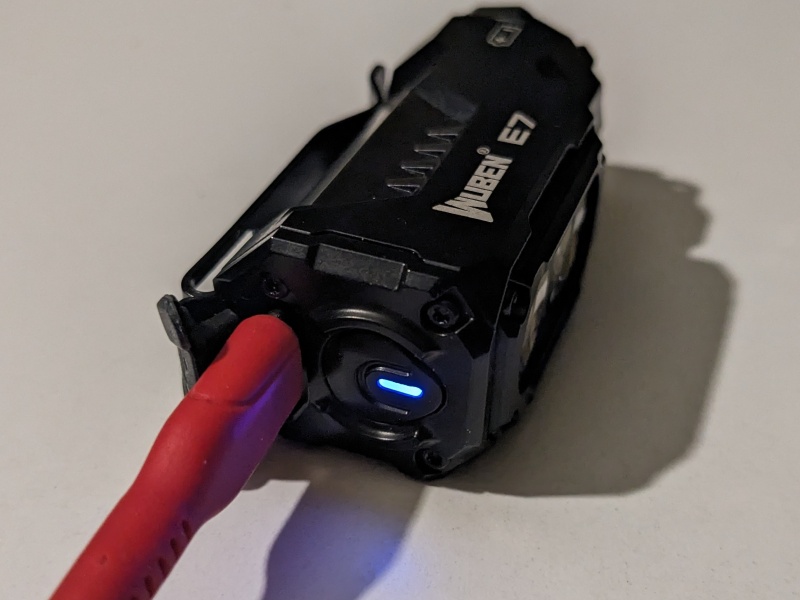
Battery status indication#
The indicator LED on the head will display the following for 5 seconds when the torch is on:
| Colour | Battery level |
|---|---|
| Blue | Capacity ≥ 90% |
| Blue flashing | 40% ≤ Capacity < 90% |
| Red | 15% ≥ Capacity < 40% |
| Red flashling | Capacity < 15% |
“Red flashing” will continue while the torch is on.
High and Turbo are not accessible when the battery is low and the battery status indicator is flashing red.
Low voltage protection#
There is low voltage protection built into the torch.
I tested low voltage protection by connecting the head of the torch to a bench power supply and then by lowering the voltage from 4.2V to 0V.
| Mode | LVP? | Red flash | Cut-off voltage |
|---|---|---|---|
| Low | Yes | 3.15V | 2.88V |
| Med | Yes | 3.22V | 2.88V |
| High | Yes | 3.27V | 2.88V |
| Turbo | Yes | 2.48V |
The battery status indicator started flashing red around 3.15V and the light turned off at 2.88V for Low, Med and High.
Turbo was a bit strange. The battery status indicator did not flash red and the light turned off at 2.48V. It would be nice if the light turned off closer to 2.88V like the other modes.
High and Turbo modes are disabled when the battery voltage is low and the red battery status indicator is flashing. This happened one time when I was using a battery with a voltage of 4.19V. I took the battery out and put it back in and the torch worked as expected (i.e. a blue status indicator appeared and I was able to access High). There might be a problem with my sample.
PWM#
I did not notice any visible PWM (flickering).
What I like about the UI#
- Simple user interface.
- Shortcut to Turbo from off.
- Shortcut to Strobe from off.
- The optional sensor is pretty cool! Sometimes remote switches and sensors provide limited functionality (e.g. on/off Turbo) but the E7 can be completely controlled by the sensor.
What could be improved#
- A shortcut to Low from off by holding the button would be nice.
Batteries and charging#
Battery#
A Wuben ABJ1100C 18350 3.6V Li-ion 1100mAh cell was included. The battery arrived with a voltage of slightly over 4.10V.
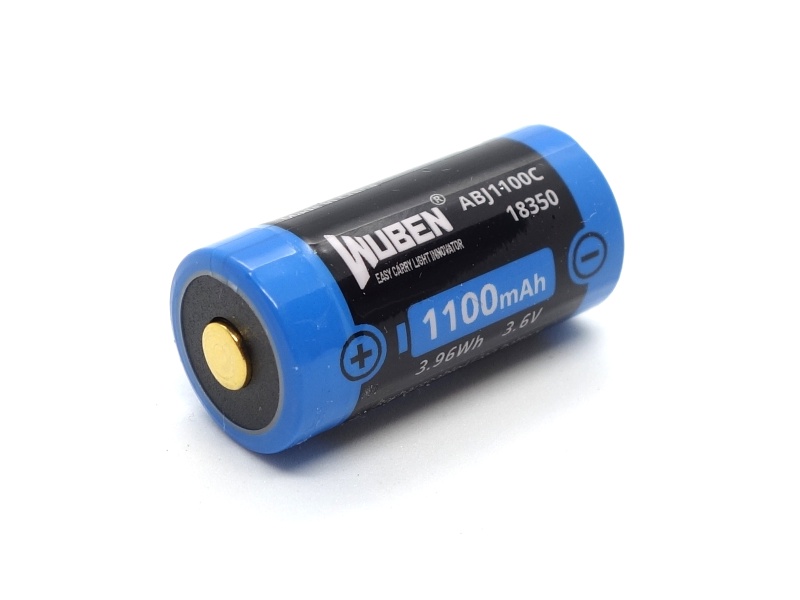
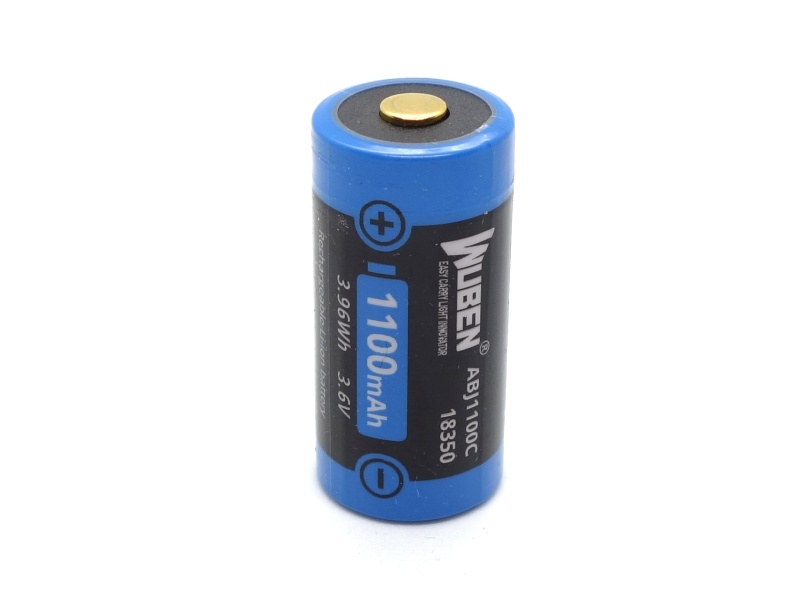
I measured a capacity of 1092mAh by using Capacity Test mode on a Vapcell S4 Plus with a discharge rate of 500mA.
Insulating film was used to prevent the torch from being accidentally turned on and to avoid standby drain.
I tried the following cells:
| Cell | Top | Compatible? |
|---|---|---|
| Wuben ABJ1100C 18350 1100mAh 3.6V | Button | Yes |
| KeepPower IMR18350 Li-ion 1200mAh 3.7V | Button | Yes |
| Manker 18350 Li-ion 1100mAh 3.7V USB-C | Button | Yes |
| Olight ORB-183C11 1100mAh 3.6V | Button | Yes |
| Skilhunt BL-111 18350 Li-ion 1100mAh 3.6V | Button | Yes |
| Vapcell F14 18350 Li-ion 1400mAh 3.7V | Flat | Yes |
I tried the following cells with the extension tube:
| Cell | Top | Compatible? | Comment |
|---|---|---|---|
| Samsung 30Q 18650 3.7V Li-ion 3000mAh | Flat | Yes | |
| Panasonic NCR18650GA 3.7V Li-ion 3450mAh | Flat | Yes | |
| Acebeam ARC18650H-310A 3100mAh USB-C 22-J6 Black | Button | Yes | |
| Acebeam ARC18650H-310A 3100mAh USB-C 23-F White | Button | No | The head and tailcap are too narrow. |
| Protected 18650 3.7V Li-ion 2600mAh | Button | No | The tailcap is too narrow. |
The length of the tube is suitable for most 18350 and 18650 cells.
The inside diameter of the head and the tailcap of the Wuben E7 is a bit too narrow for some large 18650 cells with built-in USB-C charging and a protection circuit.
I provided feedback to Wuben and they increased the inside diameter to 18.8mm.
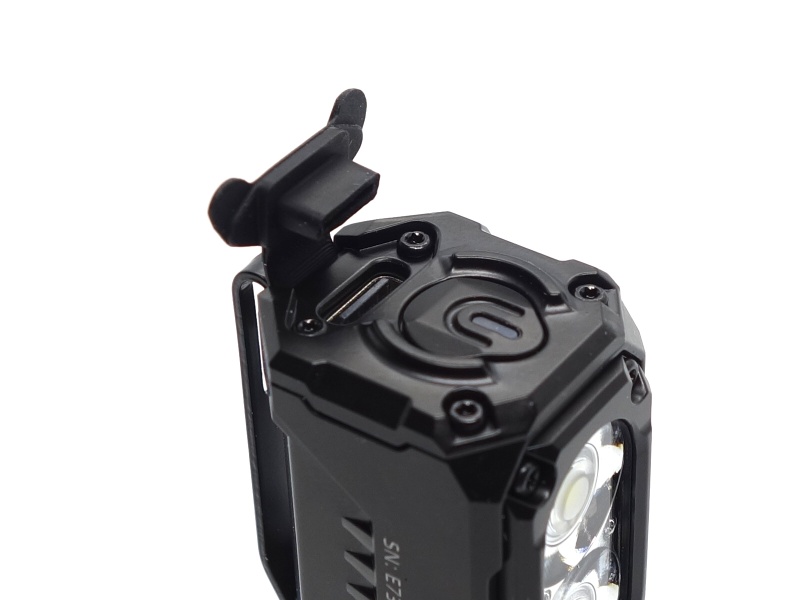
Charging#
The Wuben E7 has a USB-C charging port with a rubber cover near the switch.
Power supply: PinePower Desktop USB-C PD
USB Meter: AVHzY CT-3 (recommended by LiquidRetro)
Room temperature: 18 C
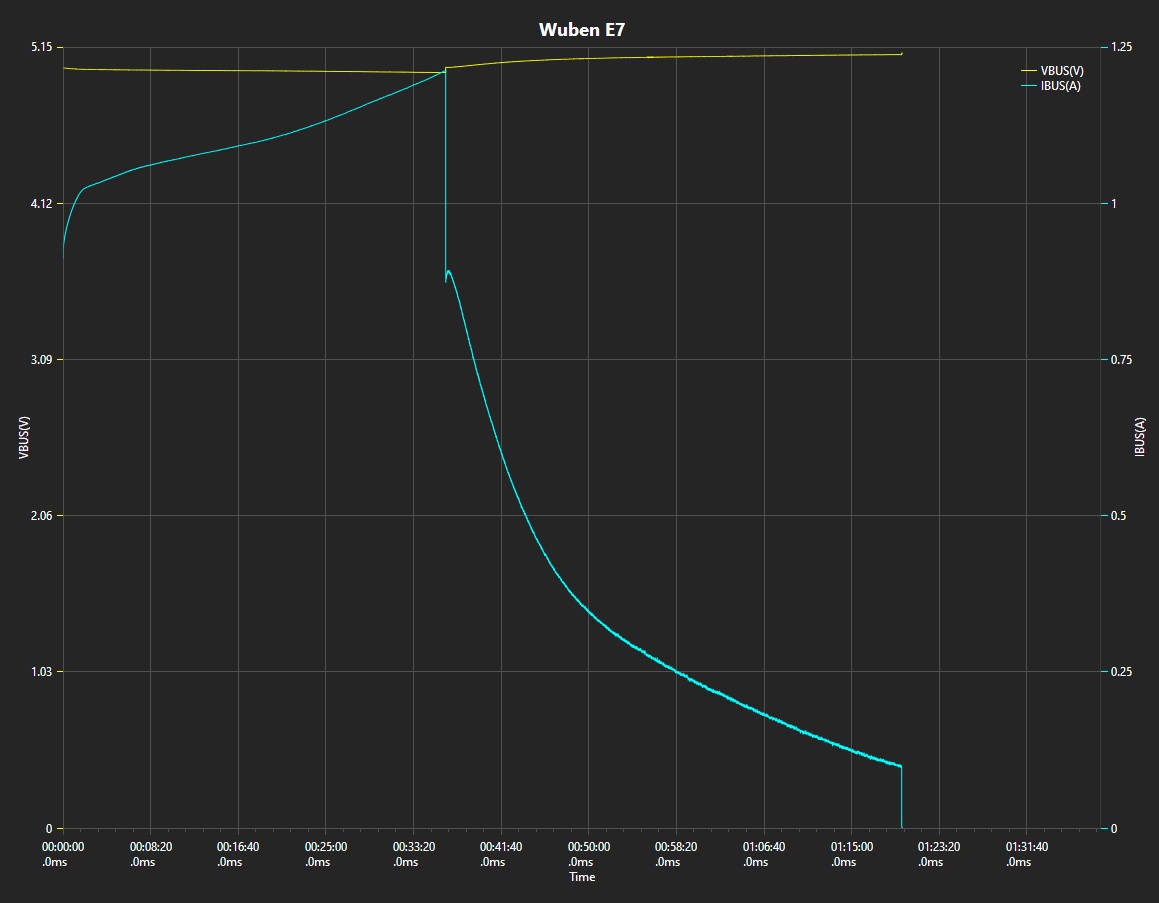
I charged the included cell inside the Wuben E7 from 3.10V to 4.17V. Charging completed after 1 hour 19 minutes. The charging rate was approximately 5V 1.2A.
Charging status indicator#
The charging status indicator is red while charging and it becomes blue when the battery is fully charged.

Power supply compatibility#
I tried the following power supplies with the built-in USB-C charger:
| Power supply | USB Type | Protocol | Does it charge? |
|---|---|---|---|
| Apple 61W Power Adapter | USB-C | PD | Yes |
| Google Pixel Power Adapter | USB-C | PD | Yes |
| PinePower Desktop | USB-C | PD | Yes |
| PinePower Desktop | USB-A | QC | Yes |
| PinePower Desktop | USB-A | Yes |
USB-C to USB-C charging works.
Performance#
Specifications from the manual:
| FL1 standard | Turbo | High | Med | Low |
|---|---|---|---|---|
| Output (lumens) | 1,800 + 800 + 400 | 400 | 150 | 5 |
| Runtime | 1min + 1min + 1h 12min | 1h 18min | 4h 30min | 60h |
| Beam Distance (metres) | 132 | |||
| Beam Intensity (cd) | 4,356 |
I have performed tests using the included Wuben ABJ1100C 18350 1100mAh 3.6V cell. I also performed runtime tests using a Samsung 30Q 18650 3000mAh cell.
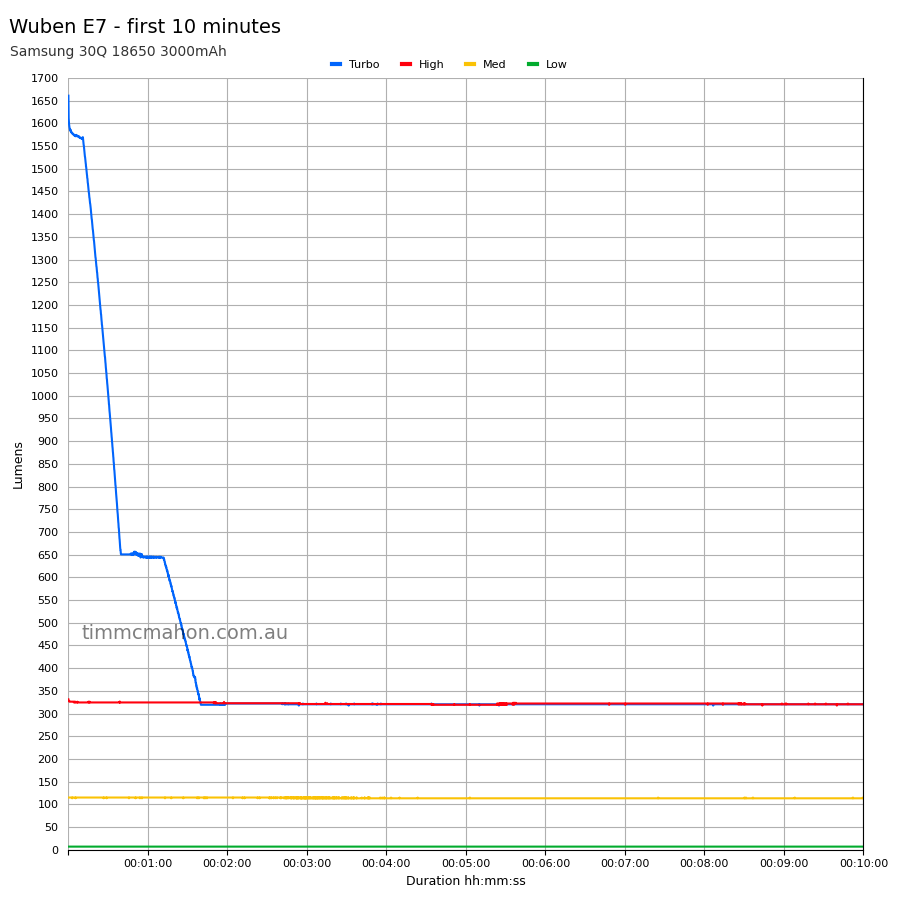
Lumen measurements#
I used a UNI-T UT210E clamp meter to measure the current at turn on.
| Cell | Mode | Specs | Amps at start | Lumens @turn on | Lumens @30 sec | Lumens @10 min |
|---|---|---|---|---|---|---|
| 18350 | Low | 5 | 0.02 A | 6 | 6 | 6 |
| 18350 | Med | 150 | 0.24 A | 114 | 114 | 113 |
| 18350 | High | 400 | 0.72 A | 329 | 322 | 318 |
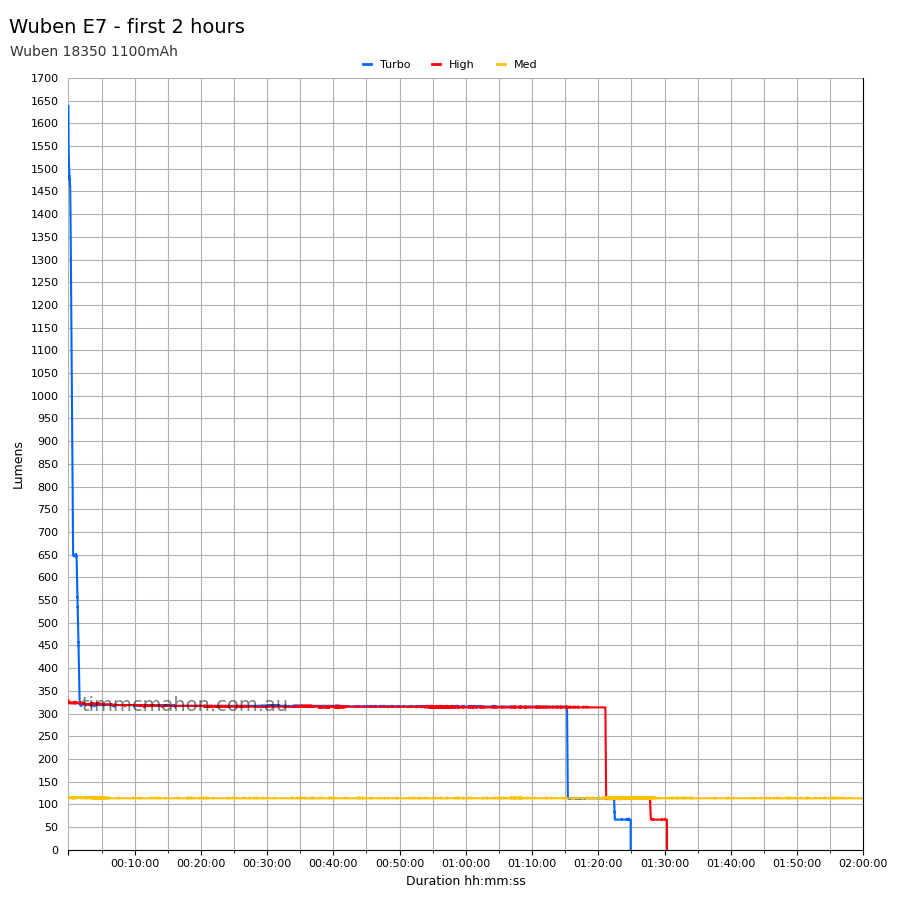
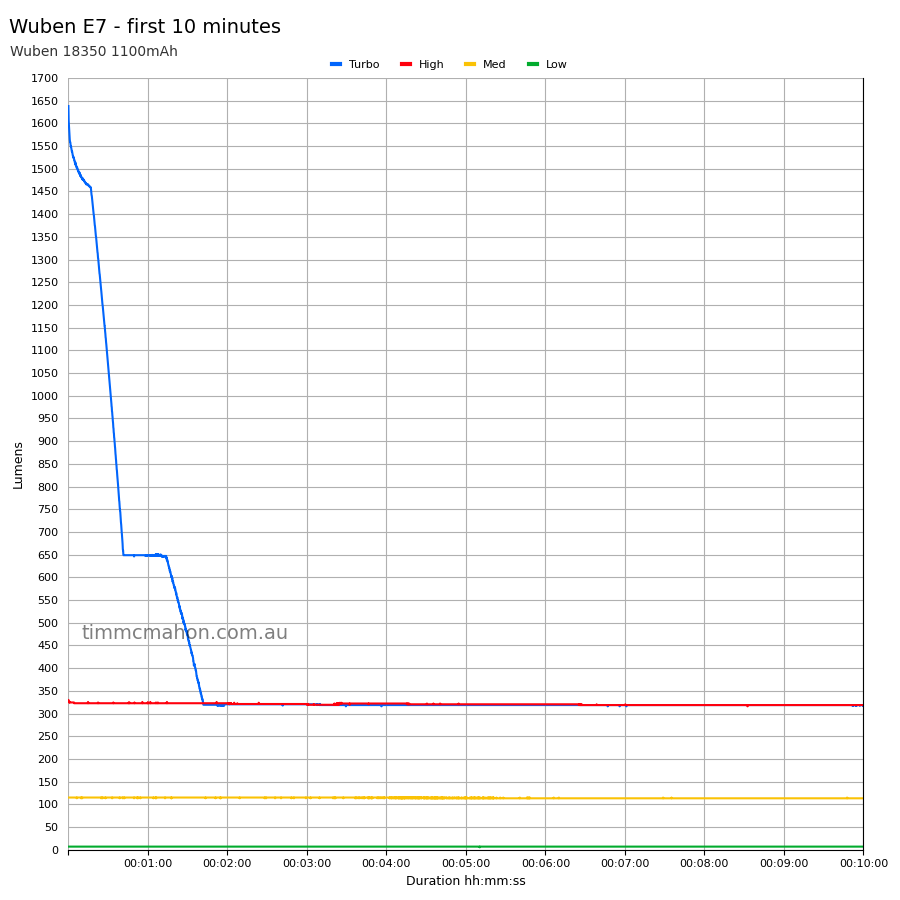
| 18350 | Turbo | 1,800 | 5.47 A | 1,638 | 1,065 | 318 |
| 18650 | Low | 0.02 A | 6 | 6 | 6 | |
| 18650 | Med | 0.24 A | 114 | 114 | 113 | |
| 18650 | High | 0.71 A | 331 | 324 | 320 | |
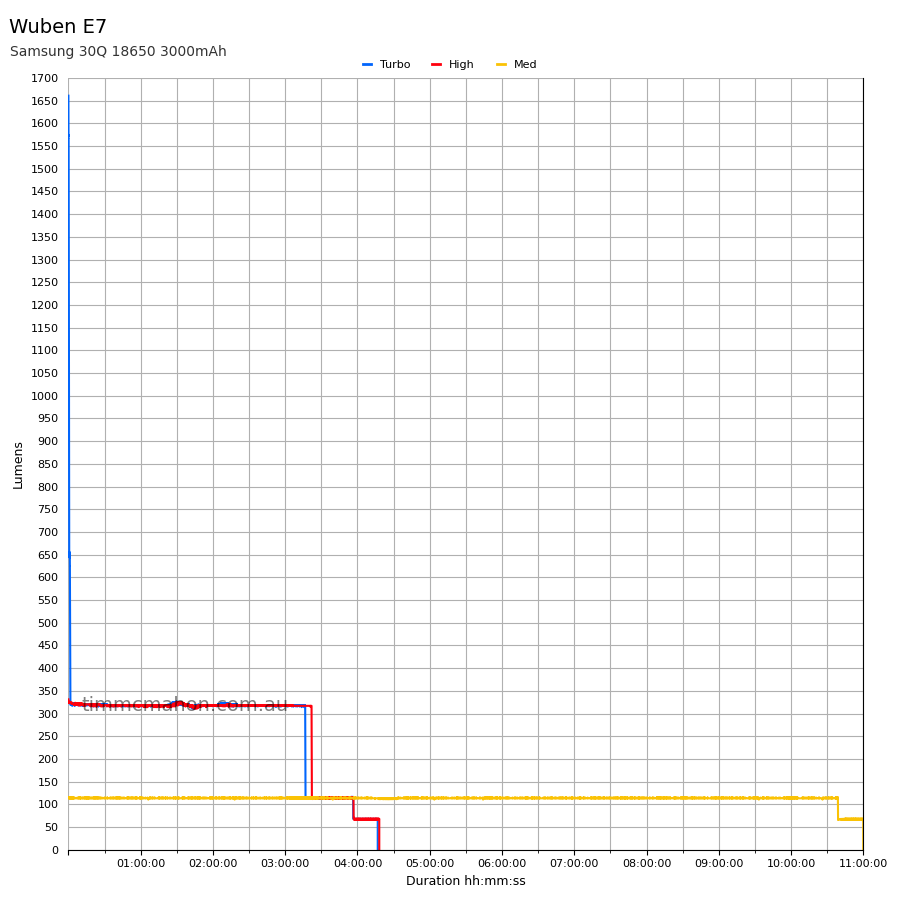
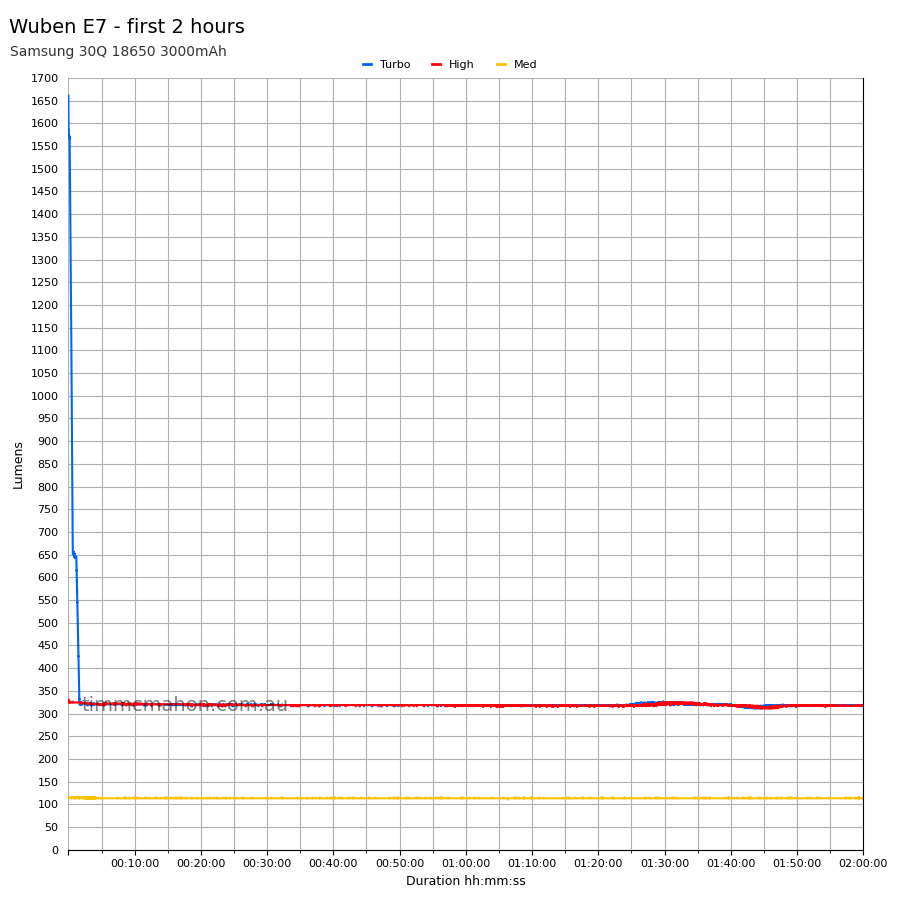
| 18650 | Turbo | 5.50 A | 1,661 | 1,000 | 320 |
The lumen output is lower than expected.
Standby drain#
103.4 µA
I used a UNI-T UT139C digital multimeter to measure the current.
The optional AP40 sensor draws about 4 mA. I measured the current with a Ruideng TC66 USB-C Meter. I would recommend keeping the sensor unplugged when the torch is not being used so that the battery doesn’t drain.
Runtime graphs#
I used my own DIY lumen tube with a TSL2591 sensor and forked bmengineer’s project RuTiTe to record runtimes.
Note: Lumen measurements may be off by 10% with my DIY lumen tube.
The room temperature was approximately 17 C.
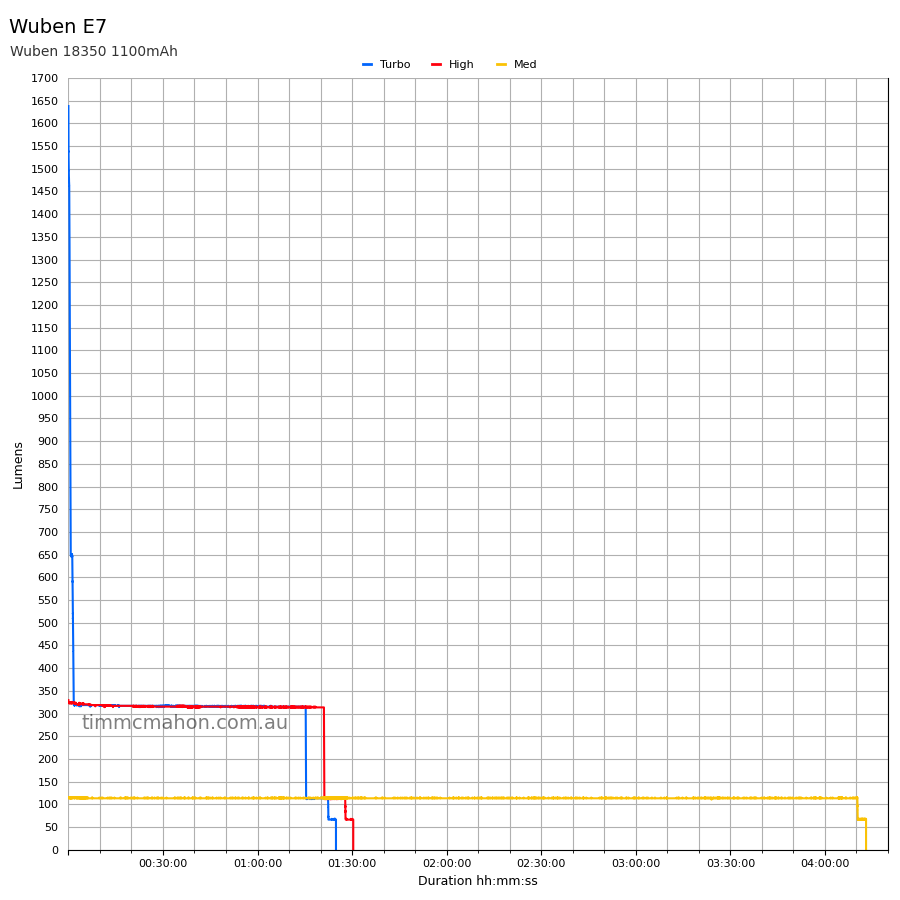
Runtimes with an 18350 cell#
Runtimes with an 18650 cell#
Runtime#
Here is a summary of the runtime results:
| Cell | Mode | User manual | Runtime result | Turn off | Final voltage |
|---|---|---|---|---|---|
| 18350 | Turbo | 1min + 1min + 1h 12min | 1h 22min 24s | 1h 24min 53s | 3.05 |
| 18350 | High | 1h 18min | 1h 30min 22s | 1h 30min 22s | 3.23 |
| 18350 | Med | 4h 30min | 4h 13min 2s | 4h 13min 2s | 3.03 |
| 18350 | Low | 60h | 10min+ | 10min+ | |
| 18650 | Turbo | 3h 57min 8s | 4h 17min 33s | 3.03 | |
| 18650 | High | 4h 18min 29s | 4h 18min 29s | 2.97 | |
| 18650 | Med | 10h 59min 55s | 10h 59min 55s | 3.03 | |
| 18650 | Low | 10min+ | 10min+ |
“Runtime” is the time until the output reduces to 10% of the output at 30 seconds (as per the ANSI/PLATO FL1 2019 Standard).
“Turn off” is the time until my DIY lumen tube no longer detects more than 1 lumen.
“+” indicates that the light remained on after recording had stopped.
The output is well regulated!
Turbo and High lasted slightly longer than expected. Med stopped slightly earlier than expected.
The runtime is much better with an 18650 cell.
Throw#
I took lux measurements with a UNI-T UT383BT at 30 seconds. Each mode was measured at one metre.
| Mode | Specs (cd) | Specs (m) | Candela measured (cd) | Distance (m) |
|---|---|---|---|---|
| Low | 15 | 7 | ||
| Med | 357 | 37 | ||
| High | 998 | 63 | ||
| Turbo | 4,356 | 132 | 3,522 | 118 |
The beam distance is slightly lower than expected.
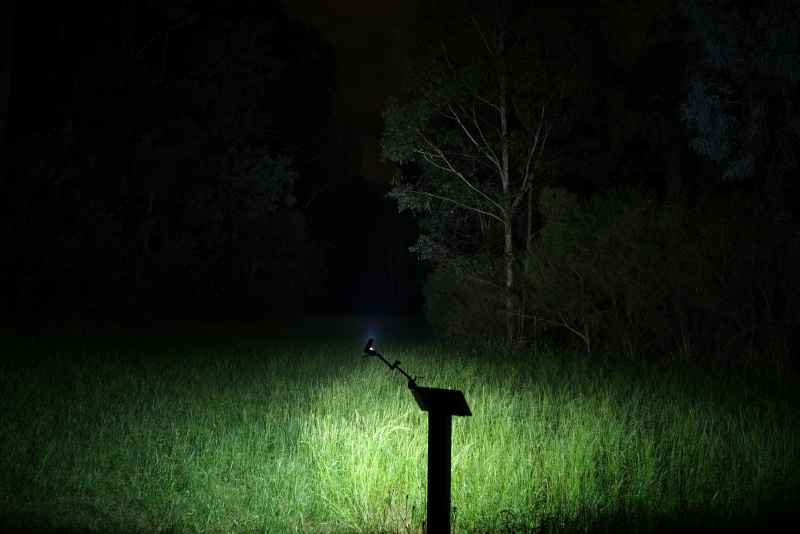
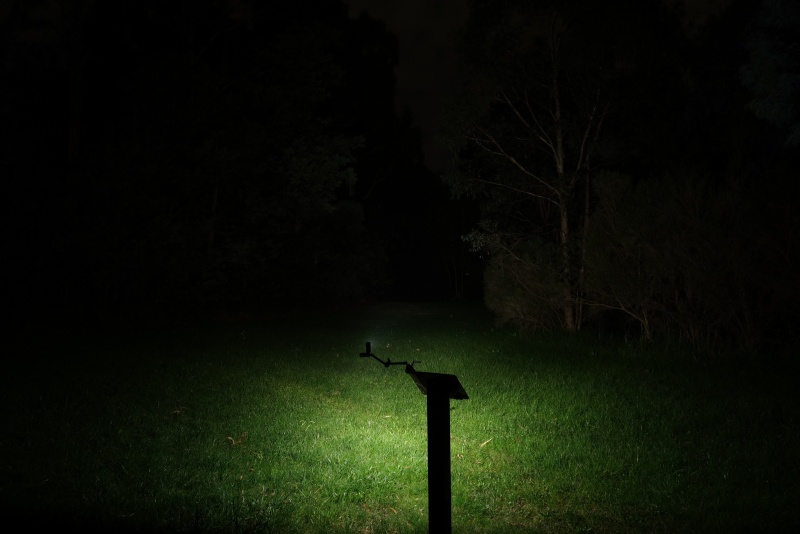
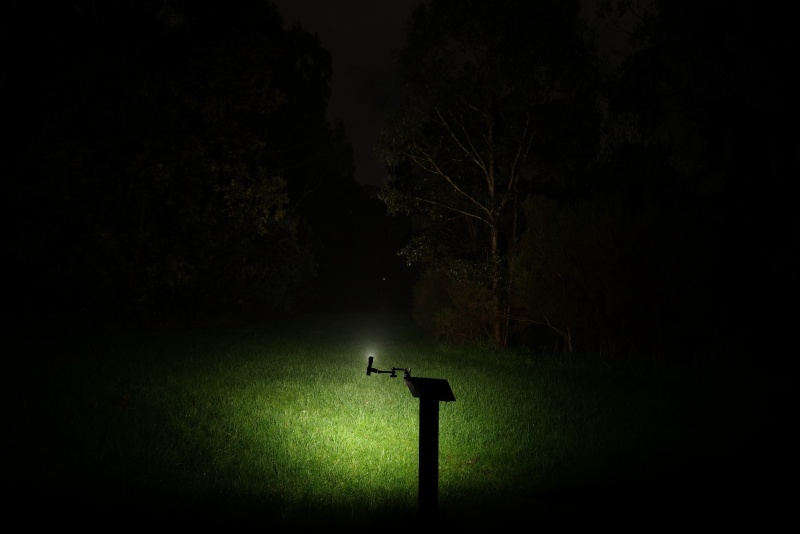
Beamshots#
I went to a local park and aimed the Wuben E7 at a tree 70 metres away while using Turbo.
Beamshots were taken using a Sony RX100M2 using 3.2", f3.2, ISO 100, 5000K WB.
Wuben E7 (Turbo)#
Wuben X0 Knight (Turbo)#
Skilhunt H150 (T1)#
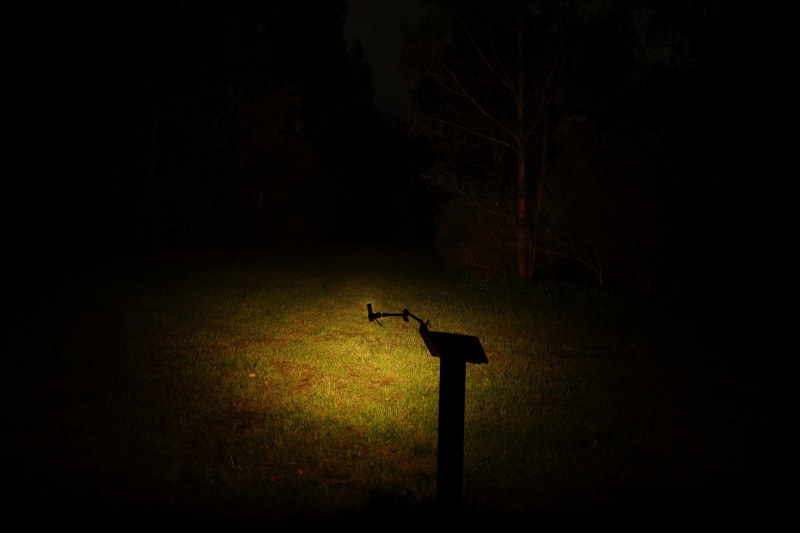
Armytek Wizard C2 WR Warm (Turbo)#
Conclusion#
The Wuben E7 is a nice budget version of the Wuben X0 with a heap of new features and optional accessories.
Wuben keep innovating with their designs. The E7 is influenced by the X0 and X3.
The beam produced is nice and floody. The CRI is low and the CCT is pretty cool at around 6500K. That said, Wuben have just released a 5000K version.
The beam distance is slightly shorter than expected and the light did not reach the claimed lumen output.
The user interface is pretty simple. It would be nice if the user interface had a shortcut to Low from off.
The runtimes are pretty good and the output is well regulated!
I like how Wuben have an optional sensor to control the torch and an optional extension tube to significantly improve the runtime.
Pros:#
- Nice floody beam.
- Lumen output is well regulated.
- Good runtimes.
- Strong magnet in the tailcap.
- Flexible pocket clip.
- Simple user interface.
- Built-in USB-C charging.
- Battery is user replaceable.
- Optional sensor.
- Optional 18650 extension tube.
- Optional headband.
Cons:#
- Safety issue: Reverse polarity protection failed for an unprotected cell.
- Did not meet the claimed lumen output.
- The beam distance is slightly lower than expected.
- The MCPCB may not efficiently transfer heat away from the emitters because the shelf is anodised.
- Low CRI.
Price#
The Wuben E7 is US$29.99 from wubenlight.com. An optional headband is included for free at the time of writing.
There are Cool White and a Neutral White versions of the Wuben E7.
The Wuben P1 headband is US$9.99 from wubenlight.com.
The 18650 extension tube is US$9.99 from wubenlight.com.
The Wuben AP40 Gesture Sensor is US$9.99 from wubenlight.com.
Product page#
25% off promo code for Black Friday and Cyber Monday in 2023: TIM25
20% off promo code: TIM20
https://www.wubenlight.com/collections/everyday-carry?ref=Tim
I may earn a commission if you use an affiliate link or a promo code. This will help fund future torch reviews and tutorials.